Welcome to Ink N Scrap Habits!

I've created this blog to share my life & love of paper crafts with others. You will read bits and pieces of what goes on in my world and be able to see my paper craft creations! Please leave me a comment if you see something you like. I'd love to hear from you!

Friday, October 31, 2008

Halloween Fun Filled Friday Challenge!

Happy Halloween!


With today being Halloween, it seemed the right thing to do was to have a Halloween themed Fun Filled Friday.

So, with that being said, Here's Pumpkin Patch Riley!


I just received my Hanna order just the other day & I've been playing with my Riley's ever since. You can expect to see more of him, that's for sure!


I colored this Riley with Prismacolor Pencils and blended the colors with Gamsol. I used my Nesties to cut him out & layer him in orange, green, and black cardstock.


For some extra dimension, I added black grosgrain ribbon tied in a knot on both sides of him.

I created the card front by running some orange cardstock through my Cuttlebug with the Pumpkin Harvest embossing Folder. I matted this with Olive green cardstock, and put a black brad in each of the 4 corners. I noticed that everytime I placed the matted Riley image over the orange embossed paper to see my card progress, some of the black would rub off onto the embossed parts, creating a distressed look. I really liked how it accented the pumpkins, so I rubbed black cardstock over it more to really make them stand out.

I finished my card by layering the card front on a black cardstock base which measures for a 4 5/8" x 6" card. I added the matted Riley image to the center & my Halloween card was complete!

Stamps: Hanna Stamps, Pumpkin Patch Riley
Ink: Versafine Onyx Black, Colorbox Fluid Chalk Ink in Olive Pastel and Lime Pastel
Paper: Smooth white cardstock by Office Depot, Colored cardstock by The Paper Company and Bazzill
Accessories: Black Ribbon by Bobbie M. Designs, Black Brads by Joann's Scrap Essentials, Nesties, SU! Sponge Doubers, Cuttlebug Pumpkin Harvest Embossing Folder


Make sure to link me up to your halloween card if you made one for today. I'd love to see it!


Hope you all have a great night with all of the ghosts and ghoblins out there & have a wonderful weekend full of Halloween treats too!

Smiles,
Jennifer

Wednesday, October 29, 2008

Peace on Earth for Card Sketch Wednesday


Here's my card for the Card Sketch Wednesday challenge. Did you get a chance to play?


Here's the sketch, in case you missed it.


I used a brayer to create the background for the first time while making this card. I had some friends over not too long ago & one of them was brayering like crazy making backgrounds for her Christmas cards. I was in awe at how great they turned out--it looked so smooth & easy that I broke down and bought one. Hey, I had to put my Michael's 50% off coupon to good use and it turned out to be a fantastic purchase!


My first step in creating this card was to heat emboss the 3 Wisemen Peace on Earth image by DRS Designs with Silver Embossing powder on dark blue cardstock. Then, I carefully trimmed the blue cardstock around the border of the image. I used my plain oval Nestabilities to cut a white oval and adhered the embossed image on top of it.


Next, I stamped the snowflake background, also by DRS Designs and heat embossed it with clear embossing powder. Then I used dark blue ink and my brayer to color the white cardstock background. I love this look and it was fun too! :-) I used a decorative corner punch on all four corners and then adhered it to white cardstock.


I adhered the matted image to the center of the background and added white satin ribbon tied in a bow to the upper right corner. I put dark blue snowflake eyelets in place of the circles on the sketch and then put a silver brad inside the eyelet hole of each snowflake. This completed my card front.


I finished the card by adhering the entire card front to a dark blue cardstock base. The finished card size measures 5 7/8" x 4.5."


As I looked at my finished card, I thought it needed a little something--like bling of some sort. So, I added Silver Stickles to the silver brads in each of the snowflake eyelets. Doing this added just the right amount of sparkle to this Christmas card!


Stamps: DRS Designs- 3 Wisemen Peace on Earth, Interlocking Snowflake Background
Ink: Rubber Stampede Embossing ink, SU! Night of Navy,
Paper: Smooth white cardstock by Office Depot, Colored Cardstock by Paper Reflections.
Accessories: Nesties, Creative Beginnings Embossing Powder in Silver and clear, White Satin Ribbon by Offray, Brayer, Snowflake eyelets unknown, silver brads by All My Memories, Silver Stickles by Ranger, SU! Ticket Corner Punch.


FYI for all of you sketch challenge lovers out there--this is the last week to finish up your cards for all of the sketch challenges posted in October for the October Blog Candy drawing. I'll be picking the winner from all of the the challenge cards made this Saturday, November 1st.


Don't miss your chance at some fun Blog Candy, make sure to check out all of the October Sketches below and create away! Don't forget to post a link to your card on the appropriate sketch challenge post, so that I can check it out & enter you in the blog candy drawing.

October 1st

October 8th

October 15th

October 22nd

I can't wait to see your challenge cards!

Have a great Hump Day!

Smiles,
Jennifer

Sketch Wednesday #17

Here's this week's Card Sketch Wednesday Challenge.


Can't wait to see what you do with it. You have until this Friday 10/31/08 11:59 EDT to post a link to your card using this sketch to be elgible for the October blog candy drawing.


Here are all the details about how Card Sketch Wednesdays work:


Card Sketch Wednesday Details:
The details are pretty simple--make a card of any theme you choose utilizing the card sketch posted on my blog and then reply with a comment posting a link to your blog or online gallery so that everyone can view how you utilized the sketch. You have all month to complete each challenge. So there is no confusion, a "month" runs from the first day of the month through the last day of the month--example Oct. 1st-Oct. 31th.

Bonus Opportunity for Participating in Sketch Wednesday Challenges:
Each month, I will assign a number in order from all of the comments/links posted from all qualifying participant weekly sketch challenge cards and draw one lucky winner for a package of blog candy from me! All of the blog candy goodies that I will offer will be craft/card making related--embellishments, ink pads, images, stamps, ribbon, punches etc.


Stay tuned...I'll post my card later today!


Smiles,
Jennifer

Tuesday, October 28, 2008

O Christmas Tree!


"O Christmas Tree,
O Christmas tree,
How lovely are thy branches..."


Can you imagine that Christmas Carol while looking at this card? This card reminds me of it!

I think it really looks like these ornaments are hanging on a tree!


I started creating this card by inking the pine bough stamp with 2 different shades of green ink and stamping it repeatedly on white cardstock. Unfortunately, it is hard to see the 2 colors in these photos. Then I stamped 2 of the spiral ornaments and 1 of the 3 wise men ornament and colored them with pencils. I blended the pencil colors with Gamsol and then cut each ornament out.

I used a decorative corner punch on each of the 4 corners of the stamped white cardstock and matted it with olive green cardstock. I used the Decorative Corner punch on the olive green cardstock too! Next, I added a strip of red ribbon and a red brad in each of the upper right, and lower left corners. I adhered the matted card front to a red cardstock base. The finished card size measures 4.75" x 6."


I used foam tape to adhere each of the ornaments to the card front as shown. Then, as a finishing touch, I covered each ornament with Diamond Glaze to make them look like they were made of glass.


Stamps: All images by DRS Designs- Pine Bough, 3 Wisemen Ornament, Spiral Christmas Ornament
Ink: Versafine Onyx Black, Colorbox Fluid Chalk Ink in Olive Pastel and Warm Green.
Paper: Smooth white cardstock by Office Depot, Colored cardstock by The Paper Company
Accessories: Prisma Color Pencils, Gamsol, Diamond Glaze, Offray Ribbon, Making Memories Brads, Decorative Corner Punch by EK Success.


Stay tuned for tomorrow's Card Sketch Wednesday Challenge. It's the last one for the October Blog Candy Drawing!
Please let me a comment, I'd love to hear from you!
Hape you all have a wonderful day!

Smiles,
Jennifer

Monday, October 27, 2008

DRS Designs Card Sketch Challenge

It's that time again...DRS Designs has announced another Challenge on the DRS Designs Blog. The challenge for this next two week period is a sketch challenge! Everyone loves sketch challenges and we would love for you to play along. There is no time limit and you can use whatever stamps you like (we know you're waiting for your DRS Designs stamps to arrive so we'll let it slide this time!!!! LOL) Be sure to leave a comment on the DRS Designs Blog with a direct link to your creation so we can check it out. If you post to SCS, please use the keyword DRSC7.


Here is the sketch:


I used this sketch to create my Christmas Bells Card and fulfill my requirement for this past Friday's Fun Filled Friday Challenge to use the Lemon Juice Technique.


I apologize my pictures for this card are not very good. We've had very gloomy weather over the last few days and by the time I finished this card it was already dusk out--not a lot of natural light left in the day to get good pictures. I'll retake them and replace these with new ones soon!

I colored the image with markers, and cut it out. I used the lemon juice technique to create the distressed background surrounding the image. I love how quickly and smoothly this distressed the cardstock and took the "stark white" right out of it. I inked the edges with brown ink and matted the distressed piece with red cardstock. I used foam tape to adhere the bell image to the distressed piece, and added Diamond Glaze to the bells to make them shiny to imitate a metal-look.

While the Diamond Glaze on the image was drying, I used the Open Plaid background stamp by DRS Designs, to create my own plaid pattern paper with red, green and yellow ink. DRS Designs has many demos on how to make your own paper using their background stamps. You can see the one I used here. I matted the pattern paper piece with red cardstock also, and tied a red ribbon around it with a bow. I arranged the pieces according to the sketch on green cardstock.


To add the sentiment, I only inked the "Happy Holidays" you see here from the Holiday Multi Greeting stamp with red ink.


I adhered the card front to a red cardstock base, and the card was complete.


This finished card size measures 4.75" x 5.75."


Stamps: DRS Designs- Holly and Bells, Holiday Multi Greeting, Open Plaid background
Ink: Versafine Onyx Black, Colorbox Fluid Chalk Ink in Warm Red, Warm Green , and Yellow Ochre, Chestnut Brown
Paper: Smooth white cardstock by Office Depot, colored cardstock by The Paper Company.
Accessories: Bic Markers, May Arts Ribbon, freshly squeezed lemon juice, heat gun, 3D-Dots, Diamond Glaze

Hopefully you have a chance to participate in this Sketch Challenge by DRS Designs. I'm going to attempt to make another card with this sketch later in the week. Stay tuned to see what I come up with!

Have a Wonderful Week!


Smiles,
Jennifer

Sunday, October 26, 2008

Fun Filled Friday Update, and Halloween Challenge!

I'm so sorry for my lack of posting over the last few days, but let me tell you, it was a much needed break! I was getting to the point where posting and card making were becoming a chore, rather than a fun hobby. I've taken the time this weekend to do some other fun things and give myself a little time away from my computer and my craft room. I'm glad to say that right after I get done typing this post, I'll be heading to my craft room to start on new projects for this week.


Many of you Fun Filled Friday Followers are probably wondering where my Lemon juice project is from last week's challenge. Well, I did actually get it done today, but I tied it in with the new DRS Designs Blog challenge and it will be posted tomorrow (Monday) morning. Good things come to those who wait, right? :-)


Did any of you get to try the Lemon Juice technique? I love the smooth distressed look it gives my projects. This was my first time trying it, and I know I'll be using it again, probably very soon too!


With Halloween being on Friday this week, Kimmy and I have decided to have a Halloween Fun Filled Friday Challenge...anything Halloween goes!
I'm sure many of us are in the Halloween spirit, so this challenge should be pretty easy.


I'm looking forward to seeing your Halloween projects! Don't forget, Kimmy has a blog candy drawing for all of the FFF participants. Give it a try! You never know if she'll pick your name for the goodies!

Hope you all had a great weekend!

Smiles,
Jennifer

Friday, October 24, 2008

Teal Colored Snowflakes

How's the weather in your neck of the woods?

Here in Michigan, the weather has really changed this week. Today, is cold and rainy, and by Monday we are expecting snow showers! Definitely jacket-wearing-type of weather.
I'm afraid winter is not far away!

Last night I got myself a nice hot cup of tea, turned the fireplace on and created the night away. Some nights I really love having the house to myself.

So, all this talk about cold weather, snow on the way and Winter right around the corner, I decided to create a Snowy Holiday Card.

In the paper crafting world, snowflakes come in all different colors.
Today's snowflakes are Teal!


I used the 2 snowflake backgrounds available by DRS Designs to create the backgrounds for this card. I love them both! The snowflakes on them look very delicate, and create such an elegant project.


The main image is the Snowflake Ribbon Slide. I heat embossed it and then tied silver ribbon through the center. I added Icicle Stickles to it to give it that icy look!


The scalloped circle is also mounted with foam tape to help give the matted image some extra dimension.


The "Happy Holidays" sentiment I used here is actually part of the Holiday Multi greeting stamp. I love this stamp because it also allows you to use all of the words at once, by inking the entire stamp, or you can use just one of the sentiments by only inking the one you want. For this card, I only inked the Happy Holidays that is at the bottom, upside down.


Stamps: DRS Designs- Interlocking Snowflake Background, Easy Snowflake Background, Snowflake Ribbon Slide, Holiday Multi Greeting
Ink: Stampin' Up Taken With Teal, Rubber Stampede Embossing Ink
Paper: Smooth white cardstock by Office Depot, Bazzill Cardstock
Accessories: Ribbon-Unknown from my stash, SU Word Window Punch, Nesties, SU Ticket Corner Punch, Creative Beginnings Embossing Powder, Stickles, 3D-Dots


****Sorry for not posting yesterday. Life, you know, it really gets in the way of crafting sometimes! For all of you who follow Fun Filled Fridays, I'm sorry I don't have my Lemon Juice project finished for you either. (Can you tell I'm a little behind?) I should have it posted for you sometime over the weekend.


Do you have any fun plans for the weekend, or will you be spending it inside like me who will be hiding from the cold weather?

Regardless of what you do this weekend, I hope it's wonderful!


Smiles,
Jennifer

Wednesday, October 22, 2008

Faux Santa Postage Sketch Challenge


Every Wednesday on my blog I post a new Card Sketch challenge for anyone to try. There's even a chance for Blog Candy for anyone who participates.


For this week's sketch challenge, I created this Faux Postage Santa card. This stamp is a new one by DRS Designs. They just released many new Christmas Images.


I created my own pattern paper for this card by stamping the North Pole Postmark image repeatedly on white cardstock. Then, I chalked the background around each image with peach colored chalk, and colored each Santa's face and hat with Prismacolor Pencils and Gamsol. I used a decorative corner punch on each corner. After I added the ribbon, I matted the paper as shown.


I heat embossed the sentiment with red Embossing powder and inked the edges with red ink. I used my Nesties to create the tag, and added bits of ribbon to accent it.


As a finishing touch, I added red and white Stickles to each Santa's Hat.


Stamps: DRS Designs- North Pole Postmark, Small Merry Christmas Sentiment
Ink: Versafine Onyx Black, Colorbox Fluid Chalk Ink in Warm Red
Paper: Smooth white cardstock by Office Depot, Bazzill Cardstock
Accessories: Prismacolor Pencils, Gamsol, Inkadinkado Chalk, Decorative corner punch by EK Success, Autumn Ribbon by The Paper Company, Red and White Stickles


You can still try the sketch challenges posted for the entire month of October until October 31st. Please check them out if you haven't already.

October 1st
October 8th
Ocotber 15th

If you get a chance to participate (I hope you do!) make sure to post a link to your card on any of these posts, so we can all check them out, and I can be sure to enter you for the Ocotber Blog Candy Drawing.

Happy Card Making!

Smiles,
Jennifer

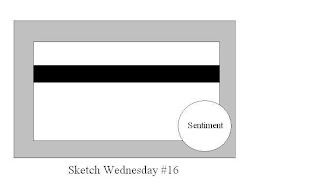
Sketch Wednesday #16


It's Card Sketch Wednesday!


Here's this weeks sketch:


Can't wait to see what you do with it. I'll post my card later today, I'm off to work on it now!

Here are the deets on my weekly Sketch Challenge. Participation = Chance for blog candy!

Card Sketch Wednesday Details:
The details are pretty simple--make a card of any theme you choose utilizing the card sketch posted on my blog and then reply with a comment posting a link to your blog or online gallery so that everyone can view how you utilized the sketch. You have all month to complete each challenge. So there is no confusion, a "month" runs from the first day of the month through the last day of the month--example Oct. 1st-Oct. 31th.

Bonus Opportunity for Participating in Sketch Wednesday Challenges:
Each month, I will assign a number in order from all of the comments/links posted from all qualifying participant weekly sketch challenge cards and draw one lucky winner for a package of blog candy from me! All of the blog candy goodies that I will offer will be craft/card making related--embellishments, ink pads, images, stamps, ribbon, punches etc.

Happy Wednesday!

Smiles,
Jennifer

Tuesday, October 21, 2008

Christmas Sleigh Ride!


Have you ever taken a real sleigh ride? I haven't, but I'd like to! I envision the one I'd like to go on just how this card looks...a horse drawn sleigh, going through a park, while it's snowing outside! (and Jingle Bells playing too! LOL!)


All images used on this card are by DRS Designs. The sentiment and snowflake background stamps used on this card are some of the new Christmas images just released last week.


The image is colored with Prismacolor Pencils and I blended the colors with Gamsol. I used light blue chalk on the sky background, stamped the sentiment there in black ink, and then used light blue ink to stamp the snowflakes over the sentiment. Next, I used Shimmerz on the Sleigh and white Glitter Glue to create the snowy ground.


While the Glitter Glue was drying, I used the Snowflake background stamp and light blue ink again to create my own pattern paper on the light blue cardstock that I used to mat the image. Once the image was dry I used a decorative corner punch on all 4 corners of the image and the red cardstock I used to mat it.


The matted image is adhere to the snowflake paper with 3D-Dots for added Dimension. I added the ribbon and brads and assembled the card as shown.


This finished card size measures 6" x 6".


Stamps: DRS Designs- Simple Joys of Christmas Greeting, Interlocking Snowflake Background, Horse and Sleigh
Ink: Versafine Onyx Black, Colorbox Fluid Chalk Ink in French Blue
Paper: Smooth white cardstock by Office Depot, Colored cardstock by Bazzill and The Paper Company.
Accessories: Prismacolor Pencils, Gamsol, Shimmerz, Glitter Glue, Ribbon unknown from my stash, 3D-Dots, Brads by Making Memories, Chalk by Inkadinkado, decorative corner punch by EK Success.


Stay tuned for tomorrow, it's another Card Sketch Wednesday Challenge!
Until then...

Smiles,
Jennifer

Sunday, October 19, 2008

Sentimental Gift!

Last Monday, DRS Designs announced a new blog challenge which was to use a sentiment as a focal image on your project.


Here's another card I made for that challenge. This card used the Holiday Multi Greeting stamp as my focal image. I used ribbon to create the look of a wrapped Christmas Gift, displaying that my image was the stamped wrapping paper. I inked each of the sentiments using Red and Green ink before stamping it. After it was matted and I tied the ribbon on it, I used Pop-Dots to raise it off of the card front. I think this helps it really look like a package coming off the card!


This card depicts a gift wrapped in sentiments, so I couldn't help myself naming this post "Sentimental Gift." (Ha Ha! Quite the Comedian, I am!)


I might actually make my own wrapping paper with this stamp this year! I love how the red and green ink look against the white paper and the bold red bow. Have you ever made your own wrapping paper?

Stamps: DRS Designs- Holiday Multi Greeting
Ink: Colorbox Fluid Chalk Ink in Warm Red and Warm Green
Paper: Smooth white cardstock by Office Depot, Colored cardstock by The Paper Company
Accessories: Red Grosgrain Ribbon by Bobbie M. Designs, Pop-Dots


Hope you're have a wonderful Monday. I am off of work today, off to play with my stamps!

Smiles,
Jennifer

Lemon Juice Anyone?

Well, it's Sunday again! This week's Fun Filled Friday Challenge is to use the Lemon Juice Technique. I just learned of this not too long ago & challenged Kimmy to create with it this week. Have you heard of it before? Have you created with it? If not, now's your chance!

The Lemon Juice technique is used to create an aged, distressed type look to projects. Not many people are aware of this and it's a shame because it's very quick and easy!
The supplies required for this technique are lemon juice, white or ivory cardstock, a heat gun, stamps and ink, and the instructions are easy to follow....
Cut your cardstock to the size you need for the image you'll be stamping. Dip your finger in the lemon juice and rub it on the cardstock. The amount of coverage is up to you. Cover the whole thing, add just a few streaks here and there, or only add lemon juice just around the edges. There is no right or wrong! Next, heat the cardstock with your heat gun holding it just a couple inches away. This will take quite a bit longer than if you were embossing. The heat needs to first dry the lemon juice, and then begin to "burn" it, creating the brown distressed look. Just keep heating it until it looks as dark as you want it. If you just want to age around the edges, then that's where you'll aim your heat gun. The longer you heat it of course, the darker it will be. Your cardstock will warp a little but that just goes with the distressed look. Once you achieve the look you want, stamp your image on top, color it, and complete your card. It's that simple!
The awesome thing about this technique is it makes your stamp room smell good, LOL! There's nothing like the clean, fresh scent of lemons!
So, why don't you join Kimmy and I this week and create something distressed with lemon juice?
I'd love to see your projects! Make sure to check back on Friday--that's when I'll show you mine!

Smiles,
Jennifer

Meowy Christmas and SC198

Finally, I've finished the Splitcoast Stampers card sketch challenge for this week-SC198. I've struggled with this card since Wednesday when the sketch was posted! I think it is that darn half circle that gave me the most problems--I don't have any circle cutting tools so I ended up using my Cricut to create it.


Did you see my post from yesterday? I talked about the new Christmas stamps from DRS Designs that are a "pun on words." Here's the second one just released this past Tuesday.


For all you Cat lovers out there, this ones for you! "Wishing you a Meowy Christmas" instead of a Merry Christmas! Get it? Ha! Ha Ha!


The sentiment on this card and the cat image are all one stamp. The wreath is separate. One of the great things about the stamps from DRS Designs is that they are unmounted rubber, so you can easily cut away sentiments from images like I did here. (Not to mention the other great thing about unmounted rubber is that they can be shipped rather cheaply compared to those stamps that are wood mounted and very bulky!)


My Stamp-a-ma-jig was very handy in making this card. I stamped the wreath first and then stamped the cat inside of it, leaving a little space between the edge of the wreath and the cat. I wanted to really create the look like the cat was in the wreath, so I stamped the wreath again on a separate piece of cardstock, colored it with pencils, and cut out a portion of it to add below the cat. Then, I colored the rest of the image as well and blended the colors with Gamsol.

I used my Nesties to cut out and mat the cat image, and then added red Stickles to all of the Holly berries in the wreath. While it was drying, I used the new Snowflake background stamp to create my own pattern paper by heat embossing. I used this paper to create the background of the sketch.


I added white satin ribbon tied in a bow to the bottom background piece and once the Stickles were dry I again used my Stamp-a-ma-jig to stamp the words around the image. Next, I added a red brad to both sides of the wreath as shown, and then assembled the pieces according to the sketch on a green cardstock base.


Stamps: DRS Designs- Meowy Christmas, Interlocking Snowflake Background, Holly Wreath
Ink: Versafine Onyx Black, Colorbox Fluid Chalk Ink in Warm Red, Rubber Stampede Embossing Ink
Paper: Smooth white cardstock by Office Depot, Colored cardstock by The Paper Company
Accessories: Stamp-a-ma-jig, Prismacolor Pencils, Gamsol, Xmas Red Stickles, Creative Beginnings white embossing powder, White Satin Offray Ribbon, Brads my Making Memories.

Hope you enjoyed seeing my "pun on words" cards.
Have a very Relaxing Sunday!

Smiles,
Jennifer

Saturday, October 18, 2008

An Irish Christmas for you!

Anyone out there love the "pun on words" sentiments like me? For example, "Best Fishes" as in Best Wishes on a Fish Card, or "Happy Bee-day" for a Birthday card with a bee on it.
Well, DRS Designs has a few new ones just in time for Christmas! Here's one for today and I'll post another one tomorrow!


Get it? "Irish" instead of "I Wish!" I'm sure those of the Irish Heritage will love this Christmas Tree as well. Isn't it cute?


Both images seen here are now available by DRS Designs.

I heat embossed the Shamrocks in green and the star in yellow. Then, I used green chalk to shade in the background behind the shamrocks. Next, I filled in each Shamrock with green glitter and added gold glitter to the star.


The sentiment was stamped with green ink and I used my Nesties to mat it.


Unfortunately these pictures don't do justice for this card. with the gold accented ribbon and all of the glitter on the image, this card just shines. Wish I could make one for all of you just so you could see it in person. Oh, if only time & money would allow it! :-)


Stamps: DRS Designs- Irish Christmas Tree, Irish you a Merry Christmas Sentiment
Ink: Rubber Stampede Embossing Ink, Colorbox Fluid Chalk ink in Warm Green
Paper: Smooth white cardstock by Office Depot, colored cardstock by The Paper Company and Bazzill.
Accessories: Creative Beginnings Embossing Powder, Nesties, Stickles, Red Brads by Making Memories, Santa's Workbench Ribbon by Joann's


Stay tuned for another "Pun on Words" by DRS Designs and the Fun Filled Friday Challenge announcement tomorrow. Oh, and of course, more Holiday cards as the week goes on!

Irish you a fabulous weekend! Sorry, I just couldn't resist! :-)


Smiles,
Jennifer

Friday, October 17, 2008

Christmas Gift

I promised earlier today that I had a little present for you. Well, I wasn't kidding!


This card features one of the new Christmas sentiments by DRS Designs, just released this past Tuesday.

I like how the sentiment coordinates with this wrapped package image. For added dimension, I used pop dots to raise the matted gift to create the illusion that it really is a box coming off of the front of my card. This finished card measures 5" x 5.5."


Stamps: DRS Designs- Greatest Gifts Sentiment, Merry Christmas Bow
Ink: Versafine Onyx Black
Paper: Smooth white cardstock by Office Depot, Colored Cardstock by The Paper Company
Accessories: Bic Markers, Ribbon by Offray, Eyelets by Joann's Scrap Essentials, Pop-Dots, Decorative Corner punch by EK Success

Well, I'm heading back to my craft room to create more cards to show you in the upcoming days. Work has me so busy lately, that I've fallen behind--gotta stamp & create every last second I have to make progress!

Wishing you a wonderful weekend!

Smiles,
Jennifer

Fun Filled Friday Sketch Challenge

This past Sunday, I challenged Kimmy to use this sketch for our Fun Filled Friday Challenge this week. This sketch was drawn by Kerry, a member of the Stamp Shack.

Finally, I finished my challenge card this morning. Time is really slipping away from me this week. My regular job is really getting in the way of my stamping and it's really irritating me! I'm sure many of you can relate to this. I guess I shouldn't complain, with all that is going on today, I'm thankful I have a job.


Here's my Fun Filled Friday Challenge card.


I used 2 leaf stamps to create my own pattern paper. I layered it with strips of Fall ribbon that measure approx. 2.5 inches long and assembled the card as you see here. This was a pretty quick and easy one for me this week, once I figured out what to do with this sketch. (Of course, right?!) This finished card size measures 6.5" x 5."


Make sure to run over to Kimmy's Stamps, Scraps, & More to see what she created with this sketch.


Stamps: DRS Designs- Small Silhouette Leaf, The beauty of Autumn Sentiment, Tiny Fall Leaf
Ink: Colorbox Fluid Chalk Ink in Yellow Ochre and Chestnut Roan.
Paper: The Paper Studio
Accessories: Autumn Ribbon by The Paper Company, SU! Ticket Corner Punch


Well, I've been busy playing with my new Holiday stamps from DRS Designs. Did you place an order from their new release? I'm loving these stamps! Stay tuned for later today...I have a little present to show you!


Have a wonderful Friday!

Smiles,
Jennifer

Thursday, October 16, 2008

Delicate Flower


I created this card last week for my Aunt's Birthday, which was on Monday. She loves handmade stuff, so I knew I had to make her a Birthday card. I used a 2 step stamping set by SU! to create the flower.


And as I'm sure you can tell, I used my Nesties (love them!) and my Cuttlebug to create the background.


Here's the inside, before I wrote in it of course! I used this sentiment by DRS Designs.


It reads, "Wishing you a day of Happy Moments and a year of Happy Days!"


I love how this sentiment could be used as a birthday or for other occasions, like anniversaries or weddings as well.

Stamps: SU! Heartfelt Thanks, Sentiment by DRS Designs
Ink: Colorbox Fluid Chalk Ink in Olive Pastel, Lime Pastel, SU! Regal Rose, SU! Rose Red
Paper: Smooth white cardstock by Office Depot, Bazzill
Accessories: Nesties, Cuttlebug and Swiss Dots Cuttlebug Embossing Folder, Brads by O'Scrap, Ribbon by Bobbie M. Designs.


Stay tuned for tomorrow's Fun Filled Friday Challenge. We have a sketch challenge this week. Have you seen it?


Smiles,
Jennifer

Wednesday, October 15, 2008

Snowman Sketch!

Here's my Sketch Wednesday Challenge Card:


In case you missed it, here's the challenge sketch:


Are any of you Snowmen lovers like me?

I say, you can never have too many Snowmen images. They are all so cute & fun to use, and this one is no exception! This is a new image by DRS Designs. You can see all of their New Releases here.

DRS Designs also has a new Snowflake Background stamp now available. This one is more detailed & delicate looking then their first one, which you can see here.


Stamps: DRS Designs- Lil Stretch the Square Button Snowman (H1143), Interlocking Snowflake Background Stamp (H015)
Ink: Versafine Onyx Black, Colorbox Fluid Chalk Ink in Warm Red
Paper: Cardstock by Office Depot and The Paper Company
Accessories: Bic Markers, Nesties, Stickles, Ribbon by Offray and Bobbie M. Designs, Black Square Brads by Joann's Scrap Essentials

Don't forget about the other October Sketch Challenges, if you haven't tried them yet.


October 1st


October 8th

This is a pretty easy sketch to work with. Did you give it a try? I'll be waiting for your comments and a link to see your version of this sketch!

Have a great day!


Smiles,
Jennifer

LinkWithin

Blog Widget by LinkWithin