Welcome to Ink N Scrap Habits!

I've created this blog to share my life & love of paper crafts with others. You will read bits and pieces of what goes on in my world and be able to see my paper craft creations! Please leave me a comment if you see something you like. I'd love to hear from you!

Sunday, November 30, 2008

Fun Filled Friday-Winter!


Today is Sunday, so that means it's time for a new Fun Filled Friday Challenge announcement.

Not sure what Fun Filled Friday is? Click here to read all about it.

With December right around the corner, Kimmy has challenged us to create a "Winter" themed project this week.


Is it looking like Winter in your neck of the woods? We're expecting a winter storm tonight that could leave us with up to 6" of the white stuff!


I'm glad I'm off of work tomorrow...the first major snow fall of the season tends to make the roads very messy here, if you know what I mean.


Have you subscribed yet? Don't miss another Fun Filled Friday challenge or the new stuff I have in store for you this week. Subscribe now!

Hope you're having a Great Weekend!


See you tomorrow!


Smiles,
Jennifer

Saturday, November 29, 2008

May I Have Your Attention?

So, did you all have an enjoyable Thanksgiving? Ours was busy, busy, busy! Read on...


First, Thanksgiving Day started at Noon with my Dad's side. There were 5 of us: My Dad, my Sister, my almost 93 year old Great-Aunt, and my DH and I. My Great-Aunt wanted to go out to dinner since she doesn't get out much. I can't blame her! Well, it was more like a big lunch for her and ended up being breakfast for my DH and I. Since I work afternoon's and my DH works midnights, Noon usually ends up being our breakfast hour! Then, afterward we went back to my Great-Aunts house and watched football and had Apple Pie--one of our Thanksgiving favorites!


Round 2 was at my Aunt's house to celebrate with my Mom's family at about 3:30pm. There were about 40 of us there! Yes, really, and literally! My Grandparents had 7 children and now all of them are married and have children of their own. I'm the second oldest of 16 Grandchildren, and there are 2 Great Children as well, plus some of the In-Laws attend too. See, Big Family! DH and I ate "lunch" here and dug into the desserts. We also took a big plate of leftovers home too!


7pm started round 3 at my DH's Aunts house to celebrate with his Mom's Family. There was a smaller group there, about 8. We talked and enjoyed each other's company over some cocktails and just had munchies. Nothing to fancy, but it was a good time!


Then, finally around 10:45pm, DH and I arrived home and shared the plate of leftovers from my Aunts. DH soon fell asleep on the couch after & I dragged him to bed about 12:15am--What a day! (But it wasn't over yet!)


Yesterday/Friday, our Thanksgiving Festivities continued...Round 4 at my DH's Dad's house with his family. Dinner at 5pm with 9 people. The food was excellent, and we always know to bring our plastic containers if we want to take home the leftovers. We ended up having so many containers that we needed a box to carry it out to the car! But, I don't mind at all...We shouldn't have to cook at all this weekend with all the leftovers we have, which is good, because DH and I are both working all weekend.


Let me just say with Thanksgiving finally over, I'll sleep good tonight! It was busy and exhausting, but so good and lots of fun too!
Was your Thanksgiving as busy as mine?


Now, onto today's card...It's not me asking for your attention, it's this cute singing frog from DRS Designs!


I was already in the process of making this card, when I got an idea about what a cute birthday/Party announcement this image and sentiment would make. Perhaps I'll make one later this week if time allows...


I colored the singing Frog with pencils and blended the colors with Gamsol. I used sponge daubers to shade the light and dark blue ink around him, and cut him out and layered him using my Nesties.


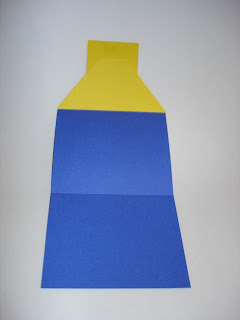
I stamped the sentiment in Olive Green ink on yellow cardstock and then matted it as shown. I created the cardstock front with dark green cardstock and created the base from blue cardstock.
The Finished Card Size measures 5.5" x 4.25."


Stamps: DRS Designs- Singing Frog, Ladies and Gentlemen
Ink: Versafine Onyx Black, Colorbox Fluid Chalk Ink in Olive Pastel, French Blue and SU! Ballet Blue
Paper: Smooth white cardstock by Office Depot, Colored Cardstock by The Paper Company
Accessories: Prismacolor Pencils, Gamsol, Nesties, Brads by Joann's Scrap Essentials, EK Success Decorative Corner Punch.

Stay tuned for tomorrow's Fun Filled Friday Challenge announcement.
Thanks for visiting today!

Smiles,
Jennifer

Friday, November 28, 2008

Fun Filled Friday House Mouse Holiday!


This week I challenged Kimmy to create a card using a House Mouse image, since it's been a long time since we've played with them! You can see my Fun Filled Friday Announcement post here.


I colored with image with pencils and blended the colors with Gamsol. I matted the image with red, craft, and green cardstock as shown. I mounted the Holly pattern paper with green cardstock and added 1 large green brad and 2 small red brads to the upper center as shown. Next I adhered this layer to my red cardstock base, and mounted the matted image to it with foam tape for added dimension.


Stamps: House Mouse by Stampabilities
Ink: Versafine Onyx Black, Colorbox Fluid Chalk Ink in Chestnut Roan
Paper: Smooth white cardstock by Office Depot, Colored Cardstock by The Paper Company, pattern paper by DCWV
Accessories: Prismacolor Pencils, Gamsol, Brads by Recollections and Joann's Scrap Essentials, 3D-Dots, SU! Notched Corner punch, Red Satin Ribbon by Offray
Finished Card Size: 6.25" x 5.5"


Did you see Kimmy's Warm and Cozy House Mouse card?

So, how many of you braved the crowds and went shopping today? I stayed home, slept in, and enjoyed my morning. Did you get any really, really good deals? Leave me a comment & let me know what I missed out on. I'd love to hear from you!


Hope you all had a Wonderful Thanksgiving!


Smiles,
Jennifer

Thursday, November 27, 2008

Happy Thanksgiving!


To all of my Blog Readers,


Wishing you the many blessings of Thanksgiving today, and may your home and hearts be filled with family, friends, and much happiness!


Hope you all have a Safe and Happy Thanksgiving!


Smiles,
Jennifer

Wednesday, November 26, 2008

Card Sketch Wednesday & Cats Have Staff!


Welcome to Card Sketch Challenge #21!

Every Wednesday here at Ink N Scrap Habits, I have a card sketch challenge, and I participate as well. Hope you'll have a little free time this week with the holiday and join me! I love seeing what other people do for the same sketches.


I created this fun Cat card for today's challenge. I love the way the pink and brown go together, and this sentiment is hilarious! All of the images seen here are from DRS Designs.


I used the new sitting Kitty stamp, colored with pencils and blended with Gamsol. Then I used a sponge dauber and pink ink to sponge around him while it was still in my Nesties Die. Next I matted it as shown.


I created my own background paper using the fun Cat Paw Easy Background Stamp with brown ink on light pink cardstock. Can you say Cute, Cute, Cute?


I used foam tape to adhere the cat image to the paw background layer and then again to adhere the paw background to the card front.


Here's a close up of that adorable Kitty. If you like this Kitty image, then I'm sure you'd like the other DRS Designs new Kitty Image seen here.

Stamps: DRS Designs- Happy Cat Sitting, Dogs Have Owners, Cats Have Staff Sentiment, Cat Paw Easy Background
Ink: Momento Tuxedo Black, Colorbox Fluid Chalk Ink in Rose Coral and Chestnut Roan
Paper: Smooth white cardstock by Office Depot, Colored Cardstock by The Paper Company and Bazzill
Accessories: Ribbon-Confetti by My Minds Eye, Brads by Joann's Scrap Essentials, Nesties, Sponge Daubers
Finished Card Size: 5.75" x 5"

I hope you've enjoyed this Sketch Challenge today. I appreciate you visiting here today and I welcome your comments.

Hope you have a wonderful Thanksgiving Holiday tomorrow!

Smiles,
Jennifer

Tuesday, November 25, 2008

SC203 God's Promise


This was the sketch challenge (SC203) last Wednesday over at Splitcoast.


I hadn't originally planned to use it, but when I received my new stamps from DRS Designs last week and saw this sentiment, I had to put it to use.


My version isn't like the sketch exactly, but I like how the religious sentiment matches with the cross-like layout on my card. This card is really pretty in person--I'm very happy with how it turned out. I guess this would be a Sympathy card. Do you think so?


I created the background by cutting light green cardstock to fit just slightly smaller than the front of my cardstock base. Then I used my Scalloped Square Punch to punch away each of the 4 corners. Next, I cut the light blue cardstock to fit just smaller than the light green cardstock. I then used my paper trimmer to cut away each of the 4 corners as shown and adhered it on top of the light green cardstock.


Then, I used the Cuttlebug Textile Texture Embossing Folder to emboss the card front. Because it was such a large pice of paper, I had to run it through the Cuttlebug 4 times--one for each side. The area under the sentiment did not get embossed.
I wrapped the blue and gold ribbon both vertically and horizontally around the background and then adhered my matted sentiment in the center.


Stamps: DRS Designs- God's Promise
Ink: Versafine Onyx Black, Colorbox Fluid Chalk Ink
Paper: Colored Cardstock by The Paper Company
Accessories: Cuttlebug and Textile Texture Embossing Folder, Marvy Uchida 1" Scallop Square Punch, Brads by Making Memories, Holiday Ribbon Bow-tique by Michael's
Finished Card Size: 5.5" x 5.5"


My Card Sketch Wednesday Challenge is tomorrow.

You'll stop by and give it a try, won't you?

See you then...

Smiles,
Jennifer

Monday, November 24, 2008

DRS Designs Challenge #9, Postage Frames!

Today on the DRS Designs DT Blog we've just begun Challenge #9! It is to use the DRS postage frame/envelope art stamps as focal points on our projects. These stamps are great for the front of your envelopes of course, but why limit yourself to only using them on your envelopes, when you can make them the main part of your project? So, go ahead, pull out your postage frames and give it a try! Be sure to let us know if you participate by posting a link on the DRS Designs Challenge post so we can visit you. If you post to an online gallery, be sure to use the keyword DRSC9 so we can find it!

For this challenge, I created this Monochromatic Butterfly Thank you Card.


I have to admit, this was pretty quick and easy to make, however, I already had the idea in my head before I sat down to create it. All of the butterflies colored with pencils and blended with Gamsol. I used marker to color in their bodies and a white gel pen on the butterfly wings in the postage frame. I sponged the light purple on the Ribbon Slide Butterfly. I used my Score Pal to create the scored off center and used purple ink to stamp the flower image around it.


I know this card would be perfect for my Friend, Theresa. She loves purple and butterflies! Now, she just has to give me a reason to Thank her! :-)


Stamps: DRS Designs- Butterfly Postage Frame, Butterfly Ribbon Slide, Small Thank you,
Ink: Momento Tuxedo Black, Colorbox Fluid Chalk Ink in Wisteria
Paper: Smooth white cardstock by Office Depot, Colored Cardstock by The Paper Company
Accessories: Prisma Pencils, Gamsol, Bic Markers, Ribbon by May Arts, Corner Rounder by EK Success, White Gelly Roll Pen, Score-Pal
Finished Card Size: 5.5" x 4.25"


Unfortunately, I didn't get a chance to decorate any envelopes, but I do have them stamped. I hope to get to color them this week and show them to you soon! Be sure to check inspiration from the other DRS DT designers below. We've all completed this challenge using a variety of the postage frames available. I enjoyed looking at all of the projects myself!


Angel Rivera Cathy Indelicato (Team Coordinator)
Dawn Knight
Etha Schuette
Heather Lee-Reppen
Janette Olen
Jessica George
Jessica Knutsen
Vicki Parson


I appreciate your visit today, and would love to hear from you!

Stay tuned for more fun projects throughout the week. I created 8 new ones to show you! (Yes, I made great use out of the time I was home alone this weekend. Sometimes I really like it when he goes out of town. Shhh, Don't tell him I said that!)

Have a great day!

Smiles,
Jennifer

Sunday, November 23, 2008

House Mouse Challenge!

For those of you who may be new to my blog, Kimmy, one of my best friends, and I host card making challenges on our blogs every week called Fun Filled Fridays (FFF). We take turns every other week giving a challenge. These challenges are announced every Sunday, and we display our finished cards for that challenge the following Friday. Kimmy and I keep the details to ourselves regarding these challenge cards, so until her challenge post Friday, I have no idea what she is planning on making until I see it, just like the rest of you, and vice versa. I think it is so much fun to see how different or similar our cards turn out.


Since today is Sunday, it's time to announce this weeks challenge...

It's been a while since I've used my House Mouse stamps, so this week we're going to dig them out!
I'm Challenging Kimmy to create a card using those adorable House Mouse stamps for this week's Fun Filled Friday Challenge!


If you have some House Mouse stamps we'd love for you to join us in this challenge! Make sure to post a link to your finished card so we can check it out!


Which House Mouse stamp is your Favorite?


I think the one I used on this card is my Favorite, but this image won't be the one I use for this weeks challenge. :-)


You'll have to wait till Friday to see it!

Stay tuned to my blog all this week as I have all kinds of new cards to show you!

Until Next time...

Smiles,
Jennifer

Saturday, November 22, 2008

Rubbernecker Hibiscus

Here's another awesome image by Rubbernecker! I love their stamps! Just wish I had more time to use them! :-) I'm sure you can all relate!


I made this card several weeks ago & I'm just now getting around to posting about it. I colored the image with my Prismacolor Pencils and blended the colors with Gamsol. I cut the image out & and matted it with pink and brown cardstock.

The pattern paper is from the DCVW Glitter Stack. As you can see I used a decorative corner punch on my background layers and added some ribbon loops and a bow to accent the image.


This image reminds me of some tropical place with hot Summer temperatures. You definately won't find Hibiscus-type flowers here in Michigan, and definately not today--the temp right now is 26 degrees with a high expected of only 33! The sun is out though, so I'll take the little bit of heat it will give off today.

Well, as always, my weekend is packed full. Heading out to do a little Christmas Shopping with my Sister today and maybe we'll even stop and see Santa for fun! (If we do I'll post a picture for you to see!) I plan on spending the evening crafting away in my studio! DRS Designs has just released some new stamps and I get to play with them! Yeah! Have you checked them out yet?

Stamps: Rubbernecker
Ink: Versafine Onyx Black
Paper: Smooth white cardstock by Office Depot, DCWV Glitter Stack, Bazzill Cardstock
Accessories: Prismacolor Pencils, Gamsol, Ribbon unknown from my stash, Decorative Corner Punch by EK Success
Finished Card Size: 5" x 5"


If you've stopped by today, Thank you so much for your visit!

Please leave me a comment. I'd love to hear from you!

Have a Wonderful Saturday.


Smiles,
Jennifer

Friday, November 21, 2008

Thanksgiving Blessings!


For our Fun Filled Friday challenge this week, Kimmy challenged us to make Thanksgiving cards. Can you believe Thanksgiving is next week already? WOW! Where has the year gone?


Just in time for this challenge, Nancy from the Stamp Shack sent me this Blessings image by Outlines. I thought it would make a great Thanksgiving Card!


I used quite a few mediums to color this image--markers & chalk, as well as pencils and Gamsol. I love how the red jacket on the scarecrow stands out like a sore thumb!


Make sure to run over to Kimmy's blog and check out her Thanksgiving Challenge card. I wonder if she's going to use her new Thanksgiving Turkey Riley stamp???????


Stamps: Image by Outlines, sentiment by Hero Arts
Ink: Versafine Onyx Black, Colorbox Fluid Chalk Ink in Chestnut Roan
Paper: Pattern Paper by Heidi Grace, Colored Cardstock byNature Preserve and Bazzill
Accessories: Prismacolor Pencils, Gamsol, Bic Markers, Chalk by Inkadinkado, Ribbon by Pebbles Inc.
Finished Card Size: 6.25" x 5"


Today is also my day to post on the DRS Designs Blog. Click on the link and head over there so you don't miss my post on a Cozy Christmas card I made recently. Two posts in one day is so rare for me! :-)

Hope you all have a wonderful weekend!


Smiles,
Jennifer

Warm and Cozy Christmas!

Today is also my day to post on the DRS Designs Blog. Click on the link and head over there so you don't miss my post on a Cozy Christmas card I made recently. Two posts in one day is so rare for me! :-)
Hope you enjoy it!
Smiles,
Jennifer

Thursday, November 20, 2008

Boyds Bear Thanks

At the Stamp Shack a few weeks ago, someone started a thread, "what is your favorite tea?" As the discussion progressed, I realized how many different flavors are out there that I'd really like to try. I say try because I can't tell you how many times I have bought different flavored tea or flavored coffees and then really disliked them. Then, I'm stuck with a whole box of tea or coffee grounds that I don't know what to do with. Have you ever been in this position?

So, I decided to create a stamping swap where we would swap different flavors of individually wrapped tea. Participants had to create some type of decorative tea bag holder that has stamping on it or send in tea related stamped images to be eligible for the swap. I was surprised at how quickly the swap filled up--15 participants in all and had I opened the swap to more I'm sure they would have filled as well.

Some of the tea flavors that are being sent in are:
Bigelow Pomegrante Pizzazz
Bigelow Vanilla Caramel
Chai tea
Apricot Tea
Tazo's Awake Tea
Stash Ginger peach green tea
Harney & Sons Organic Citron Green
Twinings "Earl Grey Tea"
Taz passion
Twining's of London Herbal Unwind-Citrus, Cinnamon, & Soothing Spices
Stash decaf Creme carmel tea
Stash Decaf Chocolate HAzelnut Tea
Trader Joe Chocolate decaf tea
Chamoile

Have you tried any of these tea flavors?


So, anyways, on to my card for today...


In one of the swap packages, I received a cute little Boyds Bears stamp set from my friend Ethel. I needed a few Thank You cards so I put this kit to use right away!


Since these bears are also sharing "tea," I'm adding this image to my tea packet of stamped images for the swap. So, if you're a particpant, you can look forward to receiveing some of these images as well!


Stamps: Uptown Rubber Stamps
Ink: Momento Tuxedo Black, Colorbox Fluid Chalk Ink in Chestnut Roan
Paper: Colored Cardstock by The Paper Company and DCWV, Pattern paper by Chatterbox
Accessories: Prismacolor Pencils, Gamsol, Ribbon by K & Company, Square Brads by Joann's Scrap Essentials
Finished Card Size: 5.5" x 4.25"


So, what's your favorite tea flavor? or If your a coffee drinker, what is your favorite flavor coffee?

Thanks for visiting!

Smiles,
Jennifer

Wednesday, November 19, 2008

Sketch Challenge Wednesday #20 Christmas Santa

It's Wednesday, so it's time for a Card Sketch Challenge here at Ink N Scrap Habits.


Here's the sketch for today.


Card Sketch Wednesday Details:
Make a card of any theme you choose utilizing the card sketch posted on my blog and then reply with a comment posting a link to your blog or online gallery so that everyone can view how you utilized the sketch. You have all month to complete each challenge. So there is no confusion, a "month" runs from the first day of the month through the last day of the month--example Nov. 1st-Nov. 3oth.

Bonus Opportunity for Participating in Sketch Wednesday Challenges:
Each month, I will assign a number in order from all of the comments/links posted from all qualifying participant weekly sketch challenge cards and draw one lucky winner for a package of blog candy from me! All of the blog candy goodies that I will offer will be craft/card making related--embellishments, ink pads, images, stamps, ribbon, punches etc.


This is the card I created for the sketch challenge. I love this card. I think it turned out so cute!
He was fun to make too! As you can see I used stamps from DRS Designs to create my own background paper again. I used the Snowflake background stamp to stamp blue snowflakes all over white cardstock and then used red ink to stamp "Merry Christmas" all over as well. I used Versamark ink to stamp the snowflakes on the light blue cardstock.


I colored the Santa image with pencils and blended the colors with Gamsol. I added Stickles to the snow on the chimney, along the ripped paper line, and put a small dot of glitter in the ccenter of each snow flake for just a hint of sparkle throughout the front of the card.


Won't you give this sketch a try?


Ink: Versafine Onyx Black, Versamark Ink, Colorbox Fluid Chalk Ink in Warm Red and French Blue
Paper: Cardstock by The Paper Company
Accessories: Prismacolor Pencils, Gamsol, Ribbon by Bobbie M. Designs, Buttons-unknown, Staples-unknown, Glitter Glue, Brads by Joann's Scrap Essentials,


Have a Wonderful Wednesday!

Smiles,
Jennifer

Tuesday, November 18, 2008

FYI: Defective ATG Adhesive Dispenser Guns

Last week I posted about the type of adhesive I use, and rambled a bit about how great I think the ATG Gun is. You can see that post here.

One of my readers, Sue, brought it to my attention that some of the 714 ATG Guns by 3M sold during the last months of 2007 and early part of 2008 may be defective. I know many people have had problems with theirs and have attributed it to user error, so I wanted to get the word out that perhaps the trouble is because the device actually defective.

Sue called 3M (1-888-936-3636), and sent hers back with the prepaid label they sent her. 3M is replacing it at no charge and she is getting 2 rolls of adhesive for free for her troubles!


Apparently the defective portion has something to do with the piece you can take off and on to replace the tape. Sue found her gun very hard to use and that it took a lot of muscle to roll out the tape. The person at 3M she spoke to said the gun should just "glide" during use. Her gun would not feed the tape correctly. It always looked like the adhesive roll in her gun was not staying flat-or staying in a nice compact roll...it turned into a very uneven mess inside the gun. It was more trouble for her to get it to work, then it was worth.


I haven't had any of the trouble I describe here, nor have I had a reason to contact 3M myself. This info is all based on an email conversation I had with Sue over the last few days and I thought many of you may find it useful.


Does this sound like the troubles you've had with your ATG Gun? Make sure to call 3M ASAP and get that ATG replaced so you can love yours just as much as I love mine! There's no need for you to waste precious crafting time trying to get it to work if there is a real reason it is not working correctly.

I hope this info helps you if you're having problems with your ATG Gun. If not, make sure to pass this info along. From one crafter to another, I think we need to get the word out about this.

Stay tuned for tomorrow's Card Sketch Wednesday Challenge.


See you then?!?!?!?


Smiles,
Jennifer

Monday, November 17, 2008

Holly and Holiday Candles!

Last night in my craft room I was able to complete 3 cards from start to finish. I did have my images colored already though, so that helped tremendously. I'm glad to have a head start on my projects for this week, especially after taking it easy last week!

Here is one of the cards I created:


I colored the images with pencils and blended the colors with Gamsol. Next, I Inked the edges around the image with yellow ink and then matted it as shown.


I used the Multi Holiday Greeting stamp to create the sentiment by only inking the sentiment I wanted to use. I then cut it out & inked the edges with yellow ink. I matted it in green and then attached it to the image as shown.

I created the card base from red cardstock for an A2 size card. I adhered the image and sentiment to the front center of the base. Then I stamped the Triple Holly image on white cardstock, colored it with pencils, and blended the colors with Gamsol. I cut it out & used foam tape to adhere it to the upper left corner of the image.


What's a Christmas Card without Stickles? I finished this card by outlining the candles with my Xmas Red Stickles to add a little umph!


Stamps: DRS Designs- Brush Holiday Candles, Triple Holly, Holiday Multi Greeting
Ink: Versafine Onyx Black, Colorbox Fluid Chalk Ink in Yellow Orche and Warm Red
Paper: Smooth white cardstock by Office Depot,
Accessories: Prismacolor Pencils, Gamsol, Xmas Red Stickles, 3D-Dots.
Finished Card Size: 5.5" x 4.25"


Hope you all have had a good Monday. Since I worked the weekend this is technically my Friday. I'm so excited to be off tomorrow. I'll be working again in my craft room, typing up some future blog posts, and going to the gym with my Hubby. Maybe if time allows, I'll bring up some stuff from the basement to start decorating the house for Christmas. After the snow yesterday, I'm getting giddy for the Holidays!
See you for a visit here tomorrow!

Smiles,
Jennifer

Sunday, November 16, 2008

Thanksgiving Challenge!

Hello Everyone!

Did you miss me? LOL!

Sorry for the delay in posting over the weekend.

I work in a hospital, normally on afternoons-from 2pm-10pm, but on my working weekends I work day shift and it just really kicks my butt! It's such a shock to my system when I have to get up at 4:15am! After work today I took a 3 hour nap to try to make up for my lack of sleep, but I think I'll find myself in bed early tonight as well. But enough of that...on to this week's Fun Filled Friday Announcement!

Kimmy gave this week's challenge theme to create something Thanksgiving related. This is perfect timing for this challenge, because just over the weekend I received some new Thanksgiving images by Outlines, from my Friend Nancy at the Stamp Shack. (Thanks Nancy!) I'm definitely going to color them up & use them for this challenge. Make sure to check back on Friday to see my Thanksgiving Challenge card. Kimmy, will be posting hers as well.

So, did you have a restful weekend? Just like the weather forecasters predicted, we did get some snow today here in Michigan & it is supposed to snow on & off for the rest of the week. Today's snow wasn't too bad though--maybe about a half inch, but the flakes that came down were the big fat ones! It was pretty to watch!

Stay tuned for some new cards this week. I'm off to my craft room right now to create some cards with the images I colored up all last week.


Smiles,
Jennifer

Friday, November 14, 2008

Harvest Basket & Snow on the Way!

For this week's Fun Filled Friday Challenge, I challenged Kimmy to create one last Fall Harvest type of card. Fall is my favorite season and I hate to see it go, but it is that time of year. The trees in my back yard have gone from this (Back in Mid October)...

to this...Today!


Same trees, just taken from the opposite direction. What a big change 3 weeks makes, huh? From bright & colorful, to dull and dreary. (yes, we still don't have grass yet...we're waiting for Spring to do all of the landscaping!)

As you can see the leaves are G-O-N-E! Winter may be here before we know it. Actually here, in the Metro Detroit area we'll probably see it tomorrow! They say we could get up to 2 inches. Yuck, I'm not ready for all that!


So, as an attempt to keep winter as far away as possible, here's my Fall Harvest card for today's Fun Filled Friday Challenge.


Nothing too fancy with this card today. I think it is pretty straight forward as far as how I made it. My supply list will help you see what I used to create it. I down sized a bit for this card. The cards I've been making lately have been rather big, so for this one I decided to create something petite. The finished card size measures 4.5" x 4.25."

Stamps: Stamps by Heather
Ink: Versafine Onyx Black, Colorbox Fluid Chalk Ink in Chestnut Roan
Paper: Smooth white cardstock by Office Depot, Cardstock by Bazzill and The Paper Company
Accessories: Bic Markers, Inkadinado Chalk, Nesties, Copper Brads by Joann's Scrap Essentials


Don't forget to check out Kimmy's Fall Harvest card here.

Are you expecting snow for this weekend like me? Or is there snow in your neck of the woods already? Leave me a comment and tell me where your from and what the weather is like for you. I'd love to hear from you!


So, with winter on the way, stay tuned for more winter and Christmas cards for next week. I'm going to try to post over the weekend too, depending on what time allows. I have a brand new card sketch for you next Wednesday as well.


Hope you all have a wonderful weekend. :-)


Smiles,
Jennifer

Thursday, November 13, 2008

Kreativ Blogger Award


I am honored to say that I've recently received this Creative Blogger Award from one of my DRS Designs DT members, Vicki. (She's giving away lots of candy this month-go check it out!)


Here are the rules:


1. The winner may put the logo on their blog.


2. Put a link to the person who sent you the award.


3. Nominate 5 blogs.

4. Put links to their blogs


5. Leave a message for your nominees.


So here are the 5 blogs I've nominated, in no particular order:

Traci-Inkin' Up The Dog!


Janette-Stampin With Style


Pam-Stamping With Serendipity


Teresa-Aunt T's Paper Arts


Kimmy-Stamps, Scraps, and More


Thank you all for being Kreativ Bloggers! I look forward to reading your blogs daily!


Smiles,
Jennifer

Wednesday, November 12, 2008

Penny Black Frog!


Finally, I've finished my sketch challenge card, but it is a little different. It's not exactly like the sketch. My brain wasn't cooporating with me today, so this is what I've come up with.

See for yourself...


I colored the image with markers and matted it as shown.

I thought this sketch fit well for a tri-fold card. I created the card base from dark blue cardstock--it measures 5.5" x 11.5." I scored it at 2.5" and 7" to create the bottom and top flaps.


I decorated the bottom flp with 2 kinds of matching pattern paper and covered the seam with red ribbon. For an added pop of color I put Prima flowers in both lower corners with a yellow brad in each flower.


Here's the card fully opened. I was a little pressed for time today so I didn't decorate the inside. I'll do that when I decide to give it to someone.


Stamps: Penny Black
Ink: Versafine Onyx Black
Paper: Smooth white cardstock by Office Depot, colored cardstock by Bazzill and The Paper Company, Pattern Paper by GCD Studios
Accessories: Ribbon by Bobbie M. Designs, Prima Flowers, Brads from Joann's Scrap Essentials


I hope you'll give this card sketch a try. Don't forget to link me up to your card if you do try it. I'd love to see see it and be able to enter you in my November Blog Candy Drawing!

Thanks for visiting. I appreciate you stopping by today.


Smiles,
Jennifer

Card Sketch Wednesday Challenge #19

Today is Wednesday...you know what that means...It's time for another Sketch Challenge!

Card Sketch Wednesday Details:
Make a card of any theme you choose utilizing the card sketch posted on my blog and then reply with a comment posting a link to your blog or online gallery so that everyone can view how you utilized the sketch. You have all month to complete each challenge. So there is no confusion, a "month" runs from the first day of the month through the last day of the month--example Nov. 1st-Nov. 3oth.

Bonus Opportunity for Participating in Sketch Wednesday Challenges:
Each month, I will assign a number in order from all of the comments/links posted from all qualifying participant weekly sketch challenge cards and draw one lucky winner for a package of blog candy from me! All of the blog candy goodies that I will offer will be craft/card making related--embellishments, ink pads, images, stamps, ribbon, punches etc.


Here's the sketch for today:


Ready, Set, Go Create!


Make sure to check back later today to see my sketch challenge card.


Smiles,
Jennifer

Tuesday, November 11, 2008

What Adhesive Do you Use?

Unfortunately, I don't have a card to post for you today.
However, I received a question the other day regarding the type of adhesive I use in my cardmaking and I thought I'd create a post to answer that in case any of you have been wondering the same thing.


I use the 3M ATG 714. You can see the link to the gun dispenser here, and the tape refills I use here. I use the adhesive tape that is 1/4" wide. The initial price for the "gun" and the refills quickly pay for itself compared to all of the other adhesives I used to buy. When I buy the refills for this I buy them in packs of 12 so I get the discounted price( $2.40 per roll, each roll has 36 yards of adhesive). You figure with shipping, approx. $3.00 for 36yds on 1 roll compared to $3.00 for 1 yard on a roll that you would buy in the store. As you can calculate for yourself, the savings are tremendous!


For cardmaking I use the regular adhesive, but when scrapbooking I make sure to buy the acid free, which is slightly more expensive, but still very economical since each roll has 36 yards!
This picture here shows the difference in the 2 rolls--both are the same size/adhesive amount, but the yellow (Gold) roll is the acid Free and the red is the regular adhesive.


I would say the only negative thing about this adhesive dispenser is it's bulkiness. You can see here how big it actually is--about 10 inches! So, it can be a little cumbersome to travel with--when going to crops etc, but, I just pack it in with the rest of my stuff. I never crop without it! I justify it by looking at the adhesive rolls and think about how much adhesive really comes on them. To dispense that much adhesive you need a big dispenser to accommodate it!


I love this thing & will never use anything else, as long as I can keep buying refills for it. It can be a little tricky when changing the tape rolls, but it gets easier every time--plus there are videos on You Tube to help.


Thanks for inquiring about the type of adhesive I use. Please let me know if you have any other questions regarding my work etc. I'd love to hear from you & I welcome your questions!

Hope you all have a wonderful day!

Smiles,
Jennifer

Monday, November 10, 2008

Stamping and Scrapbooking!

Well, it's Monday and today starts Challenge #8 on the DRS Designs Blog!! This challenge is to use your stamps in your scrapbooks and make a scrapbook page for fall - any size!!!! I do scrap, but I'm rather new to it. I was a little nervous about how and what I was going to scrap, but once I got started it was really a lot of fun to do.


A few weeks ago my DH and I went to the Cider Mill. I took my camera & was able to capture what we did and saw that day! It was beautiful outside and the weather was nice and warm, almost 80 degrees! Not very Fall-like huh?


We had cider and donuts, went on a hayride, went through the Haunted House, and picked apples and pumpkins to bring home. Later that night I made a fresh home-made Apple Crisp. Yum!


I used my DRS Designs Halloween Stamps to create a 2 page layout for this challenge. I never realized how much you really could use your stamps in scrap booking until I created these pages. All of these ideas came to me very quickly. Make sure to scroll down to see some close up pictures. I'd hate for you to miss all of the little details!


I used the Small Jack O Lantern and the Pumpkin Ribbon Slide to create a border to decorate the lower left and upper right corners of each page.


On the first page I used the sentiment "Just Witching You a Happy Halloween!" and the Witchy Accessories image to decorate it. They were both so fitting with the picture of the Witch from the Cider Mill. This witch was actually on a pole, about 12 feet high, and moved like she was really flying through the air. She also moved her head from side-to-side like she was looking at all the people there, and you could hear her cackle too!


To create my page title, I stamped the Empty Spider Web with black ink all over a large piece of orange cardstock and then cut the letters from it, using my Cricut. The picture above shows the spider web detail on the letters very well. This Frankenstein was a large piece of wood that someone had painted. I thought he looked so cool!

For the second page I used the sentiment "A Treat For you!" to decorate the pictures where we were eating fresh, warm cinnamon donuts. They definitely were a treat! Not sure why I look so sickly white--I even had make-up on, but you can't even tell! (Can you see the "Flying Witch" just behind my DH.)

The Bountiful Basket image on this page represents what a Cider Mill is all about-Harvest Time, and picking your own apples and pumpkins!


We even ran through the Haunted House while we were there! I think my mind played with me more than anything. Anticipating that something was going to jump out at me, was the most scary part. I decorated the Haunted House picture with the RIP Headstone on both sides. They had a grave yard set up just outside the entrance of the Haunted House, but because of the long lines of people I could get a good picture of it.


Stamps: DRS Designs- Small Jack O Lantern, Pumpkin Ribbon Slide, Empty Spider Web, Witchy Accessories, Just Witching You A Happy Halloween!, A Treat For You!, Bountiful Basket, RIP Headstone

Ink: Versafine Onyx Black
Paper: Bazzill cardstock and colored cardstock by The Paper Company
Accessories: Bic Markers, Cricut and George and Basic Shapes Cartridge, Ribbon by May Arts and Bobbie M. Designs, Brads By Joann's Scrap Essentials, Nesties

The DRS Designs DT would love for you to join us in this and any of our other challenges...feel free to use other stamps while you are waiting for your DRS stamps to arrive ;-) If you upload to an online gallery, please use the keyword DRSC8 and leave a comment here that links directly to your project so we can come check it out! You don't have to do a fall themed page to play...just grab some photos and stamps and knock a few more pages off your scrapbook to do list!!!

Check out the inspiration from the other DT members to get you started...

Angel Rivera

Cathy Indelicato (Team Coordinator)

Dawn Knight

Etha Schuette


Heather Lee-Reppen

Janette Olen

Jessica George


Jessica Knutsen


Vicki Parson


Hope you have an easy going Monday.

I've been off of work all weekend & now it's back to the grind for me.

See you back tomorrow!


Smiles,
Jennifer

LinkWithin

Blog Widget by LinkWithin