Welcome to Ink N Scrap Habits!

I've created this blog to share my life & love of paper crafts with others. You will read bits and pieces of what goes on in my world and be able to see my paper craft creations! Please leave me a comment if you see something you like. I'd love to hear from you!

Tuesday, March 31, 2009

Little Piggy Looks Like He's going to the Market...

...but he's not. He just wants to tell you that "you're not that old!"


Here's another sneak peek using last week's Splitcoast Sketch Challenge (SC221)! I've used more of the new releases from DRS Designs on this card--the fence, Leonard the Pig, and the sentiment. They all become available this Saturday, 4/4/09.

Too cute, huh?


I stamped Leonard in Pink ink and then used the masking technique to stamp the fence behind him. I shaded the area around his feet with green ink and then used a colored pencil to draw in grass. I sponged the sky with light blue ink and then inked the edge of a scalloped circle to create "clouds."


Stamps: DRS Designs- Silhouette Fence, Leonard's Dance of Joy, Hogwash Sentiment (all to be released on 4/4/09)
Ink: Versafine Onyx Black, Colorbox Fluid Chalk Ink in Warm Green and French Blue, SU! Close To Cocoa, Cameo Coral
Paper: Smooth white cardstock by Office Depot, Colored Cardstock by American Crafts
Accessories: Prismacolor Pencils, Gamsol, Ribbon by Offray, Making Memories Paper Piercer, Stamp-a-ma-jig, Brads by Making Memories
Finished Card Size: 5 5/8" x 5 3/4"

Don't forget Friday is when the DRS Designs Blog Hop will take place and Saturday is the big release day!

Thanks for stopping by today!

Hope you have a great one!
Smiles,
Jennifer

Monday, March 30, 2009

No Layer Challenge Continued with Sneak Peeks!

I've got some exciting news for you today!!


DRS Designs will be holding their first blog hop this Friday, April 3rd to show you all of their new images that will be available this Saturday April 4th!!! How cool is that!?!?! They've got some really cute images coming out & you don't want to miss all the sneak peeks the DT has in store for you this week! Read on to see what sneak peeks I have for you today...


Last Monday DRS Designs announced a new blog challenge to create No Layer cards. I've made 2 more challenge cards to show you including a little sneak peek! I've used some of the new stamps on these cards!


The sentiment on this card is part of the new release, and of course this cute little bee is also by DRS Designs. Please don't mind his very blue wings! I colored him with marker and used a very light blue color on his wings, but when I applied Stickles to them, it made the blue marker look so much darker. How many bees have you seen with blue wings? LOL! I bet this is the first! Regardless, he is perfect for this sentiment and I love its curvy look! It really give the impression of a bee buzzing around. I also scored the area around the image and sentiment with my Score-Pal. You have to really look close to see it. I never realized how hard it was to capture Score lines in a picture. I took several pics of this card & I think this one turned out the best.

Stamps: DRS Designs- Happy Bee, Bee-Cause You're Special Sentiment (soon to be released)
Ink: Versafine Onyx Black
Paper: Premade cards by Joann's Scrap Essentials
Accessories: Bic Markers, Score-Pal, Stickles
Finished Card Size: 4.25" x 5.5"


My second card for today is this No Layer Birthday Card.

I colored the Daisy Flower Corner images with Prismacolor Pencils. No need for Gamsol on this one...the lines are way too fine for my blending stumps. I added the light green ribbon around the top and (also hard to see) 2 horizontal Score lines below the stamped design.

Stamps: DRS Designs- Birthday Wishes Come True Sentiment, Daisy Flower Corner (Both to be released soon)
Ink: Versafine Onyx Black
Paper: Premade cards by Joann's Scrap Essentials
Accessories: Prismacolor Pencils, Score-Pal, ribbon by American Crafts
Finished Card Size: 4.25" x 5.5"


Have you made a no layer card recently, or are you willing to take on the challenge? If so, run over to this DRS Designs Blog Post and post a link to your card. DRS Designs is offering a set of note cards, an ink pad and an unmounted image to a random participant. Be sure to link your creation by 8pm on Sunday, April 5 to be included in the drawing.

Don't forget that the DRS Designs first blog hop will take place on Friday.

Thanks for visiting here today. Have a wonderful day!

Smiles,
Jennifer

Sunday, March 29, 2009

This Owl is Spooked!

As I was typing up yesterday's post, a light bulb went off and I came up with another idea for the owl image from Sunflowers and Dragonflies.


Here it is as promised! What do you think?


I colored it with Prismacolor Pencils and blended the colors with Gamsol. Then I created a Post-It Note mask for the owl and a circle for the moon and sponged the background in blue & black inks. I also put my Cricut to use & cut out leaves and glued them on the branch that the owl is sitting on.


I colored his eyes with a yellow Bic Marker to give bolder look to his eye. Does he look spooky to you?


Stamps: Sunflowers and Dragonflies-Owl
Ink: Versafine Onyx Black, Colorbox Fluid Chalk Ink in French Blue, Charcoal, Yellow Orchre, SU! ink in Night of Navy, Summer Sun
Paper: Smooth white cardstock by Office Depot, Colored Cardstock by The Paper Company, American Crafts
Accessories: Prismacolor Pencils, Gamsol, Bic Markers, Cricut and Calligraphy Collection Cartridge, SU! Photo Corner Punch, Brads by Making Memories
Finished Card Size: 4.25" x 5 1/8"


Well, it is Sunday, so for this week's Fun Filled Friday Challenge, Kimmy has challenged us to create a card with 4 layers. This should be too difficult for me since I usually over-layer my cards. You'll have to wait until Friday to see what I come up with!
I guess that's it for now. I'm getting off this computer & I'm going to go enjoy the rest of my weekend!

Hope you do too! Thanks for stopping by today!

Smiles,
Jennifer

Saturday, March 28, 2009

Hooooo's the Winner????

I know you are all anxiously waiting to hear who the winner is of my Blogoversary Blog Candy giveaway, but first, are any of you owl fans?


Here's the Canadian Owl from the new company Sunflowers and Dragonflies Creative Designs.


Kimmy and I had a stamp night a while ago & she let me use her Nesties Labels one on this card. Now I'm itchin' to get them, but I'm really trying to hold off. Our yard still needs grass, so we are saving our pennies for a sprinkler system and sod. The other foliage will have to wait! It's nice to know that she has them for me to play with whenever we get together to stamp.


I colored this image with Prismacolor Pencils and blended the colors with Gamsol--my favorite way to color! I matted it as shown and used a brown Zig pen to doodle in the corners around the matted image. As I look into the eyes of this owl, it kind of creeps me out! DING! DING! Did you hear that? My light bulb just went off again. I've got another idea for this fella. I'll get right to work on it and I'll post it here on my blog tomorrow for you to see.

Stamps: Sunflowers and Dragonflies Creative Designs- Owl
Ink: Versafine Onyx Black, Colorbox Fluid Chalk Ink in Creamy Brown
Paper: Smooth white cardstock by Office Depot, Bazzill Colored Cardstock
Accessories: Nesties, EK Success Decorative Corner Punch, Brown Zig Marker, Ribbon by American Crafts, Spiral Clip unknown.
Finished Card Size: 5.25" x 5.25"


Ok, Ok, so now, what you've all been waiting for...


Drum Roll Please...


The winner of my Blogoversary Blog Candy goes to:


Sara of Scrap Happie

Sara, please email me your address and I'll get your package out to you Monday ASAP!

I hope you all enjoy my blog as much as I enjoy creating cards and blogging all about them! Thanks so much to all of you who left comments on my blog and for making my first year successful.


Don't be sad that my blog candy has expired. DRS Designs still has 2 blog candy opportunities for you to enter. Hurry and check out these sites before it's too late!


Sue's Tips and Tricks


DRS Designs No Layer Challenge


Hope you're having a wonderful Saturday--spend it stamping!!!


:-)


Smiles,
Jennifer

Happy Blogoversary to Me!


March 23rd is my Blogoversary!


Wow! Time sure flies. I can't believe I've been blogging for a year already. I never thought I'd even get into the whole blog bandwagon, but look where I am now!


I have over 60 subscribers and approx. 9000 hits!


To celebrate, I have some candy to offer to all of you!


(Click on this picture to see an enlarged view.)

Here's what's included:

Black Diamond Stickles

Spool of red and gold ribbon

Imaginisce acrylic stamp-Present

Martha Stewart Sweet Friends Stickers

Studio G Clear Stamp set-Beach theme

Jolee's By You Birdhouse

Anita's Art Stamps Outline Stickers-Hearts and Flowers

Making Memories Self Adhesive Woven Labels-Travel

Joann Scrap Essentials Gold Clip Alphabet Embellishments

***All you have to do is tell me on average how much time do you spend paper crafting each week in a comment on this blog post. I'm just curious...I'd say I'm paper crafting about 8-10 hours each week.

This post will appear at the top of my blog through out the week. I'll draw the winner from all the comments this Saturday March 28th.


ETA: My Blog Candy is now closed...Thanks to all who entered & helped me celebrate!

Thanks for helping me have a very successful blogging year!

Smiles,
Jennifer


PS: Please scroll down to see my latest blog post! :-)

Friday, March 27, 2009

Fun Filled Friday Gift Bag!

Yeah, It's Friday! I don't have to work this weekend, and I'm so excited!


You know what Friday's mean here at Ink N Scrap Habits...It's time for FFF!


Kimmy, one of my best friends, and I host card making challenges on our blogs every week called Fun Filled Fridays (FFF). We take turns every other week giving a challenge. These challenges are announced every Sunday, and we display our finished cards for that challenge the following Friday. Kimmy and I keep the details to ourselves regarding these challenge cards, so until her challenge post Friday, I have no idea what she is planning on making until I see it, just like you, and vice versa. I think it is so much fun to see how different or similar our cards turn out. Feel free to participate in our challenges! We love that! Just make sure to leave us a link to your project so we can check it out.

This week, I wanted to change things up a bit and make something other than a card. I challenged Kimmy to create a Gift Bag or Box for this week's Fun Filled Friday Challenge. I wonder what kind of bag or box Kimmy came up with?? I used this Bag in a Box tutorial on Splitcoast Stampers.


I'm always surprised when I try tutorials out for things like this from Splitcoast Stampers. From seeing the pictures posted with each tutorial I always envision my finished project so much larger that it really turns out to be. This bag only measures 5.5" tall and at the bottom it is 2.5" wide and at the top it is about 4.5" wide. Pretty small bag, huh?! I guess it would be perfect to give your friends or other female relatives a fun bottle of lotion, bubble bath etc.


Over all this bag was easy to make. The hardest and longest part was creating my patterned paper. I used the DRS Designs Birthday Multi Greeting stamp and several colors of ink to decorate the paper used on the outside of my bag.


I used the Treading Water punch to create the bottom edge and doodled it with a white Gel pen. I added a little bling to my bag by filling the border punch holes with red Stickles.

I reinforced the holes for the ribbon handle by cutting 2 scalloped circles with my Nestabilities and scoring them in half. I decorated them with my white Gel pen as well.


From start to finish, I think this bag took me a whole half hour or so. Not too time consuming, and a project I will definitely keep in mind when I need a small gift bag later.


Stamps: DRS Designs- Birthday Multi Greeting
Ink: SU! Real Red, Brilliant Blue, Glorious Green, Pixie Pink, Orchid Opulence
Paper: Smooth white cardstock by Office Depot, Colored Cardstock by The Paper Company
Accessories: Nesties, Friskars Treading Water Border Punch, Xmas Red Stickles, Ribbon Unknown, Crop-a-Dile, White Gelly Roll Pen
Finished Bag Size: 5.5" x 2.5" on the bottom and about 4.5" at the top.


Just a couple Reminders for today...


Don't forget to check out the DRS Designs featured Friday Stamper. You can see Jennifer Taylor's cards on the DRS Designs Blog.


Today is the final day to sign up for my blog candy if you haven't already done so. I'll be drawing a winner tomorrow!


Hope you all have a wonderful weekend! TGIF!


Smiles,
Jennifer

Thursday, March 26, 2009

What BREAST Cancer Cannot Do!

Remember the card resembling these ones in the picture I made a few weeks ago? I work at a local hospital in the radiology department and I often talk about my stamping and card making hobby with the girls at work. None of them are papercrafters, but they enjoy seeing my work and seeing it in print when it gets published.

One of the girls, Cindy, a Mammography Technologist, was particularly interested in this card because she has a friend who was recently diagnosed with breast cancer. Her friend is 40 years old and has 2 daughters, 8 and 3, and she's going for an evaluation this week that will determine whether or not she will need chemotherapy and radiation treatment. Cindy asked if I'd make one just like it to give to her on the day of her evaluation. Of course I said yes! She even offered to pay me for it, but I refused. I myself am a CAT Scan Technologist but I'm also registered in Mammography. I just couldn't accept money doing something that I love (creating cards) and blending an aspect of my day job with it. I know this card will make her smile, and give her hope!


Cindy asked if I could make yet a third "What Cancer Cannot Do" card. Before she even told me why I said "sure." She's going to ask her Supervisor if we can frame it and hang it in the Mammography room! I know this isn't exactly being published, but I'm excited about it! I hope she says "yes!"

Well, I've given you an explanation for 2 of the cards pictured above. Are you wondering why I have four cards there? Do you remember in my previous post that I mentioned I had an Aunt who was 36 years old and recently diagnosed with breast cancer and that I created a similar card with her in mind? Well, I just found out that she and another one of my Aunts are raising money to walk the 3 Day Breast Cancer Walk here in Michigan. I've made the other 2 cards to send to them with my donation towards their walk. Both of them are scrapbookers so I know they will appreciate what I've made.
Here's a picture of the inside of the cards that will be going to both of my Aunts and Cindy's friend. Isn't this sentiment perfect? It's one of DRS Designs latest releases.


Stamps: DRS Designs- Cancer Prayer, You're on my mind sentiment
Ink: Versafine Onyx Black, Colorbox Fluid Chalk Ink
Paper: Cardstock by Archiver's and American Crafts
Accessories: Cuttlebug and Cuttlebug ribbon die, Fiskars Treading Water Border Punch, Brads by Joann's Scrap Essentials, Rectangle Nesties, EK SUccess Corner Punch.
Finished Card Size: 6" x 5 1/8"

Stay tuned to see my Fun Filled Friday project tomorrow. This week's challenge is to create a gift bag or box. I haven't even started it yet. Wish me luck that I get it done in time!
Thanks for visiting today.

Smiles,
Jennifer

Wednesday, March 25, 2009

God's Promise

I'm back to work today after an enjoyable day off. I spent the day getting some much needed to do's done but I also found time to make 6 cards for DRS Design's upcoming release and today's Sketch Wednesday card.

Feel free to use this sketch in your card making today. If you do, make sure to leave me a link so I can check out your version.


Here's what I came up with...


First I stamped "God's Promise" in brown ink, then I stamped the cross image on top of it. I matted it as shown and used the Fiskars Sunburst Border Punch to decorate the vertical panel. Then I matted the entire piece some more--Have you noticed how much I like to layer, and layer, and layer!?!?!?! LOL! I cut a larger piece of cardstock and stamped "In Deepest Sympathy" down the left side, before finally adhering the entire piece on a brown cardstock base.

Here's a close up of the God's Promise poem so you can read it.


Stamps: DRS Designs- Medium Cross, Large Vertical Sympathy, God's Promise
Ink: SU! Close To Cocoa, Summer Sun
Paper: Smooth white cardstock by Office Depot, Colored Cardstock by American Crafts
Accessories: Fiskars Sunburst Border Punch, Brads by Joann's Scrap Essentials
Finished Card Size: 5" x 4.5"


In the mood for some candy? Don't forget to enter my Blogoversary blog candy if you haven't already done so & check out the DRS Designs blog for a chance to win candy for creating a no layer card.

Thanks for visiting today!

Smiles,
Jennifer

Tuesday, March 24, 2009

Here For The Party!

I'm still plugging along with the new DRS Designs images and having fun with the Cutie Pie Kids Collection! Here's another one to share with you.


This Cutie Pie is appropriately called "Here for the Party!" Isn't she sweet?
I colored her with Prismacolor Pencils and blended the colors with Gamsol. Then I stamped the sentiment and star background in red ink. I used red Stickles to fill in selected stars from the background. I added ribbon from my stash--talk about reuse and recycle, I think this ribbon is from a Christmas gift I received!


Stamps: DRS Designs- Cutie Pie Kids- Here for the Party, Interlocking Star Background, Birthday Multi Greeting
Ink: Versafine Onyx Black, Colorbox Fluid Chalk Ink in Lipstick Red, SU! Real Red
Paper: Smooth white cardstock by Office Depot, Colored Cardstock by American Crafts
Accessories: Prismacolor Pencils, Gamsol, Xmas Red Stickles, Ribbon-unknown from my stash
Finished Card Size: 4.75" x 5.5"


I'm happy to report that today is my day off! I have a long to do list and I'd like to get outside for a jog today as well. The weather is supposed to be about 58 degrees and beautiful.

I'm going to attempt to make the most of my day!

Hope you have a great one!

Smiles,
Jennifer

Monday, March 23, 2009

DRS Designs No Layer Challenge

This week the challenge on the DRS Designs Blog is to make a no layer card! It's time to get back to basics!!! Sometimes you need a quick but not overly done card and with this challenge we hope to inspire you with ideas on how to make your own quick, no layer cards. We would love for you to participate because sharing is the best source of inspiration right? If you do participate, please post a direct link to your creation in the comment section of the challenge (#17) post on the DRS Designs Blog and if you upload it to a public gallery, please use the keyword DRSC17.


To sweeten the deal, we're offering a set of note cards and an unmounted image to a random participant. Be sure to link your creation by 8pm on Sunday, April 5 to be included in the drawing.
Here's my No Layer Challenge Card:


To create this card I used smooth white cardstock to form my card base. I stamped the Large Beer Mug image in the center of the card front and colored it with markers. Then, I stamped the sentiment on top of the image using my Stamp-a-ma-jig for assistance. I used my Score-Pal to create the scored lines on either side of the image and applied Stickles to the beer "foam."


Stamps: DRS Designs- Large Beer Mug, Beer is the Answer Sentiment
Ink: Versafine Onyx Black

Paper: Smooth white cardstock by Office Depot
Accessories: Bic Markers, Score-Pal, Stickles, Stamp-a-ma-jig
Finished Card Size: 4.25" x 5.5"


I have to admit, I really like the simplicity and quickness of these types of cards. I bet you'll be seeing more no layer cards from me soon!

Thanks for stopping by today! Have a great week!

Smiles,
Jennifer

Sunday, March 22, 2009

It's a Beautiful Sunday!

So, how's the weather in your neck of the woods? Here in Michigan, signs of Spring are popping up little by little. I think we are finally done with the bitter cold temperatures and the thermometer is moving up a little. The sun is coming out more often too! I can't wait for it to warm up just a bit more so that we can turn the heat off. Plus, I love the smell of the fresh spring air when you open the windows for the first time of the year! We should be getting sprinklers and sod soon too, so I'll eventually have more pictures to show all of you who have been following our "building a house" project.


For now, another week has flown right by and it's Sunday again! This week I've challenged Kimmy to create a Gift Bag or Box for our Fun Filled Friday Challenge. This should be fun, cause there are so many paper box tutorials that I want to try--I think the hard part will be trying to decide which one to do! Won't you play along this week?


Well, I'm still plugging away at all of the new stamps I've received lately from DRS Designs. Ever since our vacation to Mexico I've been behind, but hopefully by working hard this week I'll be back on track.


Here's a birthday card I made recently using the Girl Swirly Cake image. I love the blue and dark pink color combo together! I colored this image with Prismacolor Pencils and blended the colors with Gamsol. I added Stickles to the candle flames and to the pink flowers around the cake base. The sentiment I used is part of the Happy Birthday Multi Greeting stamp. I like the versatility in this stamp--use all the sentiments together to create a background or ink up just a portion for a perfect fit on your project!


Stamps: DRS Designs- Girly Swirly Cake, Birthday Multi Greeting
Ink: Versafine Onyx Black, Colorbox Fluid Chalk Ink in French Blue, SU! Night of Navy
cardstock by Office Depot, Colored Cardstock by The Paper Company, American Crafts
Accessories: Prismacolor Pencils, Gamsol, Nesties, Golden Rod and Cotton Candy Stickles, Tiny Mardi Gras Brads by Buttons Galore & More
Finished Card Size: 5" x 5.5"

DRS Designs is holding another blog challenge tomorrow. Stay tuned for the challenge announcement and to see my project!

Ta Ta for Now!

Smiles,
Jennifer

Saturday, March 21, 2009

An Irish Blessing Claddah

Sorry for such a late post today. Today has been rather hectic, but better late then never!
Here is one last St. Patrick's Day card to share with you. Finally, this will conclude St. Patrick's Day Week here on my blog.


I stamped and colored the Claddah image on white cardstock with pencils and Gamsol. Then I stamped the image again on red cardstock, ran it through my Cuttlebug with my Swiss Dots Embossing Folder and cut out the heart. I paper pieced it onto the image I stamped on white cardstock.


When I received my stamps, I cut the "Irish Blessing" sentiment out from the middle of the shamrock oval on the Giga Oval Irish Blessing stamp. This way I could still use them together or separate. Doing so totally makes this stamp more versatile. For this card, I was able to stamp the shamrock oval around the Claddah image and then stamp the sentiment below it. I used my Score Pal to create the embossed line around the image and added a green brad to each of the four corners.

Stamps: DRS Designs- Claddah, Giga Shamrock Blessing Oval
Ink: Versafine Onyx Black, SU! Glorious Green
Paper: Smooth white cardstock by Office Depot, Colored Cardstock by The Paper Company,
Accessories: Ribbon by Paper Studio's Paper Trends, Cuttle bug and Swiss Dots Embossing Folder, Score Pal, Brads by All My Memories
Finished Card Size: 5 1/8" x 5 1/2"


Stay tuned for a new Fun Filled Friday Challenge Announcement tomorrow!


Hope you're having an enjoyable weekend!


Smiles,
Jennifer

Friday, March 20, 2009

An Irish Blessing

Happy First Day of Spring & TGIF!


Are you sick of seeing my St. Patty's Day cards yet? I promise, just a couple more to share with you today & tomorrow and I'll more on to another theme for Sunday. Last night Kimmy and I got together for a stamping play date & I completed 5 of the 12 cards I have sketched out in my notebook. I'm happy with that progress! I have 7 more sketches to bring to life, and I hope to get them completed over the weekend. So, I can assure you that I'll have a variety of themes to share next week. Remember those Cutie Pie Kids? I'm still working on those too!


Thanks for all of your sweet comments this week as I overload you with St. Patrick's Day cards. I hope you're enjoying them!


As I'm sure you all remember, earlier this week Kimmy announced that this weeks FFF challenge was to make a St. Patrick's Day card as well. So, here's an Irish Blessing for you!


All of the stamped components on this card are by DRS Designs and were stamped in shades of green ink. There are 4 separate images used on this card--Petals on a Shamrock Sentiment, the Four Leaf Clover, and Lines O Plenty Background stamp, and the Giga Shamrock Blessings Oval. (You can use your Marvy Uchida Giga Oval to punch it out!)


Stamps: DRS Designs- Giga Shamrock Blessings Oval, Petals of a Shamrock Greeting, Lines 'O Plenty Background, Four Leaf Clover
Ink: SU! Handsome Hunter, Colorbox Fluid Chalk Ink in Lime Pastel
Paper: Smooth white cardstock by Office Depot, Colored Cardstock by The Paper Company, American Crafts
Accessories: Brads by Making Memories, Ribbon By Michael's Go With The Grain, Nesties
Finished Card Size: 4 3/8" x 5"


I also played with this weeks SCS Sketch Challenge yesterday. I've posted it on the DRS Designs Blog today. You can run over and see it here.


Don't forget to check out Kimmy's St. Patty's Day card and leave a comment to enter her Blog Candy giveaway.


May we all be blessed by this Irish blessing for good health, good luck, and happiness today & every day!

Have a wonderful Spring weekend!


Thanks for visiting today!

Smiles,
Jennifer

Thursday, March 19, 2009

Perfect for a March Birthday!

I know St. Patrick's Day is long gone now, but St. Patty's week continues here at Ink N Scrap Habits!


Today's card is not necessarily a St. Patrick's Day card, but it does have a clover on it. This is a March Birthday card--perfect for anyone with a Birthday near St. Patty's Day.


I decided to keep this card pretty simple by only decorating it with eyelets and ribbon. I also added an additional Happy Birthday sentiment punched with my Word Window punch.


Stamps: DRS Designs- March Birthday Greeting, Clover from the Irish Stick N Stamp Set, Happy Birthday sentiment
Ink: SU! Handsome Hunter

Paper: Smooth white cardstock by Office Depot, Colored Cardstock by The Paper Company
Accessories: SU! Word Window Punch, SU! Eyelets, Ribbon by Michael's Go With The Grain
Finished Card Size: 4.75" x 6"


Sorry to make today's post so short, but computer time is limited today. I have a stamping play date with friends scheduled for today & I must pack up all my supplies. I have 12 (yes, 12!) card sketches in my notebook that I'm planning to bring to life, so I'll be a busy girl today. Good news for you is that I'll have lots of new & fun stuff to show you very soon!


Stay tuned to see my St. Patty's Day Fun Filled Friday card tomorrow! Have you created a St. Patty's card this week? Leave me a link so I can see it if you did.


Have a great Thursday!

Thanks for stopping by today!


Smiles,
Jennifer


PS: All you Gray's Anatomy fans ready for tonight? I want to know what happens with that ring! I guess we'll find out soon enough!


Wednesday, March 18, 2009

House Mouse Sketch Wednesday!

How was your St. Patrick's Day? Fun, enjoyable, and full of all good Irish things?


I didn't go out & celebrate...some of us have to work and bring home the GREEN, you know?


I created this Card Sketch and a House Mouse St. Patty's Day card instead!


There's nothing like a cute & cuddly House Mouse card! I just love these little critters and I know so many of you do too!


I've actually had him colored for what seems like forever, and I made it a point yesterday to create him into a card so I could show him off for St. Patty's week. The card itself was pretty easy to create, especially since I had the sketch to follow. I won't bore you will all the fine details, but if you have any questions feel free to ask! To sum it up...color, blend, mat, add brads, create tag, find coordinating designer paper, use Martha's Border punch, create cardstock base, layer as shown, Viola!

Stamps: Stampabilities House Mouse, DRS Designs sentiment "Happy St. Patrick's Day!"
Ink: Versafine Onyx Black, Colorbox Fluid Chalk Ink in Warm Green and French Blue
Paper: Smooth cardstock by Office Depot, Textured Cardstock by American Crafts, Designer Paper by Reminiscence
Accessories: Prismacolor Pencils, Gamsol, Nesties, Ribbon by Paper Studio Ribbon Trends, Martha Stewart Zig Zag Border Punch, Brads by All My Memories, sponges
Finished Card Size: 6" x 4.5"


Need a challenge? Go ahead & create with this sketch! Just make sure to leave me a link so I can see your project too!


Did you do any St. Patty's Day celebrating yesterday? Tell me all about it. I'd love to hear how you celebrated!


Well, gotta run for now, Happy Wednesday to you & Happy "Friday" to me--I'm off tomorrow! Whoooo Hoooo!


Have a great one!

Smiles,
Jennifer

Tuesday, March 17, 2009

May Your St. Patrick's Day Be the Best You've Ever Had!

Happy St. Patrick's Day to you!


Are you wearing green today? I'm not Irish, but I will be sporting the green when I go to work later today. :-) I work in a local hospital and I have my St. Patty's scrub top and my green pants already laid out and ready to go.


In Honor of St. Patrick's Day, I whipped up this card last night. I really like this sentiment & it's perfect for people like my Husband who wait all year long for St. Patrick's Day. I think this day is right up there next to his birthday--and no, he's not Irish! I think all of the attention he gets from bar hopping and playing his bag pipes dressed in his kilt and earning free beer has something to do with it. Him and his friends will be out and about until the wee hours of the morning tonight, I'm sure! My friend Kimmy will be hanging out with all of them. I'll have to get report from her to see how it goes!


Anyways, back to today's card...


I stamped the sentiment in green ink and matted it as shown. I also added a light green rhinestone to each of the four corners. I stamped a clover on the white panel then ran it through my Cuttlebug with the Swiss Dots embossing folder. I added some green ribbon and a bow to the bottom of the white panel.

Next, I stamped the clover repeatedly in white ink on green cardstock, creating the background. I used a Corner Adorner on the left side and adhered the stamped white panel to the green mat. I assembled the card front as shown. The card base was made from white cardstock and I used the Corner Adorner on the right side of this as well, and adhered the card front to the base.


Stamps: DRS Designs- Best St. Pat's Day Ever Sentiment, Clover from the Irish Stick N Stamp Set
Ink: SU! Handsome Hunter and Versacolor White Ink
Paper: Smooth white cardstock by Office Depot, Colored Cardstock by The Paper Company
Accessories: Cuttlebug and Cuttlebug Swiss Dots Embossing Folder, K & Company Brenda Walton Adhesive Rhinestones, EK Success Corner Adorner, Ribbon by Michael's Go With The Grain
Finished Card Size: 5.25" x 5.75"


Well, it's about that time for me to get ready for work. DH will be leaving soon for his St. Patty's festivities and I must see him off. So, I gotta run!


Thanks for stopping by today. I hope this St. Patrick's Day is the Best you've Ever Had!


Have an Enjoyable Day!


Smiles,
Jennifer

Monday, March 16, 2009

St. Patrick's Day Parade


Yesterday we spent the day downtown a the St. Patrick's Day parade. We had so much fun! The weather was about 54 degrees and sunny--picture perfect! I have many pictures to share with you today. You should be able to click on any of these pictures for a close up view.

My Husband plays the bag pipes and his band was in the parade. Here is a picture of the band in action. He is the fourth one from the left. His cousin, Stevie, is carrying the blue Michigan flag. His Uncle Steve is in the way back, If you look close, he's the one with the long moustache, lime green scarf and black jacket.


Close up of the guys. Stevie is the second one from the left, my Husband is the 4th from the left.


The 3 fine fellas! Please disregard the beer cans! :-)


How I forgot to take a group picture of all of us is beyond me! So sorry about that, I guess I was too focused on taking pictures of everything else! To give you a mental picture, we all wear green, we collect green beads, and some even accessorize! Here's our Friend Terry showing off her hat and beard! Looking at this picture just makes me crack up!


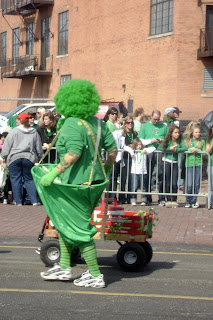
Of course there was also the clown acts and other fun Irish characters that always make the parade entertaining!
This first one is of the fire fighter clowns.


Mrs. Hula Hoop Pants!


Lucky Leprechaun posing just for me!


Side by side 2 seater bike


And finally, what's a parade without a few fun floats!


Hope you've enjoyed these. Thanks for visiting today!

Happy St. Patty's Week!

Smiles,
Jennifer

Sunday, March 15, 2009

St. Patrick's Day, All Week!

Happy St. Patrick's Day Week!


I say that because this week and my blog will be filled with green--Lots of Irish stuff going on...

Unfortunately, I don't have a stamped project to share with you today, but I promise this week I'll have plenty for you to enjoy!

First up, today--Today we are going to the St. Patrick's Day Parade downtown. It's an especially good time & my Husband plays the bag pipes in a band that is in the parade! I plan on taking lots of pictures! Keep your fingers, toes, arms and legs for us that it doesn't rain!


Tomorrow, Monday, I'll be sharing some of the pictures from the parade as I'm sure you will enjoy them, and hopefully another St. Patrick's Day card as well--if I can get my butt in gear!


Tuesday, St. Patty's Day, I have to share a St. Patrick's Day card with you for sure! That's a Must! :-)


Wednesday, Card Sketch Wednesday, I'll have another sketch for you to play with and a House Mouse St. Patrick's Day card for you. We all love the House Mouse!


Thursday, well, as of right now it's a little to early to tell. Thursday will be my anything goes day! Stay tuned to see what I have in store for you!


And, finally, Fun Filled Friday. This week, Kimmy's challenged us to create a St. Patrick's Day card. I hope you'll play along, I'd love to see your Green cards! Make sure to leave me a link, ok?

Have a wonderful day!

Smiles,
Jennifer

Saturday, March 14, 2009

Just A Friendly Note

Hooray for Saturday! Working every other weekend sure has it's ups and downs, but having 2 days off in a row is the best part! It's when I truly get to relax and do whatever I want! Unfortunately doing what I want will be somewhat limited this weekend, since we have 2 birthday parties to go to today & tomorrow we are going to the St. Patty's Day parade downtown. I will still make time to play with my stamps though! I've got lots to do in that department!

This Cutie Pie card is one I whipped up after work last night. Isn't she sweet? This image is called Springtime Helper and is one of the new releases from DRS Designs.


I colored her with pencils and blended the colors with Gamsol. Then I sponged blue in k for the sky and green ink for the grass around her feet. The sentiment is also from DRS Designs--I love the font!


Stamps: DRS Designs- Cutie Pie Kids Collection, Springtime Helper, Friendly Note Sentiment
Ink: Versafine Onyx Black, Colorbox Fluid Chalk Ink in Warm Green and French Blue
Paper: Smooth white cardstock by Office Depot, Colored Cardstock by Bazzill
Accessories: Prismacolor Pencils, Gamsol, Ribbon by Target's Club Wed
Finished Card Size: 4.25" x 5.5"


So for those of you who love Blog Candy make sure to check out Kimmy's Blog. She's celebrating with a huge package of goodies to give away in honor of her Blogoversary and her 30th birthday!


So, how are you spending the weekend? Any St. Patrick's Day festivities going on in your neck of the woods? Hope you have a great one!


Thanks for visiting today, and I'll see you tomorrow :-)


Smiles,
Jennifer

Friday, March 13, 2009

Who Let the Dogs Out?

TGIF & Happy Friday the 13th!

Just a quick reminder for you to check out the DRS Designs Blog today for you to get to know Michelle, the first Featured Friday Stamper. She was given a set of Easter images to use and you can see what she came up with on the DRS Designs Blog.

TGIF! I just can't seem to stress that enough today. For our Fun Filled Friday Challenge this week, I challenged Kimmy to create a card using a dog image.

I've had this dog image from Rubbernecker colored & blended for a while, so I figured this was the perfect opportunity to create him into a card. I think I actually got this image from Kimmy when we traded images one day--wonder what dog image she'll use for this challenge??? Will this be the first Fun Filled Friday where we use the same image?? Don't forget to run over to Kimmy's blog to see her challenge card.

This card is pretty straight forward and self explanatory. I didn't get too fancy with this one, but I've brought my computer back into card making by computer generating the sentiment. This poor little puppy looks like he's sad cause he missed the birthday party. I thought he'd make a great belated birthday card, so that's exactly what I made!

He is colored with Prismacolor Pencils and then the colors were blended with Gamsol. I sponged light blue ink around him to create the sky and then used a scallop die to sponge in some clouds in the background. I matted the image as shown and then used my SU! Word Window punch and some brads to fill in the empty space.


Stamps: Rubbernecker- Birthday Dog
Ink: Versafine Onyx Black, Colorbox Fluid Chalk Ink in French Blue
Paper: Smooth white cardstock by Office Depot, Colored Cardstock by The Paper Company and American Crafts
Accessories: Prismacolor Pencils, Gamsol, SU! Word Window Punch, Brads by Joann's Scrap Essentials, Sentiment is computer generated.
Finished Card Size: 3.75" x 6.5"


I'm so glad the weekend is here! It has been a long exhausting week for me & I blame the Daylight Savings time change 100%! It time for me to catch up on some sleep, catch up on some card making & spend Sunday having fun at the St. Patty's Day parade! I hope to get some good pics to share with all of you!

I wish you all a wonderful weekend.

Thanks for visiting today!

Smiles,
Jennifer

Thursday, March 12, 2009

Sympathy Is Many Hearts Sharing One Sorrow

I'm still not done playing with all of my Cutie Pie Kid images from DRS Designs. I have been extremely exhausted this week and haven't done much card making. I'll get to them soon I promise! So, unfortunately, no new Cutie Pie Kid cards today, but I do have another sympathy card to share.


This card idea and layout came very easy to me. This was the first card I've ever used clear embossing on, and I'm so pleased with the subtle beauty in this card. Sweet and simple, just like a Sympathy card should be!


Here's a close up of the Daffodil image that I clear embossed. It's kind of difficult to see in the picture above.


I stamped the sentiment with SU! Handsome Hunter ink, and decorated the empty space with dark green eyelets. Eyelets is another one of those embellishments that I have a ton of and don't use very often--glad I could put 4 to good use on this card!

Stamps: DRS Designs- Many Hearts One Sorrow Sentiment, Large Brush Daffodil
Ink: SU! Handsome Hunter
Paper: Cardstock by The Paper Company

Accessories: Rubber Stampede Embossing Ink, Clear Embossing Powder by Creative Beginnings, Eyelets by Joann's Scrap Essentials, Ribbon by Michael's
Finished Card Size: 5.25" x 6"

Tomorrow I will share my Fun Filled Friday Dog themed card with you. Did you get a chance to play? Have you made a dog themed card recently? If so, make sure to share the link with me, I'd love to see your work!

Thanks for stopping by today. I hope your day is wonderful!

Smiles,
Jennifer

Wednesday, March 11, 2009

Spring is in the Air!

Happy Wednesday everyone!
I'm thrilled that the weekend is almost here! Here's today's sketch for the Card Sketch Wednesday Challenge:

Grab your stamps, ink, and cardstock and play along! I'd love to see your version of this sketch.
Here's mine:


This adorable image is a new one from DRS Designs. It's called Easter Sleepover! I colored this image with Prismacolor Pencils and blended the colors with Gamsol. I used a post-It Note to create a mask for this image and sponged blue ink around it.

I used my Nesties to cut the Squares for the sketch and added brads and white satin ribbon with a bow to decorate the card front.


I love when Easter is almost here, it means that Spring is in the Air and we can kiss the cold weather and snow goodbye for one more year!

Stamps: DRS Designs- Easter Sleepover
Ink: Versafine Onyx Black, Colorbox Fluid Chalk Ink in French Blue
Paper: Smooth white cardstock by Office Depot, Colored Cardstock by Bazzill and American Crafts
Accessories: Prismacolor Pencils, Gamsol, Bic Markers, Nesties, Offray White Satin Ribbon, Brads by Making Memories
Finished Card Size: 4.5" x 4.5"


Please leave me a link to your Sketch Wednesday card if you get a chance to create with it, so I can check it out!

Thanks for visiting today!


Smiles,
Jennifer

LinkWithin

Blog Widget by LinkWithin