Welcome to Ink N Scrap Habits!
I've created this blog to share my life & love of paper crafts with others. You will read bits and pieces of what goes on in my world and be able to see my paper craft creations! Please leave me a comment if you see something you like. I'd love to hear from you!
Happy Thursday Everyone!
The new challenge this week on the DRS Designs blog is as Easy As 1-2-3!
You are to use one of something, 2 of something else, and 3 of another item. Here's the card I submitted for this challenge.
I used 1 butterfly, 2 rhinestones, and 3 scalloped borders.

The Large Single Butterfly (192G) was colored with Copic Markers and then fussy cut out. I double layered my card front and used a Nestability die to cut out the circle in the top panel. I embossed the bottom and then adhered the layered scalloped panels in place, and embellished it with silver ribbon. The Butterfly Kisses Greeting (399G) was stamped at the top. The top layer of the card front was adhered onto pale violet cardstock and then adhered onto a dark purple cardstock base. The butterfly was adhered in place in the cut-out circle with glue dots so that the wings were extended up from the card front making it 3D.
Click on this link to find the details for this Easy challenge and link your entry today for a great prize from DRS Designs!
Hope you have a great day!
Smiles,
Jennifer
A fun, Summery color challenge was just posted on the DRS Designs Blog today!
How fun and gorgeous are these colors?!?!?!?
I used them to create this "Thinking of You" card. I like that it could be a graduation card as well!
I created the sun by hand by tracing a large, circular object and cutting it out. Then I used a photo corner punch for all the rays. I sponged the edges a bit and stamped the Large Stained Glass (1133P) over top to create some dimension. I used light blue cardstock for my card front, and dressed it up a bit by rounding the corners and distressing the edges. I adhered the sun in the upper, left corner as shown and added a yellow gem. Next, I stamped the Sun Shine On You Greeting (417E) at the bottom of the card front and placed a white pearl on either side of the top line. Then I adhered the card front on to a white cardstock base and viola, this clean and simple card was complete!
Hope you like it and I hope you get a chance to play along with these beautiful colors as well!
Have a great day!
Smiles,
Jennifer
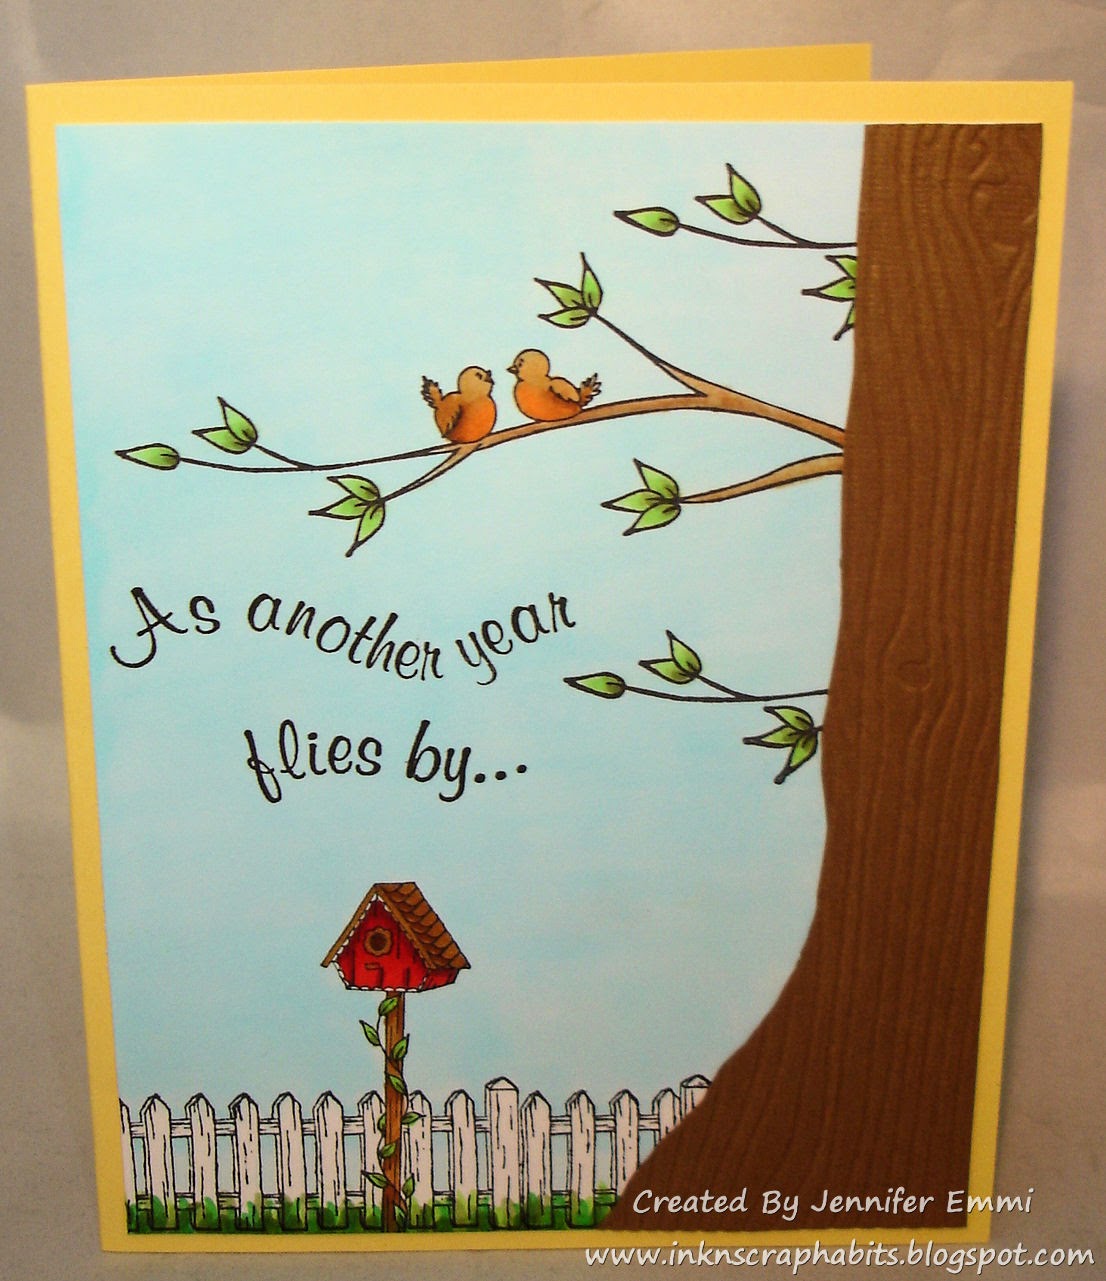
There's nothing better than having universal greeting cards in your stash that could be used for multiple occasions. Like this card I'm sharing with you today, it could be used as a birthday card for someone who likes birds, or an anniversary card because of the way the birds look on the Lovebirds Branch (413H). It would all come down to what the rest of the greeting inside read, and for now I'm going to leave that option open until I actually decide to use this card.
The scene I created here was started with a piece of white cardstock. I stamped the Lovebirds Branch 3 times in different places and at different positions coming from the right side of my card front. Next, I stamped the Single Bird House (406D) near the bottom, masked it and then stamped the Picket Fence (478P) in place over top. Everything here was colored with Copic Markers, including the sky and the grass. I hand cut a piece of brown cardstock and embossed it with a wood grain embossing folder for a realistic look, and adhered it in place on the far right side. The final touch was adding the Another Year Flies By (489F) Greeting right in the center. The card front was then added to a yellow cardstock base to make the card complete.
Have a great day,
Smiles,
Jennifer
Ha! There's a Birds and the Bees challenge posted on the DRS Designs Blog this week, and no, you don't have to be afraid to run over and check it out, LOL! I promise it's all G rated! ;-) DRS Designs has some new Spring stamps that fit the bill perfectly for this challenge and I'm showing some of them off today.
I know this card doesn't look like much, but I've used quite a few stamps on it:
Spring Bee Happy Greeting (367E)
I started my card front with light blue cardstock and stamped the Leafy Tree Branch and the Beehive branch so that it was emerging from the left side of the card front. The bee was first stamped on white cardstock, colored and then adhered in the empty space in the upper right corner with it's flying trail. After coloring them all with Copic Markers, I hand cut the tree trunk from brown cardstock and then embossed it with the wood grain embossing folder by The Paper Studio. It was adhered in place and then the sentiment was stamped at the bottom as shown. Finished card size is A2-4.25" by 5.5." I hope you like it!
Smiles,
Jennifer
I hope all you Moms out there had a wonderful and very Happy Mother's Day!!
Today I am sharing the Mother's Day card I made for my mom. Once again, my inspiration was fueled by the latest DRS Designs blog challenge--Beautiful Backgrounds. It's been a while, but I decided to get out my alcohol inks and glossy card stock to make the background for this card. My mom's favorite color is pink and I knew that that's what I needed to use on this card. So I selected a variety of pink and purple alcohol inks along with a metallic silver to create my beautiful background!
Hope all of you had a wonderful day spent with those you love!
Thanks for stopping by!
Smiles,
Jennifer
Graduation season is upon us and the latest DRS Designs Blog Challenge, "Put It In Neutral" inspired me to create this Graduation Card. I know the Rest Best of Life Greeting (385F) was originally meant to be a birthday greeting, but I think it's the perfect graduation greeting too. I think many graduates are so happy and excited that the long struggles of school are behind them that graduation is the beginning of the rest of their living life, with a career ahead, we hope!

I started by stamping the Rest Best of Your Life Greeting with black ink on white cardstock. I used a rectangle Nestability die to cut it out and then sponged tan ink over top of it while it was still in the Nestie die. It was matted with black cardstock cut out with the scallop-edged, rectangle Nestie die. I then put that aside and created the background panel. Starting with ivory cardstock, I stamped the Interlocking Star Background (819H) in black ink and the Starry Background (124H) in tan ink. This panel was also matted with black cardstock cut out with the scallop-edged, rectangle Nestie die. Next, I created the A2 cardstock base from tan cardstock and adhered the star panel to the far left side as shown. To break up the light colors a little bit, I added a fishtail banner in dark brown cardstock that was embellished with some paper flowers and petite copper brad. This was adhered so that the straight edge was flush with the right side of the card front. The greeting panel was adhered in placed just off center and this clean and simple card was complete!
So, I mentioned above that the "Put It In Neutral" challenge inspired this card. Has my post inspired you to play along as well? Create a card in neural colors (think white, ivory, tan, kraft, brown, black, gray) and link it up on the challenge post to be entered to win a great package of DRS Designs stamps! But hurry, this challenge ends to day at 6pm ET!
Thanks for stopping by and good Luck!
Smiles,
Jennifer