Welcome to Ink N Scrap Habits!
I've created this blog to share my life & love of paper crafts with others. You will read bits and pieces of what goes on in my world and be able to see my paper craft creations! Please leave me a comment if you see something you like. I'd love to hear from you!
Hi Everyone!
I hope you're all doing well and that you had a nice holiday. Any big plans for the New Year? My resolution is to be more organized and with that I hope it helps me to stop procrastinating and stay focused! I'm sure this is a resolution that many of us share!
I chose to make the greeting as the focal point of my card. I love all its gorgeous variety! The different styles and sizes of text are really eye catching! To highlight it, I used a Nestability die to cut it out and then I sponged pink ink over the text while it was still in the die. I created my own coordinating pattern paper on the bottom of the card by stamping the Interlocking Hearts stamp repeatedly using red ink on pink card stock. This card was simply embellished it by using a decorative border punch on the red panel and I added several pearls to dress it up. Finished card size is 5.5" x 4.25."
I wish you all a very happy and safe New Year! Thanks for stopping by!
Smiles,
Jennifer
Well, the count down to the big day is on, are you ready? My shopping is done, but I still have all the wrapping to do. I took a break from the holiday prep this weekend and I found myself stamping a winter scene that's inspired by the upcoming winter storm were expecting this Christmas Eve. Unfortunately the timing is bad due to all the traveling everyone will be doing for the holiday, but I'm really excited, as we haven't had a true white Christmas in a very long time. The colors are used on this card were inspired by the color challenge that can be found on this weeks DRS Designs blog.
This scene was created by using the masking technique and several of the stamps from DRS Designs Christmas Village series. These stamps included:
Smiles,
Jennifer
I'm still working on my Christmas cards, are you?
Here's one I made for this weeks "Sing It To Me" challenge over on the DRS Designs Blog.
The image was colored with Copic Markers, cut out, and then opposite corners were rounded before distressing the edges with brown ink. The background was made by stamping the Christmas Music Background and then distressing the edges of that as well. Just one of the "Merry Christmas" versions was stamped from the Christmas Multi Greeting at the bottom. I added a red scallop border to the top and then and a thin red ribbon embellished the bottom portion rather nicely. Red and green fishtail banners were added underneath the image for a little balance. I really like how this one turned out. I hope you do too!
Thanks for stopping by!
Smiles,
Jennifer
The colder temps are here and it's time to get out those quilts! And if you're anything thing like me you've also got out your space heaters and hoodie sweat shirts too! LOL! I can't stand the cold and even though I keep my house around 70*, I often use space heaters in the rooms I spend lots of time in, like my stamping room!
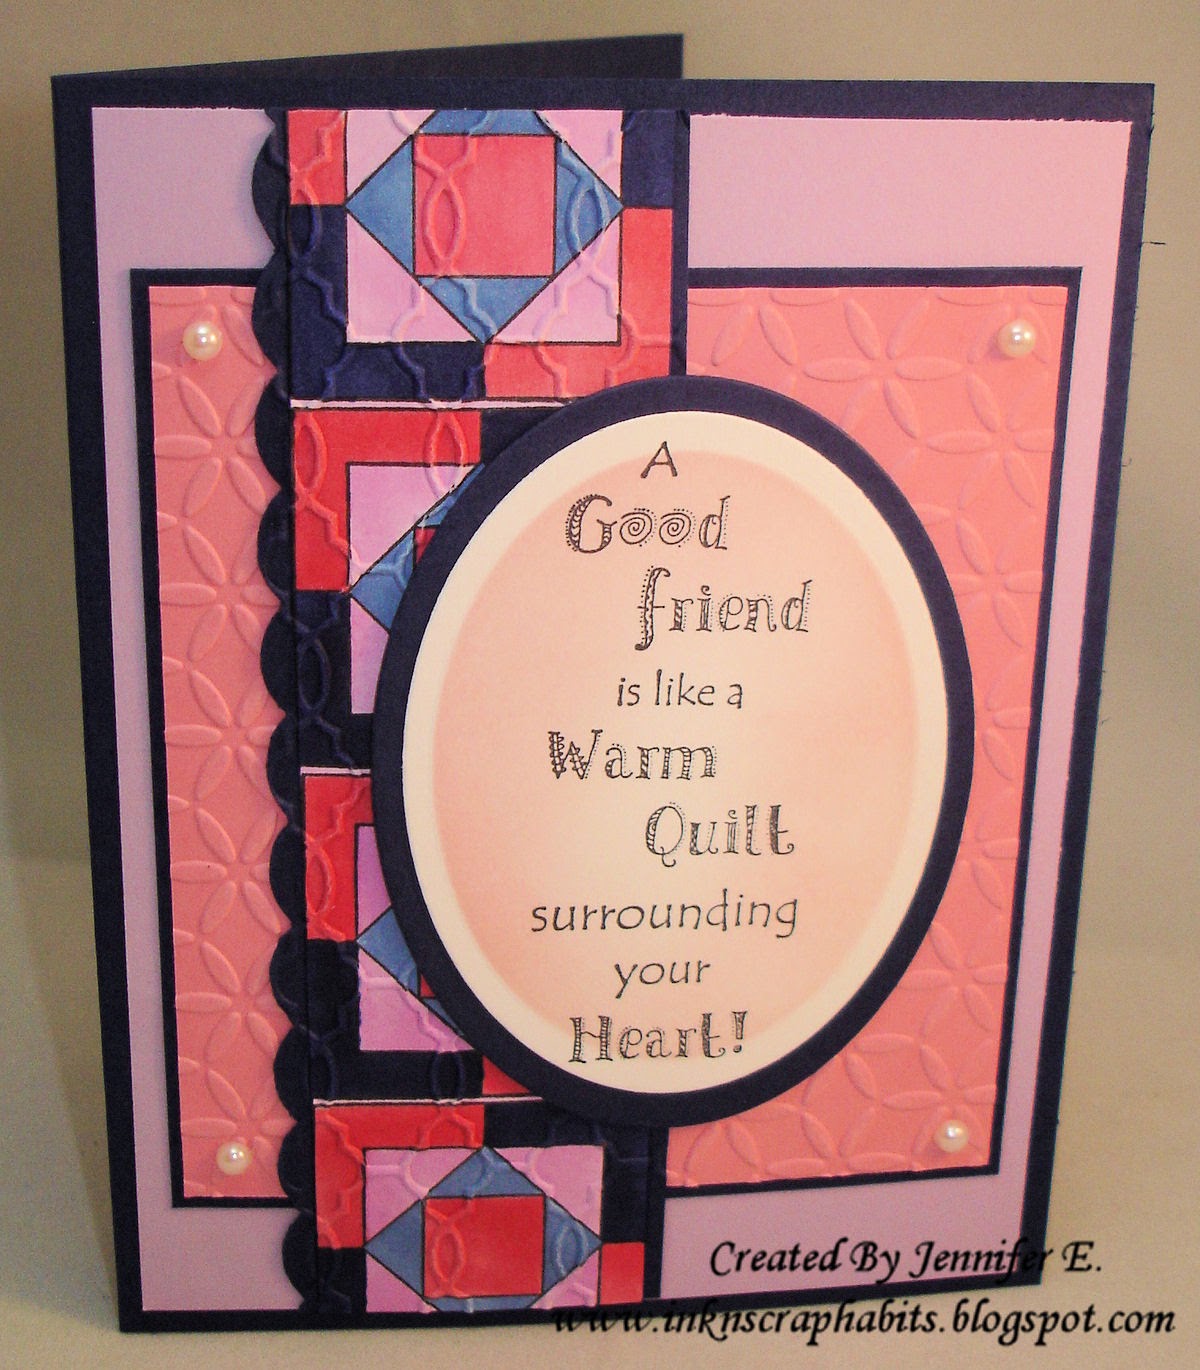
I made this with stamps from DRS Designs. The colorful vertical panel was created using the Designer Quilt Square (166D) which was stamped repeatedly in a vertical line and colored with Copic Markers. Then for added texture, it was embossed with an embossing folder. I used the Good Friend Warm Quilt Greeting (169G) in the center of the card front. It was sponged with light pink ink while still in the Nestability die to create the white frame around it.
I love the way this card turned out. I think the colors are cozy and I sure hope my friend enjoys it!
I hope you all stay warm too!
Thanks for stopping by!
Smiles,
Jennifer
Tis the season for hecticness and it's in full swing for me right now! It's taken me about 5 days to get this post typed up. But, as they say, better late than never...here's my creation for the glitter challenge that was posted on the DRS Designs Blog this past Thursday. Both the image and sentiment are by DRS Designs.
I used the sketch challenge from SC428 to inspire my layout. After stamping the Christmas Village Tree Store (214E), I created a Post-it Note mask for it and stamped the bare trees from the Christmas Village 4 in 1 Accessories #2 (210G) over top of it to create my scene. I colored the image with Copic Markers and applied glitter to all of the snowy areas. I arranged some fishtail banners as shown according to the layout and stamped "Merry Christmas" from the Christmas Multi Greeting (341H) on the largest one. I layered a few snowflake dies and pinned them together with a red brad for the embellishment.
I'm a little behind this year, but I'm happy to report that I have another quick and fairly easy Christmas card under my belt! The creation of this card was fueled by a nice, flavored cup of coffee, which seems to be one of my staples nowadays! The Arctic blast that we had blow through recently has caused nothing but warm and cozy thoughts in my stamping room--I refuse to let this kind of weather bring me down, or tolerate it so early in the season. I see it as the perfect excuse to stay in and stamp. What could be better?
The focal point of this card is the Christmas Village Cabin (212G). I masked it and then stamped the bare trees from the Christmas Village 4 in 1 Accessories #2 (210G) over top of it. I love the way the image turned out, especially once I colored it with Copic markers. It really came to life and reminds me of the cabin friends of ours have, Up North, deep in the woods. It gives me that warm and cozy feeling and because of this, I thought the Simple Joys of Christmas Greeting (957F) was the perfect pair for it. For a little bling, I used Stickles to make the snow and roof tops glisten. This card was simply embellished--2 red brads, a tiny red bow, and a textured card front made this card complete!
Thanks for stopping by!
Stay warm!
Smiles,
Jennifer
Hi Everyone!
I'd like to start today's post by wishing you all a very Happy Thanksgiving! Today is all about celebrating and being thankful for all we have. I am especially thankful for being a part of a very loving family, for having great friends and for being blessed with wonderful children, my health, and a job that helps to support our home. I'm also thankful for being a part of the DRS Designs Design Team and for all of the stress-relief stamping has helped with, LOL!
Well, another week has gone by and a new challenge is posted on the DRS Designs Blog. For their "I Pine For You" Challenge, you are to use any pine image, punch or die cut. I used the Christmas Pine Oval (279L).
I heat embossed it with silver embossing powder, and then matted it with a scallop rectangle cut from metallic silver card stock. The card front was simply embossed with the Swiss Dots embossing folder and the bottom was embellished with white satin ribbon and a snowflake die cut attached with a small silver brad. After adhering the matted image to the upper portion of the card front, I added three fish tail banners to the upper right corner and embellished it with a red and white twine bow. I tried to keep things simple since I really thought the embossed image and metallic card stock really made this card elegant. The card base was created from metallic silver card stock and the finished size is 4.25" x 5.5".
Thanks for stopping by today. I hope you all have a wonderful Thanksgiving!
Smiles,
Jennifer
Hi Friends! Hope your weekend is going well!
I'm taking a break from the craziness of getting my house ready to host Thanksgiving for our family this year. We are expecting about 40 people and I'm sure we will have enough food to feed an army, but that's what the holidays are all about, right? Good company and good food--We have so much to look forward to and to be thankful for!
A color challenge was recently posted over at the DRS Designs blog. It utilizes a poinsettia image with different hues of red and greens for the challenge. Here's my challenge entry depicting Christmas Leonard Pig (709K) in the hustle and bustle of Christmas. I've paired him with one of the new Christmas sayings from DRS Designs most recent release, the O.C.D. Christmas Greeting (183E).

The image was colored with Copic Markers, cut out, and masked. Blue ink was sponged around the edges and the upper portion was masked as well so that when sponge with brown ink it resembles him standing on a floor. I created my own pattern paper by using a portion of the Cut-apart Woven Plaid Stamp (613P). I split up the sentiment into two parts and cut them out with Nestability dies. Blue ink was sponged over top while still in the die and then each one was matted with green card stock cut with a scallop die. My card front was assembled as shown and was simply embellished with only pink grosgrain ribbon tied in a knot.
Well, I'm sure with all that is going on this week I probably won't be on the computer much until after the holiday. I hope you all have a very safe and Happy Thanksgiving full of all your favorite things!
Thanks for stopping by!
Smiles,
Jennifer
Hi Friends!
Today I have a CAS card to share with you to show off the new Lovely Gifts Christmas Greeting (235G) just release from DRS Designs.
I created the card front to resemble a wrapped Christmas gift, to play on the words "present" in this saying. Sorry about the quality of this picture--I used shimmer cardstock for the card front and greeting and it didn't photograph as well as I thought. I no longer have this card in my possession so, unfortunately, this is as good as it gets!
Run over to DRS Designs to see all of their new Christmas stamps HERE, or check out the new challenge on their blog, "Hang It Up" and enter your project for a chance to win stamps from DRS Designs just for free!
Thanks for stopping by!
Smiles,
Jennifer
I feel like everyone often forgets about Thanksgiving and all that we should be thankful for by rushing around making Christmas a 2 month holiday. I understand it's probably hard to do when the stores have Christmas decorations out before Halloween even gets here, but I'm nowhere near decorating my tree or doing anything else Christmas right now. My house is still decorated with sunflowers, pumpkins, orange leaves and other things that celebrate the Fall harvest and Thanksgiving. At the same time though, I understand that since Christmas is such a large holiday, you have to prepare early. As we all know, this is particularly important when hand making your own Christmas cards! The card I'm sharing today was created for this weeks DRS Designs blog challenge "Hang it up." Of course, this doesn't particularly relate to Christmas, since you can hang Fall leaf garland as well, but Christmas decorations were the first thing that came to mind when I read this challenge theme!
My card front began with a white piece of card stock that I sponged with blue ink. Next, I stamped the Cardinal On A Branch (856M) so that only the leaves at the bottom of the stamp were inked to create the Christmas tree border. I colored it with Copic markers and stamped the lower portion of DRS Designs new Lovely Gifts Christmas stamp (235G) at the bottom between the pine needles. The Nativity Ornament (526K) was stamped on another piece of white card stock and colored with Prismacolor pencils. Then it was fussy cut out and adhered in the center of the card front with red ribbon to resemble it hanging on a Christmas tree. A big satin red bow was attached at the top of the ornament and then the card front was matted with pink card stock to match the color scheme. Finally, the card front was attached to an A2 dark green card stock base and my challenge card was complete.
So, how is your house decorated right now? Are you eager to decorate for Christmas or is your house still decorated for the Fall harvest like mine?
Thanks for stopping by and have a great day!
Hi Everyone! Welcome back!
The tricks and treats have passed and now November is here! Can you believe it?!?! This is the time to start thinking about what you will be doing for your holiday cards this year. With that in mind, DRS Designs is getting ready to release new holiday stamps perfect for this occasion. Today I am showing off the new Feeding Reindeer (188F) stamp that will be released very soon. I chose to use him alone on my Christmas card, but he coordinates with the pieces to the Christmas Village.
I colored the Feeding Reindeer with Copic markers, and I cut the card stock around him in the shape of a tag to show it off. I added Stickles for the snow, and sponged light blue ink around the top of the tag for the sky around him. I added different colored cardstock cut on a diagonal to form my card front and in the empty space formed between the 2 red panels I stamped "Merry Christmas" from the Christmas Multi Greeting (341H). The Reindeer tag was embellished with a big red bow and adhered to the card front with foam tape. I hope you like it!
Thanks for stopping by and have a great day!
Smiles,
Jennifer
This weeks challenge on the DRS Designs blog has me thinking outside the box! The challenge is titled, "Just Half." You are to use only half an image/sentiment etc. on your challenge entry. I've never done this before, but I think it's a great idea! Here's what this challenge inspired me to do...
I used a portion of the thread spool image from the Daily Thread Greeting (173E) to create the borders on my card front. All of the spools were colored with Copic Markers. The banner in the center of the card was cut out using a fish tail die and before removing it from the die, I sponged it with light brown ink to create the white border around it. Then after matting it I tied a dark purple ribbon on the left side to embellish it. Fairly simple and way cute, don't you think?
Can I interest you in getting some FREE stamps from DRS Designs? Keep in mind that DRS Designs often has different opportunities for you to win store vouchers and earn free stamps just for playing along in several challenges. Every Thursday, a new challenge is posted on the DRS Designs Blog, and this week DRS Designs is the sponsor over at the Just Inspirational Challenges Blog. Their challenge theme is "Wishes." Think Get Well, birthday, Christmas wishes etc. for this challenge. I hope you get a chance to play along!
Good Luck and have a great day!
A couple weeks ago I created today's card for the DRS Designs "I'm so hungry" blog challenge, but due to a nasty computer virus I was unable to get it uploaded onto my computer to share. I'm glad that's all in the past now because you can only do so much on a smart phone and I'm happy to have my computer back!
When I first sat down to create this card, I really wasn't giving it much thought and as this card progressed it turned out to be a Thanksgiving greeting using non-traditional colors! I really liked the way the olive green, mauve pink, and the yellow color combination came together. I first colored the Indian Corn (151H) with Copic markers. Then, the image was masked and light brown ink was sponged around the image while it was in a Nestability die. On the pink cardstock in the background, I stamped the new Silhouette Cornstalk (179B) repeatedly using Versamark ink to create my own pattern paper. The One Line Thanksgiving Greeting (841D) was stamped above the image, and I used a portion of the new Thank You Lord Greeting (165G) for the sentiment below it. The finished card size measure 4.25" x 5.5" and other than the knot in the ribbon, this card is nice and flat for mailing. Have you made your Thanksgiving greetings to send out yet?
Thanks so much for taking the time out of your busy schedule to stop by today. I appreciate your visit!
The challenge that was recently posted on the DRS Designs blog this past Thursday is to create a project for any Fall holiday. My challenge entry was created with Thanksgiving in mind.
Both the sentiment and the image on this card are by DRS Designs. I started with the Fall Leaf With Acorn (471F) and colored it with Copic markers. I used an oval Nestability die to cut it out, masked it and sponged light brown ink around the image while it was still in the die. I love the nice, clean, framed edge this creates around the image! I think it really helps to make the colors in the image pop! Then I matted it with an orange scallop oval. The vertical panel was started with craft card stock. The upper portion of the Autumn Is Calling Greeting (150F) was stamped at the top with brown ink and an orange ribbon was tied in a knot and wrapped around it. Next, it was matted with brown card stock and then again with orange card stock that had been decorated with a border punch. As you can see the matted image was adhered just off center on the vertical panel. The card base was cut for an A2 size card from dark brown card stock and then the card front was embossed with a leaf embossing folder, and assembled as shown.
Head on over to the DRS Designs blog for all the details regarding this challenge and how you can win a store voucher to shop for free from the DRS Designs online catalog.
Hope you all had a safe and spooky Halloween as well as a relaxing weekend!
Thanks for stopping by!
I'm not sure how you feel, but I think 2014 has flew by way too fast! Maybe it's just because I'm getting older, or maybe because I'm really enjoying life and as they say, "Time flies when your having fun!" Or, maybe it's because I'm the Mother of 2 small children. It makes me so sad seeing my 9 month old son growing so fast. Just after the holidays we will celebrate his first birthday and I just can't believe it! Seems just like yesterday that my Doctor was worried about me going into pre-term labor and his big arrival, 3 weeks early. Despite all of the changes and growth 2014 has brought into my life, I am more Thankful than ever! Thankful for being blessed with a wonderful Husband to share my life with and thankful for our 2 little blessings that help make our lives challenging and fun all at the same time!

In honor of the Thanksgiving season that is right around the corner, the new challenge on the DRS Designs Blog this week is "So Thankful," and this CAS card is my challenge entry. The focal point of this card was stamped with the new Giving Thanks Greeting (160H) and the Simply Pumpkin (304G) was stamped overtop of it using orange ink. I hope you like it!
What are you thankful for this year?
Thanks for stopping by!
Smiles,
Jennifer
Hi Everyone!
Today I'm showing off one of DRS Designs newest Autumn stamps, Indian Corn (151H). Lately, I've been all about diagonals and I've incorporated them into the last few cards I've made-- this one is no exception!

I started by coloring the image with Copic Markers and then fussy cut it out. I used Nestability dies to cut the oval and scalloped pieces of card stock out. The oval was embossed with an embossing folder to add some texture to the card front. I love this look and need to remind myself to do it more often! I think it's unique and it really makes the eyes focus on the image that lays in front of it. For the background, I created my own pattern paper by stamping the Splatter Background (855H) repeatedly using yellow, green, and orange inks to match my color scheme. I also embossed the green strip of cardstock that was used to hide the seam between the 2 background layers. The Small Autumn Greeting sentiment (422B) was stamped just below the divided border with black ink and for the final touch, 3 green rhinestones were placed in the lower right corner of the card front.
Thanks for stopping by. I appreciate your visit!
Gotta love technology these days! It's been about a week without my desktop computer thanks to a virus and some other unwanted programs. It only took me about five days to use the virus scan protection program on our computer to figure out what was wrong and to clear up the problem. I'm glad to be back online without having to squint to see everything on my little phone!
So without having a computer to distract me for the last week, I was actually able to get some stamping done! Here's my latest creation that I made for the latest DRS Designs blog challenge. It's for a color challenge that's perfect for Fall!
I used their new Sunflower Hurricane Candle (167K) as the focal point on this card. I colored it with Copic markers and used a new embossing folder in the background. I still had vellum laying out on my desk from one of the last cards I created and thought it would be perfect to highlight the Brilliant Fall Greeting (502D) on this card as well. Hope you like it!
Thanks for stopping by!
I have a fun post to share with you today! Not only am I showing off what I created for DRS Designs latest blog challenge, but I also get to show off one of their new Fall stamps!
The Autumn Is Calling Greeting (150F) was just released this weekend and is now available for purchase. I stamped it in brown ink and then matted it with dark brown card stock to make it pop. I love the play on words here where the word "falling" is actually falling off the text line.
Interested in seeing what other Fall stamps were included in this release? Check out their new stamp page HERE and/or stay tuned to my blog to see more in the upcoming days!
Thanks for stopping by!
Smiles,
Jennifer
Posted by Jennifer E.
I'm still playing with DRS Designs new Halloween stamps. I can't seem to get enough! Maybe it's the weather or the fact that Autumn is my favorite time of year, but I'm really excited about all I've created recently. On the card I made for today, I'm showing off The Raven (125G) and the Spooky Tree Limb (136F), and with October just days away, I thought it was appropriate to show off the Run In Fear Halloween Greeting (532E) as well.
I added a bit of color to the image using Copic Markers, embellished it using a spider web border punch, an embossing folder, twine, brads, and my favorite Halloween Bat punchies! I even added some extra dimension to this card by popping up the image/greeting panel by adhering it with foam tape.
I hope I've inspired you today to get inky! If Halloween isn't your thing, but Autumn is, check out DRS Designs latest Blog challenge. I promise you won't be disappointed. It's perfect for Fall images and this link has a ton of inspiration too. Give it a try, one lucky winner might just be you!
It's the perfect time of year for the "Leaf It To Me" challenge on the DRS Designs blog this week! It's time to show off all different kinds of leaves, and, best thing about the card I made was that I was able to use a leftover embossed piece from a previous project! Woo hoo, half the work was already done!
The Fall Leaf and Acorn (471F) panel was embossed with copper embossing powder on ivory card stock and then colored with Copic markers. This panel was matted on orange vellum that was cut to size and then embellished with a decorative border punch.
I used copper card stock for my card front and embossed it with a leaf embossing folder. The One Line Beauty of Autumn (704D) Greeting was stamped with brown ink on vellum, decorated with a border punch, and adhered to the bottom of my card front. I embellished it with a spiral clip and brown ribbon. Three brown square Brad's were placed in the upper right corner for the final touch. The card front was then adhered on to an A2 sized ivory cardstock base.
I hope you'll be able to get out this weekend and enjoy the beauty of Autumn! I know I will!
Thanks for stopping by and have a great day!
Smiles,
Jennifer
Has the weather changed already where you live? The Fall-like temps are here and the high temps these days is only about 60*! This kind of weather definitely gets me in the mood for apples, cider, pumpkins and pie! Can't forget the ghosts and goblins too!
This card shows off the new Silhouette Spooky Village (141H) from DRS Designs. I added a bit of color with Copic Markers and then used the Accent Bats (517A) and the Halloween Arc (043E) to complete the scene. The edges were distressed to give it a spooky feel and my focal image was complete. I created the card front using orange cardstock--the top was dry embossed and the bottom was stamped with the Large Original Plaid (641P) maker stamp. I layered it with yellow cardstock and then with a back panel that was adhered with a single yellow brad at each end. The stamped image was adhered in place as shown and then the card front was adhered to a black cardstock base. Finished card size is 5.5" x 4.25."
Thanks for stopping by and have a great day!
Smiles,
Jennifer
Here is the card I made for my challenge entry, "Happy Fall Y'all!"
I created this as a note card which measures 3.5" x 5". The card base and card front was made using Ivory card stock. I stamped the Medium Silhouette Fall Leaf (701D), the Fall Leaf and Acorn (471F) and the Open Leaf (584D) randomly with Versamark ink and heat embossed them using clear embossing powder. Then I sponged a combination of yellow, orange and blue ink over top. Boy, did that make the Fall images stand out! Next, the Happy Fall Y'all (635B) sentiment was stamped with brown ink and an orange ribbon was tied in a knot at the bottom.
Hope you're enjoying the change of seasons as much as I am!
Thanks for droppin' in today!
I love when challenges force me to do things that I wouldn't normally do, or things that I've forgotten to do. Although, I guess that's what makes a challenge, a challenge! The latest challenge on the DRS Designs blog challenges you to use knots. Below is the card I created for this challenge, and it allowed me to look at my embellishments and use a spiral clip to add the knot to my card front. I haven't use spiral clips in forever! DRS Designs is also the current sponsor over at the Loves To Scrap Challenge Blog. I am entering this card into their "Anything Goes Challenge"[ as well. Interested in playing along in their challenge? You could win a $10 store voucher to get free stamps from DRS Designs online catalog.
I am still playing around with the new Halloween stamps I received from DRS Designs. I used the Silhouette Spooky Village (141H) as my focal image and distressed the edges with black ink to give it a spooky feel. I used Copic Markers to fill in the windows and color the moon. The Accent Bats (517A) were stamped to make my own pattern paper on one of the vertical panels, and the Large Original Plaid Maker (P641) was used to create the other one. The Halloween Arc (043E) was stamped so that it curved around the image in the background.
I hope you'll take this opportunity to check out both of these challenges and enter them if you're able for a chance to win free stamps from DRS Designs!
Good Luck!
I can't believe that it's September already, can you?!? Hardly seems like Summer has even started yet and it will be October and time for pumpkins before we know it! I admit though, a small part of me is almost giddy that Autumn is near. It's my favorite season! I'm in love with the new Halloween stamps that DRS Designs has just released and nothing gets you ready for the next season like stamping up cards for it. I've been inking them every chance I get!
I colored the image with Copic Markers and sponged green ink around it while it was in a Nestie die. Using the Out-Of-The-Box Technique allowed me to use a smaller die that looked better with my layout--that's why the broom is hanging out of the oval shape a bit. As you can see I split up the greeting above and below my image and three bat punchies embellished this card nicely. A white gel pen gave them eyes and made them creepy. It's almost like they're looking at you! Hope you like it!
Thanks for stopping here today. I appreciate your visit!
Smiles,
Jennifer
Hi Everybody!
Does my title have you curious?
Well, now that it's September, it will be time for the ghosts and goblins to come out soon and DRS Designs is getting ready with some awesome new Halloween stamps! They are now available for purchase and the one seen below is Count Porkula (134D)! How cute is he?!?!?!? Leonard Pig is all dressed up for Halloween and he even has his Trick-orTreat bag!
I used him as the focal point on my card below for this weeks DRS Designs blog challenge. The theme is to use gems or sequins on your project! Not a real challenge for me lately as I seem to be using gems all the time.
I made my own pattern paper by stamping the Accent Bats (517A) repeatedly on the bright green card stock. I trimmed it with gray card stock and then added a spiderweb border and black card stock to both ends. Count Porkula was colored with Copic Markers, matted with a pink scallop rectangle and adhered in the center of the card stock. Next, I used a die to cut out the bright green banner and then stamped it with the Tiny Happy Halloween (938A) greeting. I added a bit of spider web to it to match the pattern paper at the bottom before adhering it in place as shown. Finally, I added 3 green gems at the bottom right side of the card front and my card was complete!
Thanks for stopping by!
Smiles,
Jennifer
It's Thursday again and there's a new challenge posted on the DRS Designs site today! I'm excited about this one because the theme is "It Gives Me The Creeps," and it is the perfect opportunity to show off some of their new Halloween stamps!
One of these stamps is the new Raven (125G) and to me it is the perfect definition of creepy! If you look close, it has a very evil eye! Eeek!
There wasn't much coloring to this image. I used Copic markers to color in the tree branch, the birds feet, and beak. Once I trimmed down the image to fit the size of my card, I distressed it with black ink to give it a spooky feel. I trimmed it in orange card stock at the top, and added a decorative border made from black card stock on the bottom. Orange gems decorated it nicely, and I hid the seam with an orange ribbon. I stamped the Accent Bats (517A) in two places around the image and then added 2 bat punchies which made it complete. Next, I created the card base from gray card stock and distressed it with black ink as well. I stamped the Halloween Arc (043E) at the top and randomly placed more of the Accent Bats over the entire card front. Then, I added a little texture by running it through the paper crimper. Then, the decorated image was adhered in place as shown, and a final bat punchie was placed at the bottom of the card front.
We hope you're in a creepy mood and excited to get out your Halloween stamps as well. Want to play along? Please see all of the details for this creepy challenge HERE. We'd love for you to be the winner of the next prize given away for free from DRS Designs!
Thanks for stopping by!
Smiles,
Jennifer
Just the other day, one of my friends posted on Facebook that there are only about 17 Fridays left until Christmas!! Can you believe that? I know it's right around the corner, but in that perspective it makes it seem like it will be here so much quicker!
To make light of the situation I created this comical Christmas card--one that all of us stampers can most likely relate to. Isn't it true that buying stamping and crafting supplies can really make you feel like you're dashing through the dough?? I really like this card because it's perfect to send to a fellow stamper who you know could appreciate the humor!
Here are some of the details on how I created it:
All of the stamps I used are by DRS Designs. The Christmas Village Craft Store (101D) was stamped, colored with Copics, die cut and then sponged with blue ink for the sky. Glitter was added to the snow caps on the building and the ground. The Flying Cash (547F) was stamped repeatedly and colored with Copics as well to create the background. The card front was stamped with the Dashing Through The Dough (545D) sentiment before embossing it for some added texture. Once all of the pieces were assembled as shown, I added a green bow and several small pearls to embellish it perfectly.
Well, regardless of how many days are left until Christmas, I hope you've been inspired by all of the Christmas cards you've seen here lately and that you've enjoyed today's post. Are you making your Christmas cards already?
Thanks for stopping by and have a great day!!
Smiles,
Jennifer