Welcome to Ink N Scrap Habits!

I've created this blog to share my life & love of paper crafts with others. You will read bits and pieces of what goes on in my world and be able to see my paper craft creations! Please leave me a comment if you see something you like. I'd love to hear from you!

Showing posts with label butterflies. Show all posts

Thursday, May 28, 2015

Wings Of A Butterfly

Happy Thursday Everyone!
The new challenge this week on the DRS Designs blog is as Easy As 1-2-3!
You are to use one of something, 2 of something else, and 3 of another item. Here's the card I submitted for this challenge.

I used 1 butterfly, 2 rhinestones, and 3 scalloped borders. 
 
 
The Large Single Butterfly (192G) was colored with Copic Markers and then fussy cut out.  I double layered my card front and used a Nestability die to cut out the circle in the top panel.  I embossed the bottom and then adhered the layered scalloped panels in place, and embellished it with silver ribbon. The Butterfly Kisses Greeting (399G) was stamped at the top.  The top layer of the card front was adhered onto pale violet cardstock and then adhered onto a dark purple cardstock base.  The butterfly was adhered in place in the cut-out circle with glue dots so that the wings were extended up from the card front making it 3D. 

Click on this link to find the details for this Easy challenge and link your entry today for a great prize from DRS Designs!

Hope you have a great day!
 
 
Smiles,
Jennifer

Monday, September 30, 2013

Autumn Butterfly Birthday

While hopping around blogland lately, I've seen alot of framing done lately.  I really like the look, so I decided to give it a try. Here's my take on a framed card and another use for those awesome Butterfly Ribbon Slides (681D).

I started first by cutting my card front from peach colored card stock. I inked the edges with orange ink, used a decorative border punch for the left side and then a corner punch on the right 2 corners.  I used Nestibility dies to create the hole in the center for my frame.  I stamped "As Another Year Flies By" (489F)  at the top of the card front and then ran it through the Swiss Dots embossing folder.  I added some orange ribbon to the the left side and decorated the left side of the frame with Prima flowers and brads.  I stamped the Butterfly ribbon slide twice, colored both with Copic Markers and fussy cut them out. I attached them by layering them and then adding 3 black brads to the body. All of this completed the frame card front.


The center of the frame was created by stamping a panel of peach cardstock with the Silhouette Butterfly Background (536H) using Versamark ink. Then I heat embossed it with black sparkle embossing powder and attached it to the center of a black cardstock base.  

My final step was to attached the card front to the base using foam tape to create the frame depth. Wouldn't this be great for a Fall birthday? I guess I have my Aunt's October birthday card already finished! Yeah! 

Thanks for stopping by. I hope you'll be back soon!

Smiles,
Jennifer

Thursday, July 11, 2013

Happiness

Whenever I make cards with butterflies they always tend to be blue or purple. Not really sure why, but as you can see today's card is no exception. I made this for the Monochromatic challenge that can be found on the DRS Designs Blog this week.


This layout is pretty simple and because I'm running short on time today, I'm not going to go into depth about the layout construction. But, if you have a question about please feel free to contact me-I'd be glad to explain it for you.  

As for some of the not so obvious details...

  • The silhouette Butterfly Background was stamped with Versamark ink.
  • The Single Flying Butterfly was stamped, colored with Copic Markers and cut out twice.  The wing in the foreground was adhered with foam tape for dimension.  
  • The banner that the Happy Thoughts Greeting was stamped on was also added with foam tape and it is embellished with a purple button threaded with twine tied in a bow.
  • 2 medium-sized pearls were added to the upper right corner for balance and a touch of elegance.
Hope you enjoyed seeing this today! 
Thanks for stopping by!

Smiles,
Jennifer

Thursday, May 2, 2013

Butterflies

Things have gotten so crazy lately that I don't know if I'm coming or going, so there hasn't been much stamping time. The small blocks of time that I do have I've been using as stress relievers and I've tried to come up with some CAS cards. I'm happy to be able to show you some of them today! These cards were made with the DRS Designs butterfly challenge in mind and for some swaps that I'm in--I thought it would be best to try to maximize my time and "kill 2 birds with one stone" as they say.


These are 3.5" x 5" note cards. As you can see I stamped the Textured Butterfly (985E) randomly with different combinations of ink for each card. The center butterfly was embellished with pearls or matching rhinestones and the Butterfly Greeting (349F) was stamped at the bottom of each card front. I used foam tape to adhere each front to the same color cardstock base. The extra dimension and butterfly body embellishments really give these cards some simple elegance.


The best part is that these all-occasion cards could be used for any purpose. I've even used this design for birthday and sympathy cards as well, just by changing the greeting! 
I love that!

I hope I've inspired you today!
Thanks for stopping by! 

Smiles,
Jennifer

Sunday, May 13, 2012

On Mother's Day!

Happy Mother's Day to all you Mom's out there! I hope you are having a wonderful day! 


I created this Mother's Day Gift Card Holder a few weeks ago during my girls weekend, but didn't want to show it until I gave it to my Mom.  Way back in the day I posted the tutorial for these gift card holders and you can find it HERE.  All of the stamps seen on this project are by DRS Designs


I used the Flower and Butterfly Address Frame (002K) to decorate the front.  Nice thing about this stamp is how versatile it is.  You can use it as I've done here or use it as a true address frame for a return address or even to decorate an envelope with the recipient's address.  


I colored it with Copic Markers and then cut it out including the center.  I stamped the "On Mother's Day Greeting (035D)" on light purple cardstock and then used foam tape to adhere the address frame over top so that the wording was centered in the frame. The added dimension really makes the frame stand out.


This is how it looks when opened.  I stamped it with the Script Gift Card Greeting (013D) and then hand wrote my personal message below it.  I hope Mom enjoys the Amazon Gift Card I bought her! :-)

Smiles, 
Jennifer

Friday, April 6, 2012

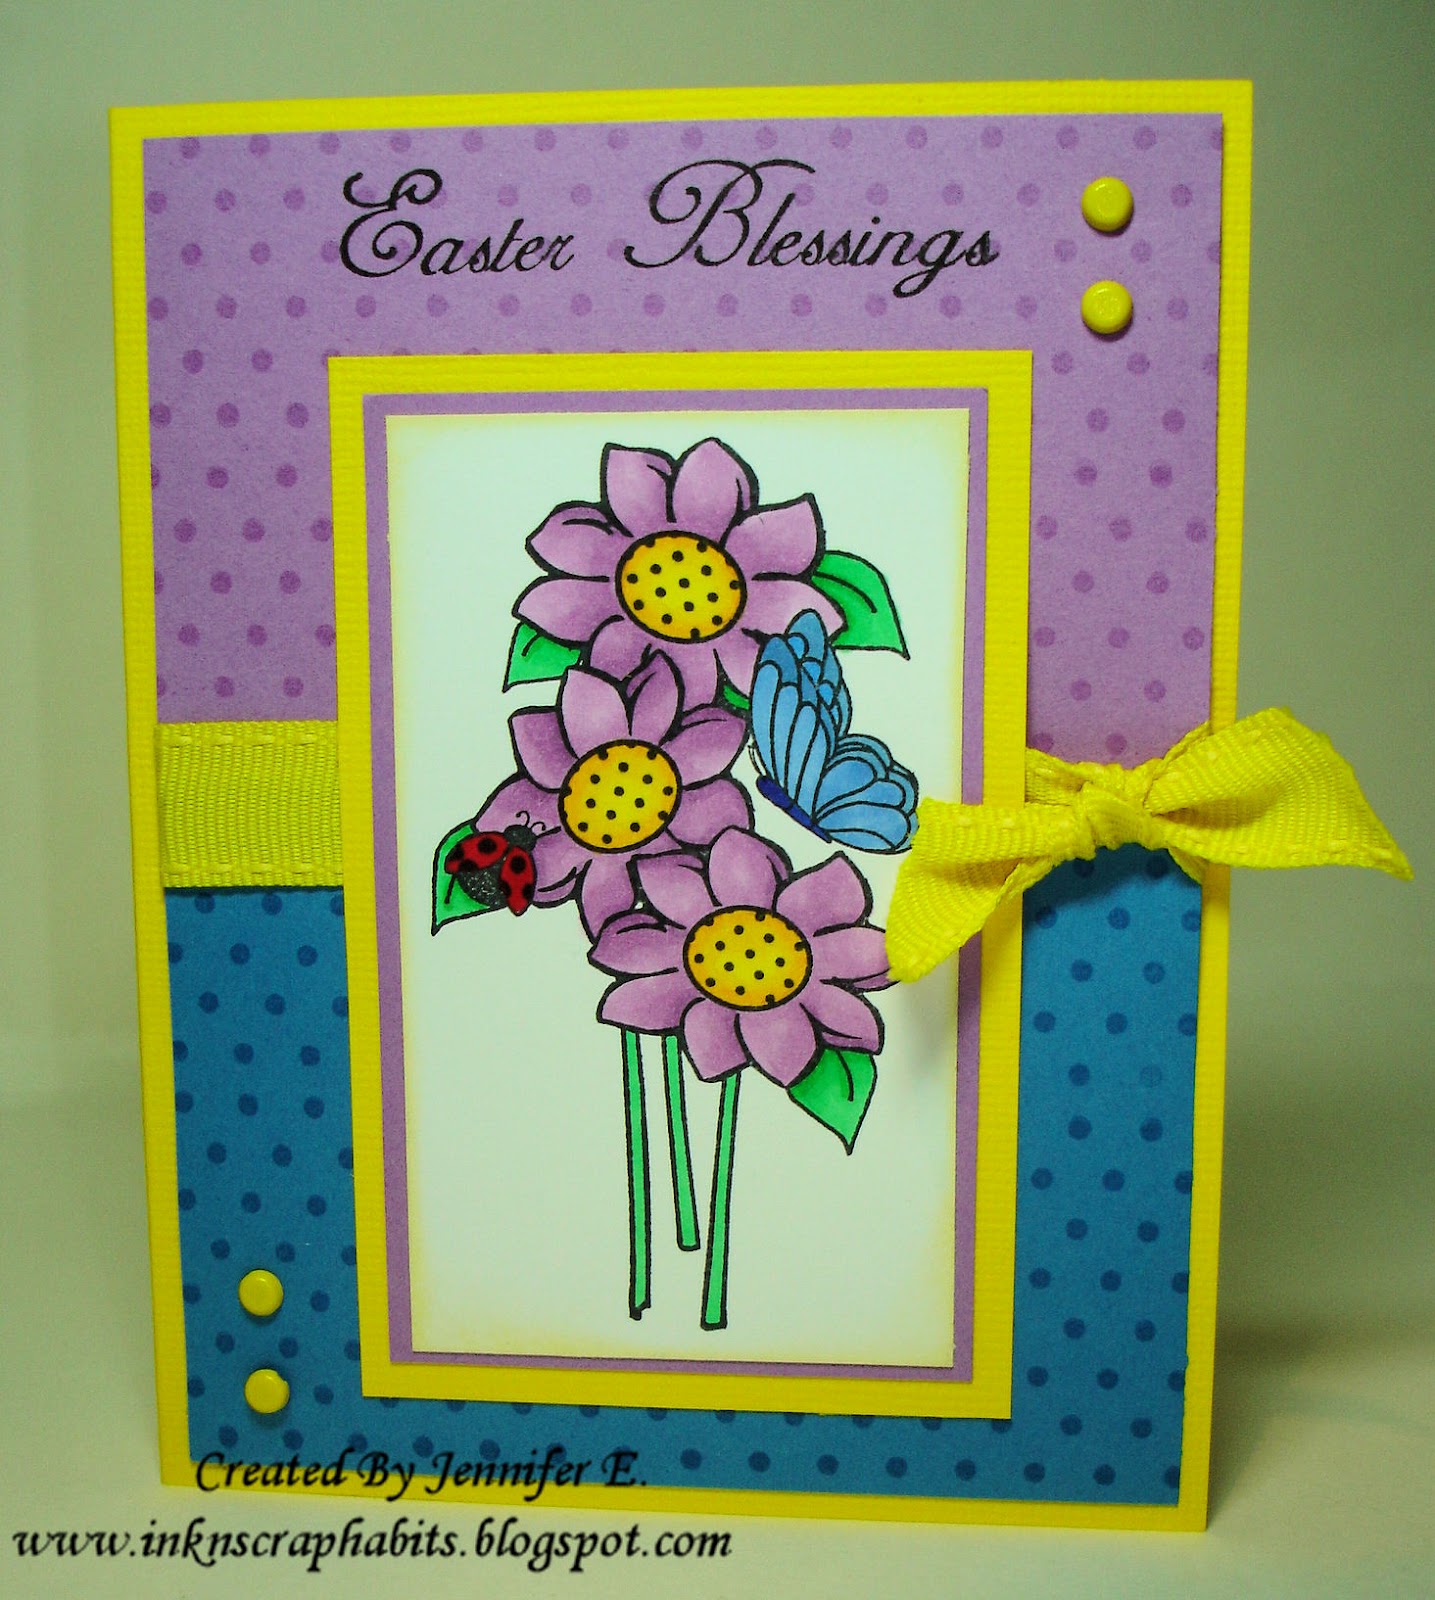
Easter Blessings

Lucky for me (and you!), I just realized that I have a bunch of cards that have not been shown on my blog yet. I'm going to try and get them all posted for you soon. I have one of them to share with you today. 


All of the stamps used to make this Easter Blessings card are by DRS Designs. I often think of purple and yellow as Easter colors, so those are the Copic colors I used on this Polka Dot Flower image (1036K).


I also used the Polka Dot Background stamp (688P) on this card to make my own coordinating pattern papers. I stamped it with Versamark ink on purple and blue smooth cardstock. The Easter Blessings Sentiment (1029D) stamped at the top is one of my favorite Easter stamps. I love the font and think it gives an elegant feel to any project.


Since the polka dots keep this card pretty busy, I kept the embellishments simple. The polka dot papers were separated by a band of wide yellow ribbon tied in a knot, and a couple yellow brads filled in the empty space in the upper right and lower left corners of my card front.

I hope you've enjoyed seeing this card and I hope you have a wonderful and blessed Easter.
Thanks for stopping by!

Smiles,
Jennifer

Thursday, March 22, 2012

Happy Thoughts

Spring has Sprung and to celebrate the theme this week for the DRS Designs Blog Challenge is Butterflies. Here's my challenge entry. I've combined this with this week's SCS sketch challenge SC377 for the layout.


All stamps on this card are by DRS Designs. I started by coloring the Daffodil Butterfly Circle (1073L) with Copic Markers. I used this as the focal point on my card front, and by doing so, I changed the SCS sketch to accommodate a circle rather than an oval. The blue background panel was stamped with the Three Butterflies (744F) with Versamark ink, and I added the Happy Thoughts Greeting (951D) with onyx Versafine ink. The pink panels were embossed with the Swiss Dots embossing folder and purple and pink ribbon were used for the horizontal panel in the sketch.


I love the colors on this card and I think they are perfect for Spring! Are you as excited as I am that Winter's over!? With all of the bright and sunny days we've had this week, Spring is off to a great start! I hope yours is too, Enjoy!

Smiles, 
Jennifer

Sunday, March 4, 2012

Easter Blessings Butterfly


Now that Lent is upon us, it's time to start those Easter cards.  Here's one of my first for this year using a new image called the Daffodil Butterfly Circle (1073L).  This image was fun to color.  I used Copic Markers and I also used twine to dress up this layout rather than ribbon.  It was a nice change and I love how it pulls all the colors together.  I added a self-adhesive pearl on either side of the Easter Blessings Sentiment (1029D)


In case you need a bit of inspiration to get you started on your Easter cards, take a look at the Easter stamps by DRS Designs or check out all of the Easter cards made by their Design Team in the DRS Designs Card Gallery.  I'm sure you'll find something to jump start your mojo! 


Have a great day!

Smiles,
Jennifer

Friday, September 2, 2011

Butterfly Take 3!

If you're a regular follower of my blog than you've probably read my post from last week explaining my latest love of the Butterfly Ribbon Slides from DRS Designs. Here's another take using them.   


For this Birthday card, I stamped the Polka Dot Background (688P) to create my own patterned paper.  I stamped the butterfly twice and colored it with Copic Markers and then cut each one out.  I layered one on top of the other and attached them together using 3 black brads.  I love how the brads make it look like the butterfly's body.  Then I just bent up the wings of the top butterfly to give it a 3D look.  The Another Year Flies By sentiment (489F) is perfect for a card like this with these layered butterflies, I couldn't help but use it again!

If you missed the yellow and blue butterflies, please make sure to check them out.  I promise you won't be disappointed!  Stay tuned, I still have one more set of the Butterfly Ribbon Slide to show off and it will be here soon!

Hope you all have a wonderful weekend!
Thanks for stopping by!

Smiles,
Jennifer

Wednesday, August 31, 2011

Get Well Soon

A few weekends ago I went to the Stamping and Paper Arts Festival in Novi, Michigan put on by Heirloom Productions.  I met up with Sue from DRS Designs and helped with the Make n' Take project, which was a lot of fun.  I also walked around gathering ideas and doing lots of shopping myself!  One of the projects I was inspired by was stamping on vellum, coloring the image with water color pencils and blending the colors with a Dove Blender Pen.  Last year at the show I bought a package of vellum that I had yet to use, until now! It was a nice change to use something other than my Copic Markers. 
Here's my card using this technique. 


I created this Get Well card using stamps from DRS Designs.  I first stamped the Daffodil Frame image (104P) with Versamark ink and then heat embossed it using Black Sparkle Embossing powder.  Next I used Watercolor EcoPencils by Faber-Castell to color in the image and then used my new Dove Blender pen to blend the colors. I adhered the image to white cardstock, cut it out, and matted it as shown. 


The background was stamped with the Polka Dot Background stamp (688P) with Versamark ink and I used "Get Well Soon" from the Blooming with Good Health Greeting (055G).  I simply embellished this card using a few brads and a turquoise organza ribbon to match.    I love the way the image looks a bit like stained glass.  I hope you like how this card turned out, I do!

Thanks for stopping by and have a wonderful day!
Smiles,
Jennifer

Thursday, August 18, 2011

Butterfly Happiness!

Back in June when I created this Butterfly Birthday card for DRS Designs Give Away, I went on a butterfly frenzy and colored up a whole bunch of Butterfly Ribbon Slides (681D).  In the midst of transforming my stamping room to the baby's nursery, I misplaced the envelope with all the butterflies in it and guess what I found just the other day?!?!?  So, needless to say, I've drawn up a bunch of card sketches so that I can use them up.  I hope you like these butterflies as much as I do, cause I'm going to be showing them off a lot in the next few weeks!  I wouldn't want you to get bored seeing them though, so don't worry, they are all different colors! ;-)

I put the yellow one to use using this weeks Splitcoast Sketch challenge #346


I used the Happiness Butterfly Greeting (222G) as my focal point.  I cut it out using a Nestability die and inked the edges yellow before taking it out of the die.  The white panel I used in the background for the card front was stamped using the Silhouette Butterfly Background (536H). I heat embossed it using Diamonds and Pearls Embossing powder.  The Polka Dot panel was also stamped using DRS Designs Polka Dot Background stamp (688P).  Some black grosgrain ribbon added a nice touch to this panel. 


As the final step I cut out 2 of the yellow Butterfly Ribbon Slides and attached them with 3 black brads and then adhered it to the card front as shown.  I love the 3D effect that makes the butterfly look as if it's flying! 

Thanks for stopping by and stay tuned to see more butterfly goodness coming soon!

Smiles,
Jennifer

Friday, July 22, 2011

As Another Year Flies By!

Did you know DRS Designs has stamps for your envelopes too? Check out the Envelope Art section of the catalog to see their address labels and postage frames.  Here's a birthday card I made using one of the postage frames. 

I've used the Butterfly Vine as the focal point on my card front and added the Butterfly Ribbon Slide (681D) to the postage/photo area.  Both were colored with Copic Markers.  I stamped, cut out, and colored 2 of the butterflies and overlapped them.  I added 3 brads to the butterfly bodies to hold them together and adhered them in place to give the illusion of a "flying" butterfly.


The card front was stamped with the "Another Year Flies By" Greeting (489F) that I split up to fit my layout.  An embossing folder, a decorative border punch and some rhinestones created a very elegant birthday card.  Wouldn't you agree?
Hope you all have a great day!

Smiles,
Jennifer

Wednesday, April 20, 2011

As another year flies by...

...It is so true..."All Good Things Must Come To An End!"  This past week I got together with 12 friends from the Stamp-Shack at the Potawatami Inn in Indiana.  This is an annual get together we've titled Shackapalooza!  We rented out a conference room for 4 days and stamped away our long weekend.  We had a blast!  It's amazing how you can spend 13+ hours in a conference room for 4 days and not get bored!  It goes by with a blink of an eye!  There's nothing like spending time with good friends stamping, eating, chatting, laughing and enabling one another!  I wish we could get together more often, but as this years' event has flown by, I'm definitely looking forward to our next Shackapalooza in April of 2012!

One of the things I planned for this stamping weekend was to try a few techniques I'd seen on Splitcoast stampers and give them a try.  One of them was the Faux Silk technique and this is the card I made using it.  What do you think?

I stamped DRS Designs new Three Butterflies stamp (744F) repeatedly on tissue paper and then lightly colored them with Copic Markers.  Then, as per the tutorial, I crumbled up the tissue paper, smoothed it out and adhered it to white cardstock to create the background.  The Another Year Flies By sentiment (489F) is also by DRS Designs.  How do you like that rosette embellishment?  I was enabled by Chelsea over the weekend with her new Tim Holtz dies that I used to make it.  I used a light blue button and some bakers twine to finish the flower and dark pink rhinestones outlined the border nicely!  

Hope you like it!
Smiles,
Jennifer

Monday, June 29, 2009

DRS Designs Dazzling Diamond Dust Challenge

How's that for a tongue twister title! Today begins the DRS Designs 24th blog challenge which is to use the dazzling diamond dust technique as a focal image. This is such a cool technique and really takes no time at all.


I created this Butterfly Birthday card using a modified version of the Dazzling Diamond Dust technique. I don't own iridescent embossing powder and with money being tight, I can't justify buying it right now--It's always good to have alternative ways of achieving a similar look too, so, here's what I did...

Just like anything that shimmers and shines & is full of glitz and glamor, trying to capture what it looks like in real life can be a challenge. So, enjoy all of the pictures I have for you today!

I recently found the instructions to the White Outline Technique while blog hopping and thought it was perfect to help me achieve my modified Dazzling Diamond Dust appearance. First, I heat embossed the sentiment with clear embossing powder on glossy cardstock. Then, I used alcohol inks to create the background in Carmel, Terra Cotta, and Gold. The gold really gave it that shimmery look. I made sure to ink right over the embossed sentiment as well. Next, I laid a piece of white computer paper over the sentiment and used a clothing iron to re-melt the embossed area, which was absorbed by the paper--no residue got on my iron (Thankfully, as I was a little worried I might ruin my good iron!) I took this technique one step further by spraying it with Iridescent Gold Glimmer Mist to add a fine glimmer on top of the gold that was already in the background.

The layout I used is based on CPS Sketch 121 from last week. The flower butterfly was stamped using the Rock N Roll technique--SU! really Rust in the middle and Pumpkin Pie along the edges. I cut it out from white cardstock and matted it as shown using mats cut from my Nesties.

I think the White Outline Technique is unique, especially here, how I've used it for my sentiment . You don't see white sentiments very often! If you click on either of these pictures you can really see the "Diamond Dust" look in and around the sentiment and on the butterfly.


Stamps: DRS Designs- Flower Butterfly (H056), Flitter Flutter Birthday (G604)
Ink: Rubber Stampede Embossing Ink, SU! Pumpkin Pie, Really Rust
Paper: Smooth white cardstock, Glossy White Cardstock, Colored Cardstock by American Crafts, Gold Bazzill Cardstock
Accessories: Nesties, Alcohol Inks, Ribbon by Bobbie M. Designs, Brads by The Paper Studio, Tattered Angles Glimmer Mist in Iridescent Gold
Finished Card Size: 4.75" x 7"

So, do you have what it takes to create a Diamond Dazzling Dust project, or will you have to modify it like me? Either way, the DRS Designs DT would love for you to participate in this challenge. Just post a direct link to your creation in the comment section of the Challenge #24 post on the DRS Designs blog and if you upload to a public gallery, please use the keyword DRSC24.

************************

One last thing!!! Be sure to stop by The Pink Elephant Challenge blog starting today thru Sunday. DRS Designs will be sponsoring the current challenge - check out the details at The Pink Elephant on how you might be able to win some DRS Designs stamps!!
*************************


Thanks for visiting today! I hope your day is great!

Smiles,
Jennifer

Sunday, June 7, 2009

CPS119-Butterfly Graduation Card!


Up bright & early today for no apparent reason and I've decided to make use of the time and get a creatin'! I've used this week's CPS sketch 119 to create a non-traditional Graduation card.


I chose to use the DRS Designs floral butterfly image to not only create this card according to the sketch, literally, but also because butterflies are a symbol of change, joy, color, and transformation. Isn't this what graduation is all about as well? Graduation is a major change and it's the beginning of a huge transformation in someone's life, bringing on a whole new level of responsibility. It's also about following your dreams and doing what you aspire.

I used the Rock N Roll technique on this butterfly image, but the difference in pink inks that I used is subtle that it's had to tell. I spiced it up a bit by adding pink and white Stickles to each flower and petal in the image.

I thought this DRS Designs sentiment went perfect with the butterfly image and all it's symbolism. Wouldn't you agree?


Stamps: DRS Designs- Go Confidently Greeting (H965), Flower Butterfly (H056)
Ink: Versafine Onyx Black, SU! Pixie Pink, Pink Passion, Summer Sun, More Mustard, and Only Orange
Paper: Smooth white cardstock by Office Depot, Colored Cardstock by The Paper Company, American Crafts
Accessories: Nesties, Sponge Daubers, white brads by American Crafts, colored brads by Queen and Company, Notched Corner Punch, Ribbon unknown, Stickles
Finished Card Size: 4.75" x 7.5"


Thanks for visiting today.

Hope your having a wonderful weekend!

Smiles,
Jennifer

Monday, May 18, 2009

DRS Designs Flap Card Challenge

Today begins a new challenge on the DRS Designs Blog! The Designs Team was challenged to make flap cards this week. You can find the tutorial from Splitcoast Stampers here. We would love for you to play along...leave a comment on the DRS Designs Blog Challenge #21 post with a direct link to your creation so we can check it out. If you upload to a public gallery, please use the keyword DRSC21.


For this challenge I made a Butterfly Birthday flap card.


I started this project by stamping and coloring the butterfly ribbon slide image twice with markers. Then, I cut one of them out with scissors and used a circle Nestie die to cut out the other. I layered them and used 3 black brads to attach them and create the butterfly "body." I bent up the wings of the top butterfly for some dimension and for the look like it was flying. Then, I matted it again with a red scalloped circle.


I followed the tutorial on Splitcoast Stampers, and created my card base from black cardstock, using my largest scalloped Nestie to trim the "flap." I adhered the matted butterfly to the center of the flap and then matted it again with a larger white scalloped circle, that was put behind the black flap.


I decorated the front by layering it with red cardstock that was stamped with the Lots of Lines background stamp, which added just the right amount of texture to the front of the card. I tied a small black and white plaid ribbon to the bottom and layered it with the Happy Birthday sentiment stamp that I punched out and matted with the SU! Word Window Punch.

Since there was so much going on, on the outside of the card I decided to keep things pretty simple on the inside. I stamped the Flitter, Flutter Butterfly sentiment in red ink on white cardstock, cut it out with my Nesties, and layered it with a panel of red cardstock that was decorated with a border punch.

Stamps: DRS Designs- Butterfly Ribbon Slide (D681), Lots of Lines Background (H366), 1 Line Happy Birthday Sentiment (B250), Flitter Flutter Birthday Greeting (G604)
Ink: Versafine Onyx Black, SU! Real Red
Paper: Smooth white cardstock by Office Depot, Colored Cardstock by American Crafts
Accessories: Bic Markers, Nesties, Ribbon by The Paper Studio, SU! Word Window Punch, Brads by Joann's Scrap Essentials, Fiskars Treading Water Border Punch
Finished Card Size: 4" x 4 1/8" folded, 4" x 11 1/4" open


I had a lot of fun making this card. I love how it's different from the regular cards I make, yet simple & easy enough to do more often! This kind of card would make a great gift card holder as well by using the bottom flap as a pocket.

I hope you enjoyed seeing my challenge card today. I appreciate your visit.

Hope you have a wonderful Monday!


Smiles,
Jennifer

Thursday, April 9, 2009

Flitter, Flutter, Glide...

...a Butterfly at Play!


Have you noticed how popular butterflies are right now in the paper crafting world? I'm seeing butterflies everywhere-blogs, card galleries, scrapbook pages, altered items etc.! Perhaps we all have Spring fever!


Well, I've joined the butterfly bandwagon and put this new sentiment from DRS Designs and their Butterfly ribbon slide image to use.


Instead of using the ribbon slide as a ribbon slide, I added 3 black brads where the ribbon would "slide" through the paper. I like the look of the brads, as it gives a sense of them having an actual body! Plus, by bending up the paper, held in place by the brad "wings" it actually looks like the butterflies have landed strategically on this card.


Stamps: DRS Designs- Flitter, Flutter Butterfly Greeting, Butterfly Ribbon Slide
Ink: Versafine Onyx Black, SU! Rose Red
Paper: Smooth white cardstock by Office Depot, Colored Cardstock by American Crafts
Accessories: Prismacolor Pencils, Brads by Joann's Scrap Essentials, Martha Stewart Zig Zag border Punch, Ribbon by The Paper Studio
Finished Card Size: 5" x 5.75"


Have you joined the butterfly bandwagon?

Hope you have a wonderful Thursday (just try to forget about the full moon!)

Smiles,
Jennifer

Wednesday, January 14, 2009

CPS Sketch Challenge


I've about had it with the freezing cold temperatures and snow here in Michigan. Now that the Holidays are over, I'm ready for Spring and Summer! With thoughts of warmer weather stuck in my head, I created this card for this week's CPS Sketch, sponsored by DRS Designs. Unfortunately, I don't have my own sketch challenge for you to see, but that will continue again next Wednesday.


I colored the main image and the butterflies with pencils, and shaded the background behind the flowers with blue chalk. Then, I went on a 3D-frenzy and colored the entire image several times in order to mount all 3 flower blooms and all 4 butterlies on foam tape! That turned out to be a bigger job than I thought, but so very worth it for the final outcome!


Stamps: DRS Designs- Framed Daffodil
Ink: Versafine Onyx Black, Colorbox Fluid Chalk Ink
Paper: Smooth white cardstock by Office Depot, Colored Cardstock by The Paper Company and Bazzill
Accessories: Prismacolor Pencils, Gamsol, Brads by Recollections, Chalk by Inkadinkado, 3d-Dots, Nesties, Dashes, Dots, and Checks Ribbon by Michael's
Finished Card Size: 5.5" x 6.25"


Hopefully you have a chance to participate with this CPS sketch challenge. If you do, please post a link to your card on this post from the CPS blog by Friday at Noon to be eligible to have your name entered into a random drawing to win something great from DRS Designs!

How cool is that?


I can't wait to see your project!

Happy Stamping!


Smiles,
Jennifer
PS: Don't forget DRS Designs has another Blog Candy Opportunity for you this week...

Creating any project using any type of ribbon slide image and posting a link on this DRS Designs Blog Post will get you entered to win several Ribbon Slides by DRS Designs. You'll get an added bonus if you create your project with a DRS Designs Ribbon Slide. The winner will be selected on Sunday January 25th.

Good Luck!

Friday, January 9, 2009

Itty Bitty!


This week's Fun Filled Friday Challenge was to create a 3" x 3" card. I thought this would truly be a challenge for me since I tend to make cards that are larger than the regular A2 size cards (4.25" x 5.5.") However, DRS Designs just came out with some new stamps and they have a few that are perfect for a such an itty bitty card! DRS Designs came to my rescue for this challenge & I found it rather easy overall! You can see all of the new DRS Designs stamps here.


To create this Butterfly 3"x 3" card, I simply heat embossed the butterfly, used my Nesties to mat it, tucked in a small piece of ribbon to create a loop, used my Treading Water border punch to decorate the right edge of my card, and layered pink cardstock behind the front of the card, and then got carried away a little bit with my distressing. Easy Peasy, but cute! I love the colors.

Sunday we will announce next weeks Fun Filled Friday theme, so make sure to come back to see what it is. If you created a 3" x 3" card for this challenge, please post a link here in my comments so I can check it out. You can see Kimmy's Challenge card here.


Stamps: DRS Designs- Silhouette Believe Butterfly
Ink: Colorbox Fluid Chalk Ink in creamy Brown
Paper: Smooth white cardstock by Office Depot, Colored Cardstock by The Paper Company,
Accessories: Nesties, Fiskars Treading Water Border Punch, Ribbon by Maya Road, Rubber Stampede Embossing Ink, Embossing Powder by Creative Beginnings, Heat Gun,
Finished Card Size: 3" x 3"


So, how is the first week of New Year Resolutions going?


I'm happy to say that I've made it to the gym twice this week, both on Monday & Wednesday, and I plan to go again today. I've been doing a jog/walk on the tread mill for 45 minutes with a 5 minute cool down. This averages about 3 miles and I burn about 300 calories. I'm really happy that I'm actually sticking to it--I know it's only been a few days, but this is major progress for me. The SparkPeople website is really keeping me focused. My DH is impressed that I'm refusing to eat foods that I can't track on their Nutrition counter. All week long I've also stayed within my calorie intake goal. So far, things are going really well.


I hope your resolutions are going well too.


Have a great weekend & I'll visit again with you on Sunday.


Thanks for stopping by today.


Smiles,
Jennifer

Monday, November 24, 2008

DRS Designs Challenge #9, Postage Frames!

Today on the DRS Designs DT Blog we've just begun Challenge #9! It is to use the DRS postage frame/envelope art stamps as focal points on our projects. These stamps are great for the front of your envelopes of course, but why limit yourself to only using them on your envelopes, when you can make them the main part of your project? So, go ahead, pull out your postage frames and give it a try! Be sure to let us know if you participate by posting a link on the DRS Designs Challenge post so we can visit you. If you post to an online gallery, be sure to use the keyword DRSC9 so we can find it!

For this challenge, I created this Monochromatic Butterfly Thank you Card.


I have to admit, this was pretty quick and easy to make, however, I already had the idea in my head before I sat down to create it. All of the butterflies colored with pencils and blended with Gamsol. I used marker to color in their bodies and a white gel pen on the butterfly wings in the postage frame. I sponged the light purple on the Ribbon Slide Butterfly. I used my Score Pal to create the scored off center and used purple ink to stamp the flower image around it.


I know this card would be perfect for my Friend, Theresa. She loves purple and butterflies! Now, she just has to give me a reason to Thank her! :-)


Stamps: DRS Designs- Butterfly Postage Frame, Butterfly Ribbon Slide, Small Thank you,
Ink: Momento Tuxedo Black, Colorbox Fluid Chalk Ink in Wisteria
Paper: Smooth white cardstock by Office Depot, Colored Cardstock by The Paper Company
Accessories: Prisma Pencils, Gamsol, Bic Markers, Ribbon by May Arts, Corner Rounder by EK Success, White Gelly Roll Pen, Score-Pal
Finished Card Size: 5.5" x 4.25"


Unfortunately, I didn't get a chance to decorate any envelopes, but I do have them stamped. I hope to get to color them this week and show them to you soon! Be sure to check inspiration from the other DRS DT designers below. We've all completed this challenge using a variety of the postage frames available. I enjoyed looking at all of the projects myself!


Angel Rivera Cathy Indelicato (Team Coordinator)
Dawn Knight
Etha Schuette
Heather Lee-Reppen
Janette Olen
Jessica George
Jessica Knutsen
Vicki Parson


I appreciate your visit today, and would love to hear from you!

Stay tuned for more fun projects throughout the week. I created 8 new ones to show you! (Yes, I made great use out of the time I was home alone this weekend. Sometimes I really like it when he goes out of town. Shhh, Don't tell him I said that!)

Have a great day!

Smiles,
Jennifer

LinkWithin

Blog Widget by LinkWithin