Welcome to Ink N Scrap Habits!
I've created this blog to share my life & love of paper crafts with others. You will read bits and pieces of what goes on in my world and be able to see my paper craft creations! Please leave me a comment if you see something you like. I'd love to hear from you!
Hi Stampers!
Hope you are all doing well today!
I'm excited that DRS Designs has some new stamps coming out very soon! This time of year, I get busy making cards for all of the holidays that I often forget about making cards for other occasions, like birthdays etc. One of the best things about this next release is that there is a little bit of everything in it--this release is not just for Autumn and Thanksgiving! For the sneak peek I'm sharing today, the Woodgrain Background (626P) is one of the new stamps soon-to-be released and it was used here to create the tree on this birthday card!

In this little scene, I stamped and colored Oswald Owl (132H) with Copic Markers and cut him out. I stamped a piece of tan card stock with the woodgrain background and then distressed the edges with brown ink. I used an oval die to cut out the center and adhered natural twine around the opening. I embossed a piece of black card stock with a woodgrain embossing folder to add some dimension to my tree-like card front. Oswald Owl was adhered inside of the oval as if he was sitting in the tree. Next I created the sentiment tag by stamping the Whooo's Special Greeting (142B) on a piece of yellow card stock and then cut it out with a shaped die. I layered it with an orange fishtail banner and a brown scallop and embellished it with a tan brad on either side as shown. The final step was to adhere the card front on to an A2 brown card stock base.
Stay tuned, right here, for more sneak peeks of the upcoming stamp release. The new stamps will be available for purchase real soon! Yay!
Have a great day!
Smiles,
Jennifer
Hey Everybody!
Have you seen the new color challenge on the DRS Designs Blog? I love it!!!! Here's the inspiration photo:
Maybe it's because I'm the Mother of 2 boys and I see colors like these all the time, but they inspired me to create a masculine card. I coordinated them with DRS Designs Lighthouse stamp (461G) and thought the yellow, orange and blue would make a gorgeous sunset. I think I was right! ;-)
I colored the image with Copic Markers and then used Nestibility dies to cut it out and layer it with coordinating cardstock. I embellished it with a spiral clip and tied some twine in a knot around it. The A2 size cardstock base was made from Navy cardstock and I layered half of it on a diagonal with orange and light blue cardstock as shown. I stamped the Small Birthday Wishes" Greeting (020B) at the bottom and adhered the embellished image in the center.
Too bad I don't have any masculine birthdays left for this Summer. This beauty will have to wait until next year! ;-)
Have a great day!
Smiles,
Jennifer
Hi Everyone!
One of my favorite color combinations is pink and brown, and after I stamped DRS Designs 4 in 1 Seashell stamp (473F) in various pastel colors, I knew that's how I wanted to proceed with this birthday card.
I used Copic markers to color the seashells and then fussy cut them out. I stamped the Beach Birthday Greeting (480G) and then cut it out using a Nestability die. I sponged it with light brown ink before removing the die to create the nice, white frame around it. I matted it with pink cardstock that was cut with a scallop die and then adhered the seashells around it as shown.
I used a piece of Kraft card stock for my A2 size card base and stamped the Sea Grass (128L) on the left-hand side and the Lighthouse (461G) on the right-hand side. Both were stamped using Versamark Ink. The embellished greeting was adhered in the center of the card front. I didn't want to take away from it, so I kept things simple and used a little bit of pink and white twine tied in a knot for the only embellishment.
I hope you like this clean and simple birthday card as much as I do!
Thanks for stopping by and have a great day!
Smiles,
Jennifer
One of the things I love about where we live in Michigan is that we are close to the water. Growing up as a little girl, it wasn't uncommon for us to spend the weekend on my Grandfather's boat. Swimming and picnic lunches were what the Summers were all about! This Seaside Dock image (1111K) by DRS Designs reminds me of those times. If my Grandfather was still alive, this would have been the perfect birthday card for him.
I colored the Seaside Dock and the Anchor (434G) with Copic markers. Both of them were matted in red and then with blue. I stamped the first line of the Beach Birthday Greeting (480G) just above the Seaside Dock image. The remaining portion of the greeting was stamped inside the card. I simply embellished this card with two red brads in the bottom right corner, and my card was complete!
Thanks for taking the time to stop by today, and have a wonderful 4th of July weekend!
Smiles,
Jennifer
Yeah! Today I'm celebrating a new DRS Designs Blog challenge AND new stamps! Yep, DRS Designs has a new release coming out and it's screaming SUMMER!!! The new challenge posted for this week is perfect for showing them off--take a look at what I created for their "Just Beachy" theme!
I used the masking technique to add this new Mermaid (472F) to the Brush Beach Sunrise (768L). The way she's chillin' on the beach reminds me of one of my favorite Disney movies, The Little Mermaid! I colored the scene with Copic Markers and then stamped the Beach Birthday Greeting (480G) over top of the sand and water. This greeting is also part of the new release. The card front was simply embellished with a little matching purple fish brad placed in the lower right corner. Then, the stamped scene was adhered to violet cardstock and adhered onto a dark purple cardstock base.
Hope you like it as much as I do!
Thanks for stopping by!
Smiles,
Jennifer
There's a new, fun challenge over the DRS Designs Blog this week called "Over The Top!" The rules are to stamp the greeting or a portion of it on top of your image..or you can also have a die cut sentiment on top or use a vellum overlay! I used this technique to create this Golfer's Birthday card!
For my over the top image, I stamped the Silhouette Male Golfer (038G) in olive green ink, and then stamped "Happy Birthday" from the Back Nine Birthday Greeting (658F) using black ink. I used kraft cardstock for my card front and stamped the upper portion of this greeting in the upper left corner as shown. I embossed a small white panel with the Swiss Dots Embossing folder, but I adhered it on backwards so that the embossed dots resembled the pattern on a golf ball to match the golf theme of this card. Brown and white twine simply embellished the card front and it was attached to an A2 olive green cardstock base.
Run over to the DRS Designs Blog to see all the details for this challenge and the fabulous prize you could win for playing along!
Thanks for stopping by!
Smiles,
Jennifer
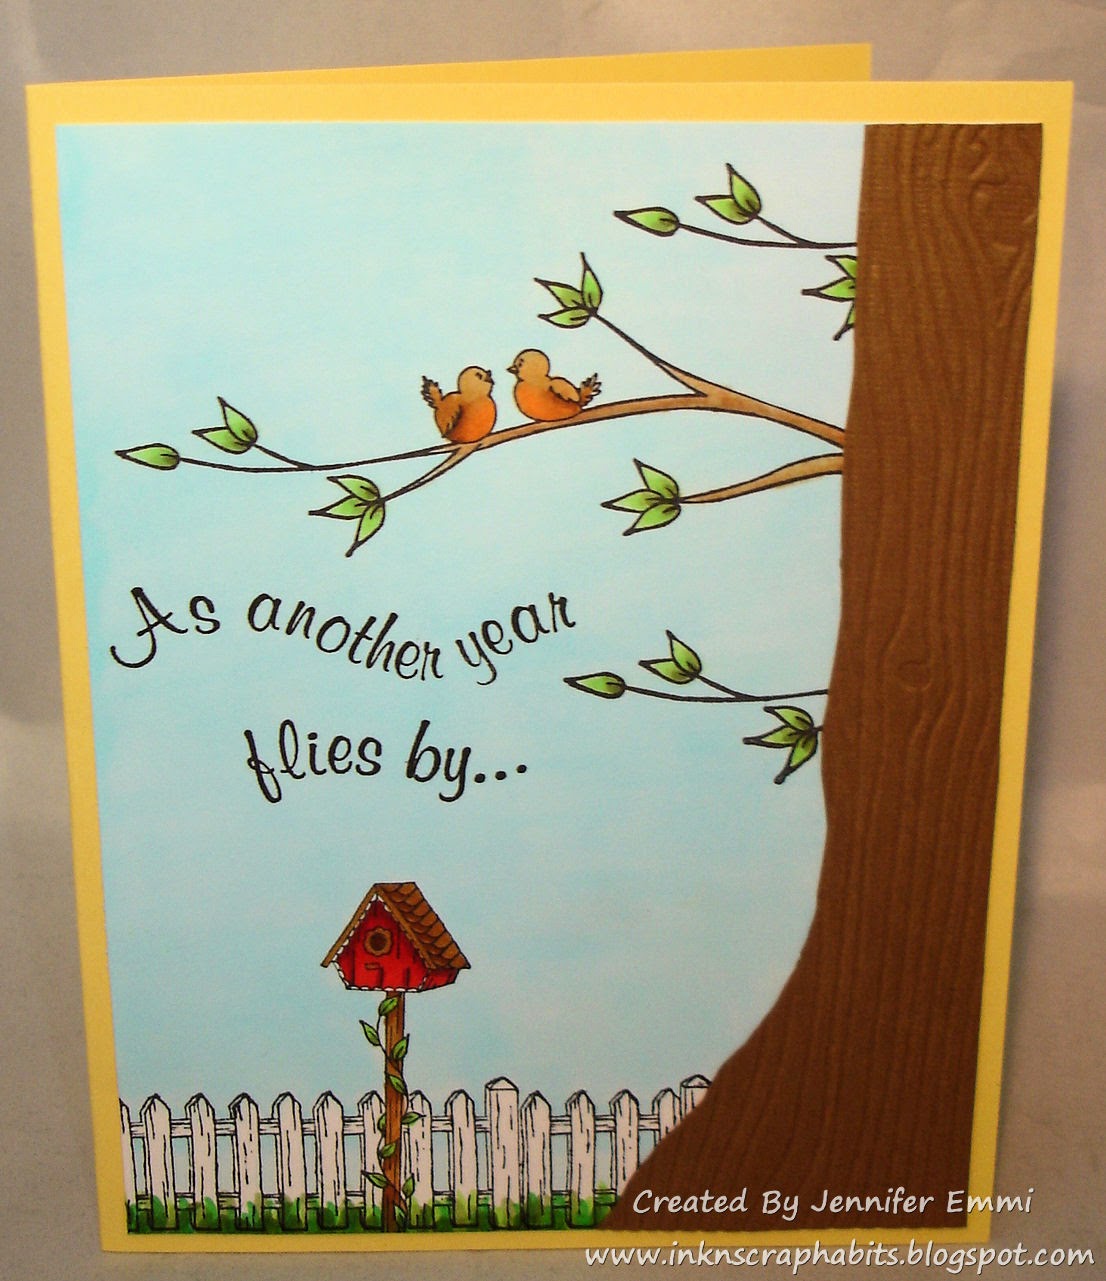
There's nothing better than having universal greeting cards in your stash that could be used for multiple occasions. Like this card I'm sharing with you today, it could be used as a birthday card for someone who likes birds, or an anniversary card because of the way the birds look on the Lovebirds Branch (413H). It would all come down to what the rest of the greeting inside read, and for now I'm going to leave that option open until I actually decide to use this card.
The scene I created here was started with a piece of white cardstock. I stamped the Lovebirds Branch 3 times in different places and at different positions coming from the right side of my card front. Next, I stamped the Single Bird House (406D) near the bottom, masked it and then stamped the Picket Fence (478P) in place over top. Everything here was colored with Copic Markers, including the sky and the grass. I hand cut a piece of brown cardstock and embossed it with a wood grain embossing folder for a realistic look, and adhered it in place on the far right side. The final touch was adding the Another Year Flies By (489F) Greeting right in the center. The card front was then added to a yellow cardstock base to make the card complete.
Have a great day,
Smiles,
Jennifer
Graduation season is upon us and the latest DRS Designs Blog Challenge, "Put It In Neutral" inspired me to create this Graduation Card. I know the Rest Best of Life Greeting (385F) was originally meant to be a birthday greeting, but I think it's the perfect graduation greeting too. I think many graduates are so happy and excited that the long struggles of school are behind them that graduation is the beginning of the rest of their living life, with a career ahead, we hope!

I started by stamping the Rest Best of Your Life Greeting with black ink on white cardstock. I used a rectangle Nestability die to cut it out and then sponged tan ink over top of it while it was still in the Nestie die. It was matted with black cardstock cut out with the scallop-edged, rectangle Nestie die. I then put that aside and created the background panel. Starting with ivory cardstock, I stamped the Interlocking Star Background (819H) in black ink and the Starry Background (124H) in tan ink. This panel was also matted with black cardstock cut out with the scallop-edged, rectangle Nestie die. Next, I created the A2 cardstock base from tan cardstock and adhered the star panel to the far left side as shown. To break up the light colors a little bit, I added a fishtail banner in dark brown cardstock that was embellished with some paper flowers and petite copper brad. This was adhered so that the straight edge was flush with the right side of the card front. The greeting panel was adhered in placed just off center and this clean and simple card was complete!
So, I mentioned above that the "Put It In Neutral" challenge inspired this card. Has my post inspired you to play along as well? Create a card in neural colors (think white, ivory, tan, kraft, brown, black, gray) and link it up on the challenge post to be entered to win a great package of DRS Designs stamps! But hurry, this challenge ends to day at 6pm ET!
Thanks for stopping by and good Luck!
Smiles,
Jennifer
Since DRS Designs last release a few weeks ago, I've been working diligently on increasing my stash of sympathy cards. I've noticed that my birthday card stash has been depleted as well, and now it's time to replenish them. Here's a rather clean and simple one I made using the new Hey Cupcake Greeting (365B) and the Cherry Top Cupcake image (463E).

I colored the cupcake with Copic markers and shaded it with brown ink while it was in a Nestability die. I went for a realistic look by adding Diamond Glaze to the cherry to give it a shiny, wet look. (Sorry that's hard to see in this picture!) I matted it with red card stock, which really helped make the cherry stand out. Next, I worked on the sentiment banner and shaded it the same way as I did for the image and matted it with red card stock as well. I embellished the banner by adding a small paper flower and adhered it to the banner with a petite pink brad. I adhered 2 pink panels in the background and stamped them both with the Splatter Background (855H) and red ink and then assembled the card front as shown. Three red rhinestones placed in the upper right corner were the final touch. Cute and easy, don't you think? ;-)
Thanks for stopping by!
Smiles,
Jennifer
Ha! The latest release from DRS Designs includes this new Leonard Pig stamp and his grin is goofy as ever!! A Birthday Party Pig (354G) makes a delightful birthday card, which as you can see, that's what I'm showing off today. I created this for this week's DRS Designs Blog challenge, Birthday Blues. As the challenge states, it has 2 requirements--your project must be birthday related and use the color blue.
I colored this image using Copic Markers:
The pinks used here are RV10, RV02, and RV23.
I used B00, B02, and B05 for the blues.
E35 and E37 created the muddy ground he is standing on.
R27, R29 and R59 colored his balloon red.
Some shading was added around him using C1 and C3.
I made a layered tag to show off the Small One Line "Happy Birthday" (B250) sentiment. Since I mailed this off to a friend, I kept my embellishments flat and rather simple. I used an embossing folder on the top border for some texture, a border punch, some red satin ribbon, and 3 red rhinestones put the final touches on this card.
Thanks for stopping by!
Smiles,
Jennifer
A new challenge has just been posted on the DRS Designs Blog and the theme is "Pet Store."
I couldn't resist getting these adorable Playful Pups (1110H) inky! I used Copic Markers to color in the image and the light blue banner was embossed with a paw print embossing folder. I used the Hot Diggity Dog Birthday Greeting (732E) for the sentiment and stamped the Small Dog Print (1003A) just above it. It might be clean and simple, yet it's perfect for my dog-loving, co-worker whose birthday is next week! She's gonna love it and I hope you do too!
Thanks for stopping by!
Smiles,
Jennifer
Woo hoo! New stamps will be available soon from DRS Designs! I've had the privilege of playing with them over the weekend and now I have a sneak peek to share with you. This card features the new Rest Best of Your Life Greeting (385F).
I love how this greeting says "Happy Birthday" without coming right out and saying it. I have a friend who literally dispises her birthday. She really has a hard time dealing with the fact that she's getting older and this type of greeting would be perfect for her. We use our birthdays as an excuse to "just get together" for dinner since we don't see each other very often and a birthday card like this that doesn't say "Happy Birthday" would compliment our meal nicely!

I made this greeting the focal point of my card front by stamping it in blue ink and then cutting it out with a Nestability die. Before I took it out of the die, I sponged the same blue ink it was stamped with around the edges of the die. I love the nice clean and framed look it creates around the stamp I want to show off. I paired it with some other great DRS stamps like the Argyle Background (438P) and the Argyle Diamond (441A), which always make a great background design. The other embellishments I used include some crimped cardstock, a scalloped border punch, white satin ribbon, a button and twine tied in a bow.
I hope I've inspired you to get inky today!
Thanks for stopping by!
Smiles,
Jennifer
The little boy next door just turned 8 and he's always climbing the trees in his backyard. He doesn't have a tree house like what is shown on this card, but if he did I know he'd be in it constantly! I created this card to go with his birthday gift and for this weeks DRS Designs birthday card challenge.
I started with a 5" x 5" card stock base. The yellow card front was stamped with the Polka Dot background (688P) and then I distressed the edges. I added a light blue decorative panel that was layered with embossed green card stock and embellished with 3 brown brads. The Tree House (087K) was stamped, colored with Copic Markers, and then matted with brown card stock. I adhered it to the left side of the card front as shown. Finally, the Out Of This World Greeting (267F) was split onto 2 banner tags, distressed and then adhered into place to fit the layout.
I hope you had a wonderful birthday, Jack!
Thanks for stopping by!
Smiles,
Jennifer
Some of my favorite cards to stamp are birthday cards. I usually have quite a few to choose from when a birthday card is needed. However, last week when I went to write out a card for a friend of mine, I noticed my stash was gone!! The good thing about this is that it actually worked out to my advantage! She is a dog lover and I was able to stamp this cute doggie birthday card just for her. It was a win, win situation for us both!
I started by coloring the Doggie Dilemma Dog With Fence (254H) with Copic Markers. After matting it I put it to the side to work on the card front. I stamped the Dog Bone (080A) on white card stock to create a border around the card front. I colored them lightly with Copic Markers and then distressed the edges with brown ink. Next, the card front was matted with blue card stock. I created an A2 dark brown card base and adhered the card front to it. The matted dog image was adhered to the upper center area and the Hot Diggity Dog Birthday Greeting (732E) was stamped below it as shown. I didn't add any bulky embellishments to it since it was going to be mailed. It was a nice change keeping my card front clean and simple! Hope you've enjoyed my post today.
Hi Everyone!
I hope all of my American readers are enjoying the long weekend for the Fourth of July holiday! Unfortunately I will be spending it working. But I hope to be able to find some time for myself to stamp. Today I'm sharing the card I made for the latest DRS Designs blog challenge. The theme is Banners, Flags and Pennants.
I had fun using the Splatter Background (855H) to create my own pattern paper. I stamped it in green and pink inks to match my color scheme. I colored Leonard Pig Blowing Bubbles (078K) with Copic markers. To follow the challenge theme, I used my banner dies to create the embellishment cluster I added to the upper left hand corner of my card front. A button and a twine bow completed the look. I like this image paired with the Popped Up Birthday Greeting (924H). The word "popped" was also colored with Copics.
The final touch I added was Diamond Glaze to the bubbles for a realistic look. In the right light they really look wet!
Hope you enjoyed my post today. Thanks for stopping by and have a great weekend!!!
It's Thursday already and another new challenge has been posted on the DRS Designs Blog. This week is a color challenge to use purples and greens. I'm showing off some new wine-themed stamps on my challenge card.
All 3 of the stamps I used are brand new and now available for purchase:
Bunch of Grapes (061D)
Pour Me...Bottle and Glass (075H)
Wine/You Improve With Age (067F)
The images were colored with Copic Markers and the Pour Me image was inked with purple ink while still in a Nestie die to get the white border around it. Wouldn't this make for a sarcastic birthday card?!?!? Now I just need to find the right recipient! Ha!
Enjoy your day and make sure to check out the challenge if you get a chance!
Thanks for stopping by!
Smiles,
Jennifer
I've seem to have lost my mojo over the last few weeks, but it seems that the only thing keeping it alive right now is the inspiration I'm finding with challenges. This weeks DRS Designs Blog challenge inspired today's card as well.
The challenge is Who's the (em)Boss? Clever, huh? Your entry needs to have embossing on it--heat or dry embossing will do! I went ahead and used the Cuttlebug Birthday folder for the background on my card.
For the focal area on the card front, I stamped the Single Birthday Candle (258B) repeatedly and colored it with Copic Markers. Then, I stamped the Small One Line Happy Birthday (250B) in the space at the bottom that wasn't embossed with the folder. I added some purple and white twine, tied with a bow, to show the separation between the embossed and non-embossed areas. I took this card one step further and stamped the One More Candle Greeting (481E) in the inside to complete it.
Check out DRS Designs challenge HERE for all the details on how you can win a $10 DRS Designs store voucher just for playing along!
Thanks for stopping by and have a great day!
Smiles,
Jennifer
Hi Everyone! Hope this post finds you well! Today I'm taking a break from all the holiday cards to show off a birthday card I sent to Operation Write Home. I kept it CAS, but I love how it turned out with all the different shades of pink!
I created the background paper for this card by stamping the Single Birthday Candle (258B) repeatedly and coloring them with Copic Markers. I layered it with dark pink cardstock that was decorated with a border punch and adhered it to the center of a piece of medium shade of pink card stock used for the card front. I used a decorative corner punch in all four corners and added 3 little white pearls to the lower right area under the decorative border.
The focal point I used for this card is DRS Designs Funky Birthday Image (494D) which was matted with a scalloped square and popped up on foam tape.
Thanks for stopping by!
Smiles,
Jennifer
I started with an A2 size light blue cardstock base. I stamped the Single Birthday Candle (258B) repeatedly on white cardstock to make my own handmade pattern paper. Then I colored it with Copic Markers. I used this paper to decorate the top portion of my dark blue card front, and then added some satin ribbon tied in a bow at the bottom of it. Next, I stamped the Small Birthday Wishes Greeting (020B) in the lower right corner of the card front and added 2 pearls to finish it off.
I hope whoever receives it likes it as much as I do!
Smiles,
Jennifer
The deadline for DRS Designs Operation Write Home Card Drive is this week. Did you submit any cards for a chance to win some great prizes? I'm not elgible to win, but here's what I've made to submit. Now, I know it's not many--hey my time is limited ;-) but it's something. The most important part is that I enjoyed making them and I'm sure they will be well received by the soliders and their families especially!
Most of these cards use stamps from DRS Designs and you'll see them on my blog over the next few weeks. So, stay tuned for details. Big thanks to those of you who participated in this great event.
Until next time,
Smiles,
Jennifer