Welcome to Ink N Scrap Habits!
I've created this blog to share my life & love of paper crafts with others. You will read bits and pieces of what goes on in my world and be able to see my paper craft creations! Please leave me a comment if you see something you like. I'd love to hear from you!
Today I am using DRS Designs new blog challenge to show off some sneak peaks of their new stamps scheduled to be released this weekend! The challenge theme this week is "I Can Feel It!" You need to use some sort of dry embossing on your entry to qualify for the challenge.
I created this non-traditional Christmas card with the Cuttlebug Heart Embossing folder to match the heart theme in the stamps. Yes, you heard that right--Christmas!! Now is the time to get started on those Christmas cards and DRS designs has some new stamps coming out to help you do just that!
The new stamps I used on this card are the Jesus is the Heart of Christmas Greeting (496F) and the Baby Jesus Heart (494G) which I colored here with Copic Markers. I also used the Interlocking Heart Background (808H) on the yellow panel. I love that this turned out so nice despite the non-traditional Christmas colors. I added some Stickles to the star and embellished the top with a metallic gold ribbon. A few brads at the bottom finished it up nicely and the card front was adhere on to a dark brown A2 cardstock base.
Hope you like it!
Smiles,
Jennifer
Can you believe this is the last week of February....already?!?!? That means that March is right around the corner and perhaps at some point it will turn to Spring and we can put this deep freeze behind us! I'm done with winter, can you tell? LOL! I have a bad case of cabin fever and I'm itching to get outside with my boys! One good thing about the weather still being yucky is that I don't mind being trapped inside if I can spend the time stamping. Today I'm sharing an Easter card I recently made during one of our recent Arctic Blasts, where the wind chill was -30 degrees!
I started by coloring the Three Wooden Crosses (1116K) with Copic Markers. I used E31, E33 and E35 specifically. I cut the image out using an oval Nestability die. Then, I masked it with a Post-it Note and sponged it with light blue ink, layering the ink, so that it was heavier toward the bottom of the crosses. The ground beneath the crossed was sponged with brown in k in the same manner. The colored image was layered with a dark brown scalloped oval and set aside while I worked on the rest of my card.
For one side of the card front I used Kraft colored cardstock that was embossed with a wood grain embossing folder to match the texture of the wooden crosses in the image. I used smooth blue cardstock for the opposite side and embellished it with a dark brown decorative border to hide the seam between the 2 card front panels. Then I stamped the I Am The Resurrection Greeting (303D) on the lower portion of the left side of the card front. The matted image was adhered in place just off center as shown and then I embellished the upper left portion of the card front with 3 different colored banners and a button tied with a blue twine bow. This card was then completed by attaching the card front to an A2 dark brown cardstock base.
I'm really happy with how this turned out, but blue and brown are one of my favorite color combinations, so I might be a little biased. I hope you like it too!
Thanks for stopping by!
Smiles,
Jennifer
Hi Friends!
Today I have a CAS card to share with you to show off the new Lovely Gifts Christmas Greeting (235G) just release from DRS Designs.
I created the card front to resemble a wrapped Christmas gift, to play on the words "present" in this saying. Sorry about the quality of this picture--I used shimmer cardstock for the card front and greeting and it didn't photograph as well as I thought. I no longer have this card in my possession so, unfortunately, this is as good as it gets!
Run over to DRS Designs to see all of their new Christmas stamps HERE, or check out the new challenge on their blog, "Hang It Up" and enter your project for a chance to win stamps from DRS Designs just for free!
Thanks for stopping by!
Smiles,
Jennifer
I feel like everyone often forgets about Thanksgiving and all that we should be thankful for by rushing around making Christmas a 2 month holiday. I understand it's probably hard to do when the stores have Christmas decorations out before Halloween even gets here, but I'm nowhere near decorating my tree or doing anything else Christmas right now. My house is still decorated with sunflowers, pumpkins, orange leaves and other things that celebrate the Fall harvest and Thanksgiving. At the same time though, I understand that since Christmas is such a large holiday, you have to prepare early. As we all know, this is particularly important when hand making your own Christmas cards! The card I'm sharing today was created for this weeks DRS Designs blog challenge "Hang it up." Of course, this doesn't particularly relate to Christmas, since you can hang Fall leaf garland as well, but Christmas decorations were the first thing that came to mind when I read this challenge theme!
My card front began with a white piece of card stock that I sponged with blue ink. Next, I stamped the Cardinal On A Branch (856M) so that only the leaves at the bottom of the stamp were inked to create the Christmas tree border. I colored it with Copic markers and stamped the lower portion of DRS Designs new Lovely Gifts Christmas stamp (235G) at the bottom between the pine needles. The Nativity Ornament (526K) was stamped on another piece of white card stock and colored with Prismacolor pencils. Then it was fussy cut out and adhered in the center of the card front with red ribbon to resemble it hanging on a Christmas tree. A big satin red bow was attached at the top of the ornament and then the card front was matted with pink card stock to match the color scheme. Finally, the card front was attached to an A2 dark green card stock base and my challenge card was complete.
So, how is your house decorated right now? Are you eager to decorate for Christmas or is your house still decorated for the Fall harvest like mine?
Thanks for stopping by and have a great day!
This weeks challenge on the DRS Designs blog has me thinking outside the box! The challenge is titled, "Just Half." You are to use only half an image/sentiment etc. on your challenge entry. I've never done this before, but I think it's a great idea! Here's what this challenge inspired me to do...
I used a portion of the thread spool image from the Daily Thread Greeting (173E) to create the borders on my card front. All of the spools were colored with Copic Markers. The banner in the center of the card was cut out using a fish tail die and before removing it from the die, I sponged it with light brown ink to create the white border around it. Then after matting it I tied a dark purple ribbon on the left side to embellish it. Fairly simple and way cute, don't you think?
Can I interest you in getting some FREE stamps from DRS Designs? Keep in mind that DRS Designs often has different opportunities for you to win store vouchers and earn free stamps just for playing along in several challenges. Every Thursday, a new challenge is posted on the DRS Designs Blog, and this week DRS Designs is the sponsor over at the Just Inspirational Challenges Blog. Their challenge theme is "Wishes." Think Get Well, birthday, Christmas wishes etc. for this challenge. I hope you get a chance to play along!
Good Luck and have a great day!
Happy Easter to you all!
Yesterday we went to the local greenhouse for their Easter event and took this picture of our oldest son with the Easter Bunny. This was the only picture we took and I'm over the top excited about it because it is perfect! We never get pictures of him where his head and eyes are both facing directly at the camera along with a perfect smile on his face!
Despite visiting the Easter Bunny, cleaning house, preparing food, and dying Easter Eggs, I even had time to stamp up this CAS card. Both the image and sentiment are by DRS Designs. The Three Wooden Crosses (1116K) were colored with Copic Markers, masked, and then sponged with yellow ink behind the crosses and brown ink for the dirt. He Has Risen (1138E) was stamped in the smooth section below the image. I love the decorative flair this Nestie die gives this card overall and how it really shows off the image. I hope you like it too!
Thanks for stopping by and have a wonderfully blessed day with your family and friends!
Smiles,
Jennifer
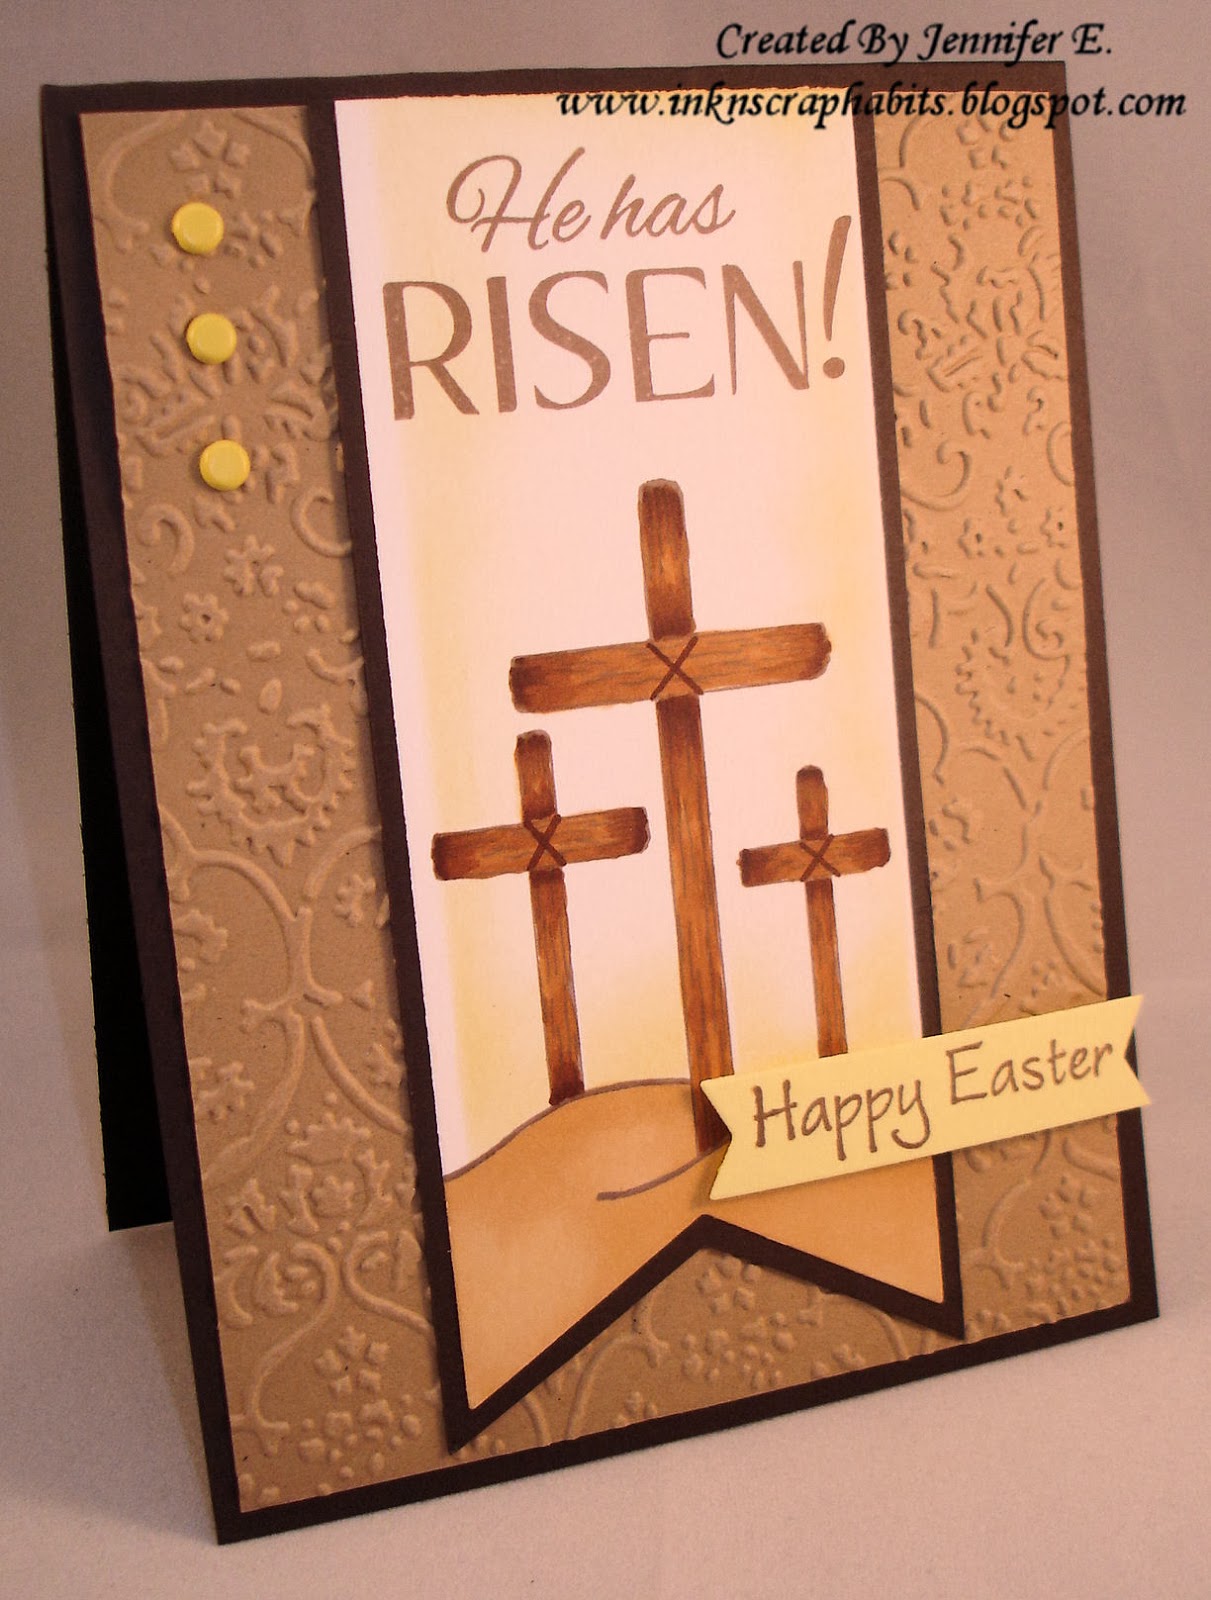
Hi Everyone!
I used a banner to show off these stamps on my card front. As you can see, the crosses were stamped at the bottom and the greeting at the top. I used Copic Markers to color in the crosses. Then, I masked the edges of the banner and the crosses with Post-It Notes and sponged the area around the image with yellow ink. Next, the banner was matted with dark brown cardstock. I used a kraft piece of cardstock for the card front and embossed it for added texture. The banner was adhered to the center and I added 3 yellow brads to the upper left corner. As the final touch, the One Line Happy Easter (665B) sentiment was stamped on a yellow banner and adhered as shown with foam tape.
Easter is just 20 days away. Have you made your Easter cards yet?
Thanks for stopping by!
Smiles,
Jennifer
It's that time of year when many of us reflect on all of the blessings we have and share the things we are thankful for. Here's a card I created with stamps from DRS Designs with these thoughts of Thanksgiving in mind.
I started with an A2 brown cardstock base and heat embossed it using clear embossing powder and the Silhouette Branch Background (363H). The ivory layer on the card front was stamped lightly with Woven Plaid (613P). I stamped and colored the Be Thankful Cross (634G) on another piece of cardstock and then fussy cut it out. I then adhered it in the center of the card front and the ivory layer was matted with tan cardstock. I added 2 brads to the upper corners and then added sheer brown ribbon to the bottom. This was adhered to the card base and my card was complete.
So, what are you thankful for this year?
As always, I am thankful for being healthy, having a wonderful husband and family and being blessed with a beautiful son. Butm this year I am especially thankful for a healthy pregnancy and I'm eager to meet our new son in January!
Thanks for stopping by. Have a great day!
Smiles,
Jennifer
I'm here today with a bittersweet post to share with you. Over the weekend I stamped this sympathy card for a dear friend of mine whose Mother passed away. She was 84, full of life and a strong fighter at the same time.
When I first started making cards, I NEVER made sympathy cards. I always thought that since handmade cards were supposed to be kept, who would want to keep a sympathy card to remember the pain and loss they felt when they received that card. However, now I feel differently --I think a handmade sympathy card is extra special and it lets the recipient know you really care. I make sympathy cards often now, and I always make sure to have a few on hand so that I have one ready to go whenever I need one. How do you feel about making Sympathy cards?
I really like how this note card turned out because I think the blue and brown together are peaceful and calming. Both stamps I used are from DRS Designs. I used the No Words Sympathy Greeting (068G) for my focal point and used the Cross In A Cross (1022B) as an embellishment. Both of them were cut out using Nestability dies and I sponged them with brown ink before removing them from the dies. The Swiss Dots embossing folder added texture to the background and a simple brown ribbon and bow made this card complete. Finished card size measures 5" x 3.5".
Thanks for stopping by!
Smiles,
Jennifer
Welcome back to Thursday! The weekend is almost here! Yeah! We're going camping this weekend with about 20 other family members so I'm eager for Friday to get here. However, since it's Thursday I have to share the new blog challenge from DRS Designs first.
This week is all about "No Layers." This is definitely a challenge for me--I love the layered look! I started with a plain white cardstock base. I stamped the Simplify Christmas sentiment (553D) near the top and the Three Wisemen Peace (504K) at the bottom. Then I used dies cuts as stencils to sponge the blue areas. The bottom of the image was sponged with brown ink to represent the desert sand. I embellished the sentiment with a blue button that was threaded with twine and tied in a cute little bow. Finally, I added Stickles to the big star to make it really stand out.
So, are you up for the "No Layer" challenge? Show us your work on the "No Layer" blog post and enter to win a great prize from DRS Designs.
Have a great day and a wonderful weekend!
Smiles,
Jennifer
One of the things I love about DRS Designs is that they have stamps for every occasion that you could ever need a card for! My little cousin is making her first communion next weekend and I was glad I was able to handmake this card for her rather than having to buy one. Thanks for coming to my rescue, DRS Designs!
I've used the Chalice (912K) and the Communion Greeting (401F) on my card front. The chalice was colored with Copic Markers and fussy cut out. I added some Diamond Glaze to the cross on the front of it to make it stand out better and enhance it. Then I adhered it in place over top of the embossed panel. The brown cardstock you see is actually a metallic copper. It really made this card elegant!
Hope your Monday is off to a great start and thanks for taking the time from your busy day to stop by! I appreciate your visit and your comments!
Smiles,
Jennifer
There's a new challenge this week over at DRS Designs and the theme is "Paper Flowers." I didn't originally plan for this to be my challenge card, but since it's Holy week I thought something with a religious theme was more appropriate. No worries though, you'll see my other challenge card in just a few days!
This is a note card that measures 3.5" x 5." I used the Impossible Faith Greeting (1025G) on the banner for the focal point of my card. I stamped it in 2 colors of ink to highlight the word "Faith." It is popped up to add a bit of dimension. Off to the side of the card front I also stamped the Triple Crosses (510G) using Versamark ink. Can you identify the other 2 stamps I used on this card?
The background design is not designer paper--I stamped it using the Original Plaid Background (641P). Can you see the pattern on the flower petals? That was done with the Material Maker Square (583L). I stamped my cardstock with it before cutting the flowers out with a paper punch. They were also adhered using foam tape. A decorative border punch and some lime-green twine helped finished this card nicely.
Thank you so much for stopping by.
Smiles,
Jennifer
The image was colored with Copic Markers and then masked and sponged with yellow ink while in a Nestie die. I kept the design elements of this card fairly simple. As you can see, I used some decorative corner punches, the Swiss Dots embossing folder and some fun red ribbon to dress up this layout.
DRS Designs is giving away free stamps to one lucky participant this week for playing along. Check out the challenge HERE and link your card up to win!
Smiles,
Jennifer
Hi Everyone!
Hope your week is off to a great start! Saturday was the big release day over at DRS Designs and the DRS DT is now having fun showing off the new Christmas stamps! I created this card to show off the new Adore Him Greeting (246F).
This greeting would be perfect for many of the religious Christmas images DRS offers, but here I've paired it with the Three Wisemen Ornament (025K). I used Copic Markers to color it. The white frames around the image and the greeting were created by sponging yellow ink around the edges while they were still in a Nestie die. The background was stamped with the Silent Night Sheet Music (506P) and the edges were distressed with Vintage Photo ink. To make each stamped element fit well on the card front, I had to make this card a little bigger than A2 size. Finished card size is 4.5" x 5.75".
Check out all the new Christmas stamps HERE--It's never too early to start making your holiday cards!
Have a wonderful day!
Smiles,
Jennifer
Happy Monday!
Hope you all had a great, restful weekend. I spent the weekend working at my real job. The Monday after is such a relief that the stressful weekend is over. I always look forward to my day off during the week and I get excited knowing that having the entire upcoming weekend off right around the corner! One thing I enjoy about my job is that in my down time, I am able to color some of my stamped images and draw out some card layouts for future projects. Today's Good Courage card is one of the projects I started at work this weekend. After putting my little one to bed last night I was able to create the actual card.

The focal image seen here was created using 2 stamps. Both the Good Courage Greeting (1083F) and the Broken Flower Fence (1091K) are by DRS Designs. I colored it with Copic Markers and stamped the greeting in the open space above it. After cutting around the stamped image, I dressed it up by adding some white ribbon and matting it twice before adhering it on a 3.75" x 5" light green card stock base. I used yellow Stickles on the centers of the daisies which added a touch of elegance.
Well, that's it for me today. Thanks for stopping by and have a great week!
Smiles,
Jennifer
Sometimes the best looking cards are those that are the simplest, and right now there's a challenge out there that works best with my schedule nowadays--Clean and Simple!
CAS is the theme for this weeks DRS blog challenge, and this Easter card is my challenge entry. I'm sure it's pretty easy to figure out how I made it, but just in case some of you are looking for a specific detail, here they are: I started by making the card base from white cardstock to measure A2 size. Next, the edges were inked with Vintage Photo. I then cut a yellow cardstock panel matted with a thin border of brown cardstock and decorated it with a little twine near the top border. This was adhered to the bottom half of the card front. Next, I stamped the bottom of the yellow panel with the Promise of God's Love Easter greeting (974F). I used the Triple Crosses (510G) as the focal point, which was stamped in Momento Cocoa Brown ink, and adhered it to the center of the card with foam tape after matting it with brown cardstock. A small bow made from twine was added to the right of the image and a few yellow rhinestones were added along the decorative panel to dress it up a bit.
I know I inked alot on this card and I added some embellishments that I could have easily omitted and still had a nice looking CAS card, but this card really didn't take me too long to make. Compared to most of my cards, this is CAS for me and I guess you could call it QAE too--quick and easy!
If you have a few minutes to create a CAS card, the DRS DT would love to see it. Link it up HERE to enter and win free stamps from DRS Designs.
Thanks for stopping by and seeing my work. I appreciate your visit!
Smiles,
Jennifer
Making your own backgrounds is so easy with all of the background stamps DRS Designs offers and the best part is that they often pay for themselves with just a few uses. In the long run, I think they are much cheaper then buying designer papers. I love stamping them in a variety of colors to match the project I'm working on. The background on this card was made using Vicki's Versatile background stamp (369H), and the Impossible Faith Greeting (1025G) was used as the focal point on my card front. I accented it with the Cross In A Cross Image (1022B). Each layer was distressed and the finished card size is A2- 4.25" x 5.5".
Hope you like it! Thanks for stopping by!
Smiles,
Jennifer
The background was created by heat embossing DRS Designs Fall Leaf With Acorn image (471F) with copper embossing powder. I also used this image as the focal point on my card front and colored it with Copic Markers. For the middle layer I dry embossed metallic copper cardstock with the Swiss Dots embossing folder to create texture on my card front. The sentiment I used, the Thanks Unto The Lord Greeting (916D), is new by DRS Designs. I hope by sharing with you my heat embossed cards that I've inspired you to get out your embossing powders and heat gun too. If I have, please share the link with me--I'd love to see what you've created!
Thanks for stopping by. I appreciate your visit!
Smiles,
Jennifer
Today I have a Communion card I made for my Godson to share with you. He made his First Holy Communion a couple weeks ago and I was so glad to see that DRS Designs had the perfect stamps so I could make him a card. I'd much rather make the cards I give away then buy them. It's a lot more fun that way too!

The first step I did in making this card was heat emboss the Praying Boy Silhouette (899F) with black embossing powder on light blue cardstock. I matted it with a white cardstock scalloped oval to use as the focal point on my card front. I stamped the First Holy Communion Greeting (913G) with black ink on white cardstock and inked the edges around it with light blue ink. I created the card front from black cardstock that I dry embossed to add a little texture to my card. I assembled the stamped pieces as shown and used the notched corner punch on all 4 corners. I added a light blue ribbon and 3 light blue brads as embellishments and then threaded metallic silver string through the notched corners. The entire card front was then adhered to an A2 sized light blue cardstock base. 
I decorated the inside similar to the card front. On white cardstock I used the notched corner punch on all 4 corners, inked the edges with light blue and I also added a strip of light blue ribbon near the bottom. I stamped the Communion Greeting (401F) for the inside message.
Thanks for stopping by and have a great day!
Smiles,
Jennifer
Sorry for the lack of posting over the last week. The internet has been down at my house and there's only so much you can do on a smart phone these days without going cross eyed! Unfortunately, blogging with (decent) pictures is one of them, so I chose to wait until it was fully up and running before attempting to post. Good thing about the internet being down is that it forced me to make better use of my time--I got a lot of housework done, some cooking and played often with DRS Designs new images!! Now you'll be seeing all of my finished projects fairly often! Yeah! Without further adieu...here's one of the cards I made:
All of the stamps used on this card are by DRS Designs. The new ones are the Fully Rely On God Greeting (740D) and the Polka Dot Background (688P). Adorably cute wouldn't ya say? That cute Tiny Frog (420A) is from a previous release. I used Copic Markers to color the images on this card, and the polka dots were created using Versamark ink. I also lightly distressed both frog panels with green ink.
The rhinestones were clear and I colored them with Copic Markers to match the color theme.
Thanks for stopping by...I hope you have an unfrogettable day! (Sorry, couldn't resist!)
Smiles,
Jennifer