Welcome to Ink N Scrap Habits!

I've created this blog to share my life & love of paper crafts with others. You will read bits and pieces of what goes on in my world and be able to see my paper craft creations! Please leave me a comment if you see something you like. I'd love to hear from you!

Showing posts with label Shaped Cards. Show all posts

Wednesday, June 3, 2015

For Two Great Teachers

As another school year comes to a close, it's important to let teachers know how special and appreciated they are, especially after all of the hard work they put into teaching our youth. Today I'm showing off the cards I've made to go with the thank you gifts for my son's teacher and teaching assistant.
 
 
These pocket cards were started by cutting scalloped squares using large Nestability dies. I adhered the right, left, and bottom edges of two of them together to form the pocket. I decorated the fronts of each one by stamping the Interlocking Star Background (819H) with Versa Mark and the Starry Background (124H) with dark purple ink.  
 
 
On one of them, I used the Teacher Tools (792G) image to embellish the front. I colored it with Copic markers. Then, I stamped "Thank You" from the Box of Chocolates Greeting (967F) and cut it out with a fishtail banner to put below the image.  
 
 
On the other, I stamped the Brush Thank You (1095H).
 
The inside message was computer generated and the tops of the message cards were embellished with a paper bow.  A matching, layered flower embellished with a pearl in the center decorated each bow.
 
 
Once I had my ideas drawn up on paper and started to create these, everything seemed to fall right into place.  I really had a lot of fun making these and I hope his teachers really enjoy them!
 
Of course, I hope you do too!
 
Thanks for stopping by and have a wonderful day!
 
Smiles,
Jennifer

Friday, March 30, 2012

Pop Up Birthday!

Happy Friday everyone!

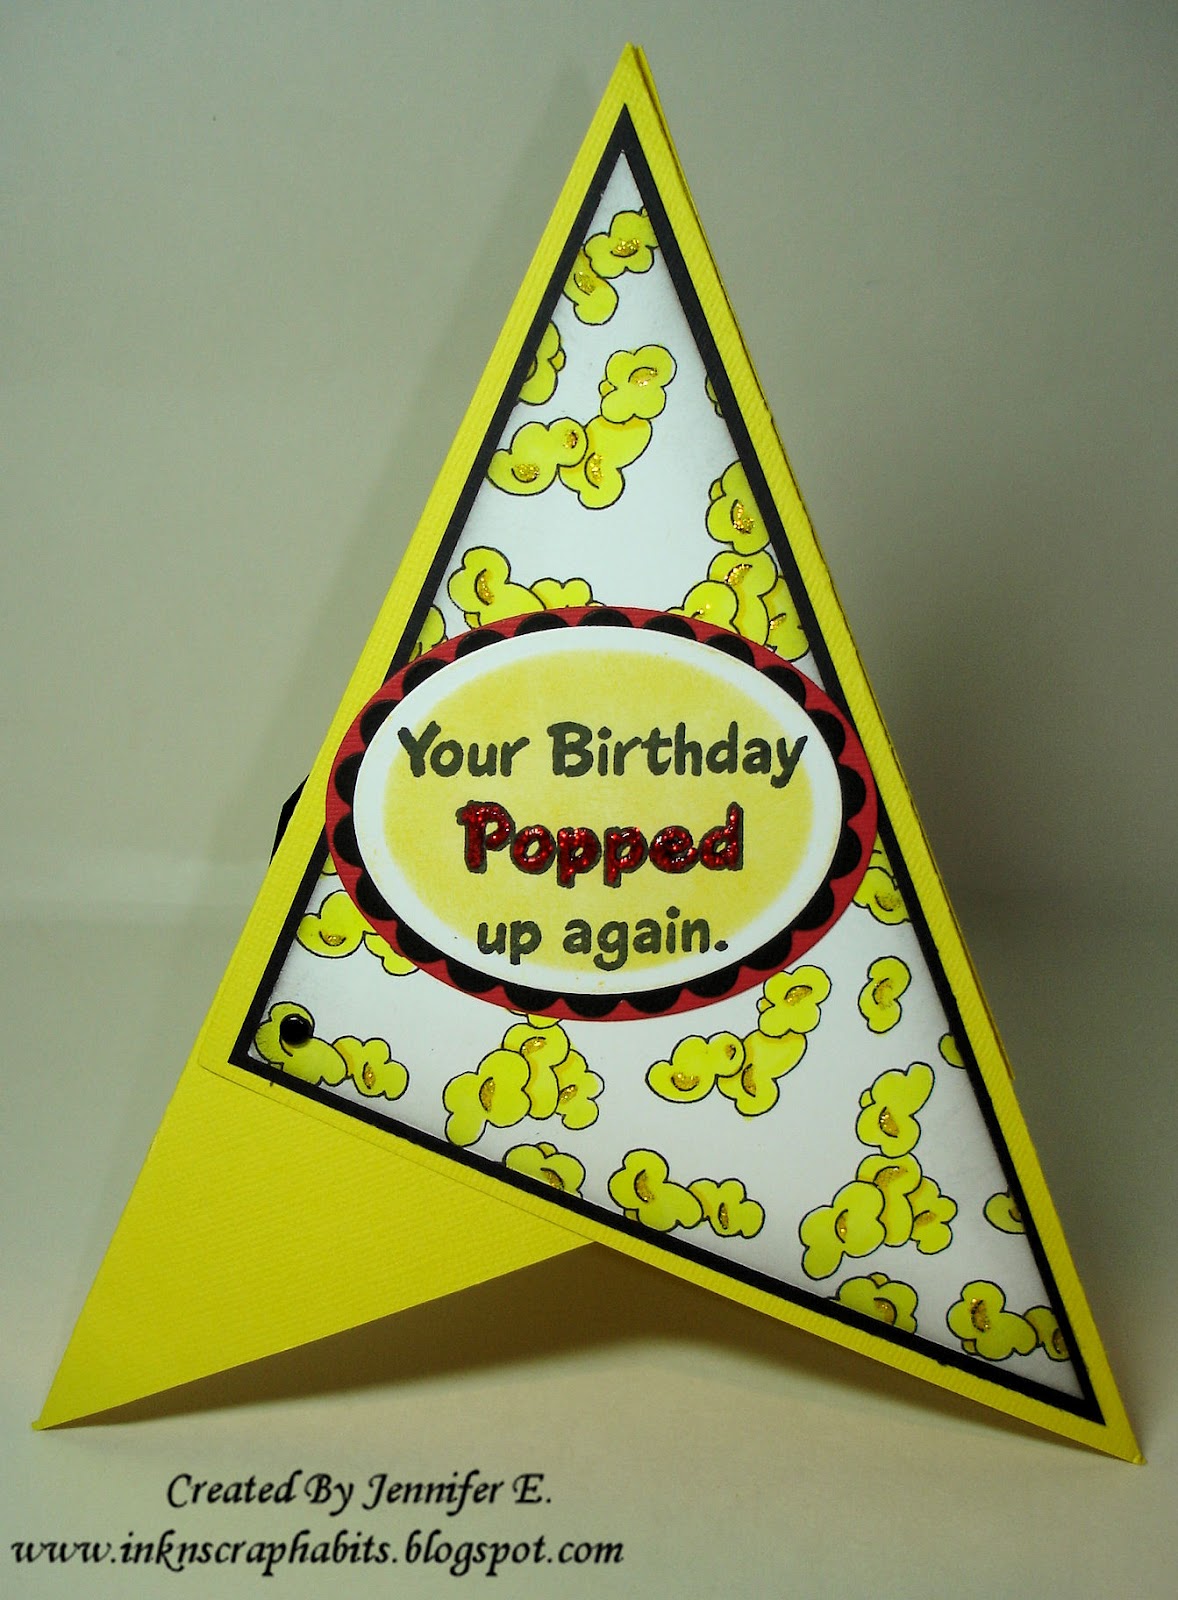
This week's DRS Designs challenge is all about shaped cards--no square or rectangle cards allowed. I really had to think about this one since anything but square cards tend to be difficult for me. I'm sure you can imagine my excitement when I found the tutorial for a Teepee card in the April issue of Scrap and Stamp Arts. It's perfect for this challenge! I, however changed the theme from a reindeer card to this Popcorn Birthday card.

Knowing that I needed some patterned paper for this card, I created my own using the Easy Popcorn Background (1124H). After cutting it to size, I matted it with black cardstock and then colored each kernel with my Y06 and Y08 Copic Markers. I also added a little Stickles to them. It really brightened up each panel. It almost made it look as if warm, melted butter glistened on each piece. Yum! Is your mouth watering yet? LOL! I assembeled the teepee as shown according to the tutorial and added stamped embellishments to each side.


The first side I stamped with a portion of the Popped Up Again Birthday Greeting (924H). The word popped was coloed with my R29 Copic marker and then I added red Stickles to the word "popped" to make it pop!


The next side was embellished with the Popcorn Bowl image (1131G). After coloring it with Copic Markers, I cut it out and adhered it to a black cardstock oval. The popcorn on this image also has Stickles on it.


Finally, here's the last side.  The image used here is the Popcorn Box (920H).  It was colored the same way as the other images and of course, Stickles were used again as well. Do you wish you could just reach in a eat a hand full of that deliciousness?!?!


 If you'd like to play along and win some free stamps.  Link up your Anything but Square card HERE.


Thanks for stopping by and have a wonderful weekend!

Smiles, 
Jennifer

Wednesday, June 17, 2009

Sunflower Pot

My sister's 28th birthday was this past Monday and since she's a huge fan of my cards I knew I had to make her one. I've been seeing more & more of those cute little flower pot cards and so I decided to give it a try for her birthday card. Like me, my sister is huge fan of sunflowers so I tried to create them with some paper punches I had. Here's what I came up with...


Overall I thought this was really cute & my sister loved it, but this was another one of those projects that I was completely surprised by how small the finished project was. I thought this card would fit perfectly in an A2 sized envelope (meaning that the finished card was approx. 4.25" x 5.5"). Well it did fit, but I could have added about 2" across and about another inch or so to the height--my A2 envelope was too big for this card! The pull out card was so narrow that I had to type my inside message just to make it fit and look nice. As you can tell, I used a very small font.


But, now I know, and I've revised the dimensions that I used to create this card so if I want to make it again I'll have them on hand.


I decorated the back as well by heat embossing the Sunflower Recognition stamp by DRS Designs in copper embossing powder. I signed my name with 2 hearts and my sister's birth date.


Stamps: DRS Designs Sunflower Recognition stamp (C786), Studio G Clear Stamps-Happy Birthday
Ink: Colorbox Fluid Chalk Ink in Creamy Brown, SU! Chocolate Chip, Versamark
Paper: Smooth beige cardstock by The Paper Company, Dark Brown cardstock by American Crafts, Bazzill Bling Yellow Cardstock
Accessories: EK Success Flower Punch, Flower die cut from Cricut and George and Basic Shapes Cartridge, Nesties, Cuttlebug and Cuttlebug Swiss Dots Embossing Folder, Colored Safety Pin by Joann's Scrap Essentials, Ribbon by Michael's Dashes, Dots and Checks, EK Success Slim Line Border Punch, Creative Beginnings Copper Embossing Powder, Heat Gun


Thanks for visiting here today & Thank you to all of my readers! I appreciate all of the comments you leave me. I really look forward to reading them everyday!

Hope you have a wonderful day!

Smiles,
Jennifer

Friday, October 10, 2008

Fun Filled Friday Challenge-Scallops!

Kimmy Challenged us to use scallops in our challenge project this week. I knew my Nesties would be handy for this challenge!


I created a Scallop Circle card. I think this is one of the first "shaped" cards I have ever made!


The image is colored with markers and cut out and layered using my Nesties. As I'm sure you can tell, I also used my Nesties to create the actual card base! I stamped the sentiment on matching dark pink cardstock & used the SU! Word window punch to punch it out.


This is the first time I've really "blinged" up one of my cards as well. The layered image alone on the scalloped cardstock base made things a little too plain, so I thought the bling was just what it needed to dress it up a bit! I also used my white Gelly Roll pen to add the white dots to the light blue scallop.

Stamps: Image-Inky Antics, Sentiment-A Muse
Ink: Versafine Onyx Black, Colorbox Fluid Chalk Ink-French Blue
Paper: Smooth white cardstock by Office Depot, Bazzill Cardstock, Cardstock by Paper Reflections
Accessories: Zots Glue Dots, White Gelly Roll Pen, paper flowers-Prima, Bic Markers, Copic Markers, chalk-Inkadinkado, SU! Word Window Punch, Nesties, Bling by Me and My Big Ideas-Icon Stickers, Darice Finishing Accents and Hero Arts Gem Stones.


Don't forget to check out Kimmy's Scallop Challenge!

Do you have big plan for this weekend? I'm getting together with some of my cardmaking Friends and we are going to craft the night away tonight. I'm so excited I can't wait for them to come over. I plan on keeping my mouth shut and getting tons done. (Yeah right!) Well, I have good intentions of getting a lot done, so stay tuned, I'll have some new cards to show you very soon!

Until next time...

Smiles,
Jennifer

LinkWithin

Blog Widget by LinkWithin