Welcome to Ink N Scrap Habits!
I've created this blog to share my life & love of paper crafts with others. You will read bits and pieces of what goes on in my world and be able to see my paper craft creations! Please leave me a comment if you see something you like. I'd love to hear from you!
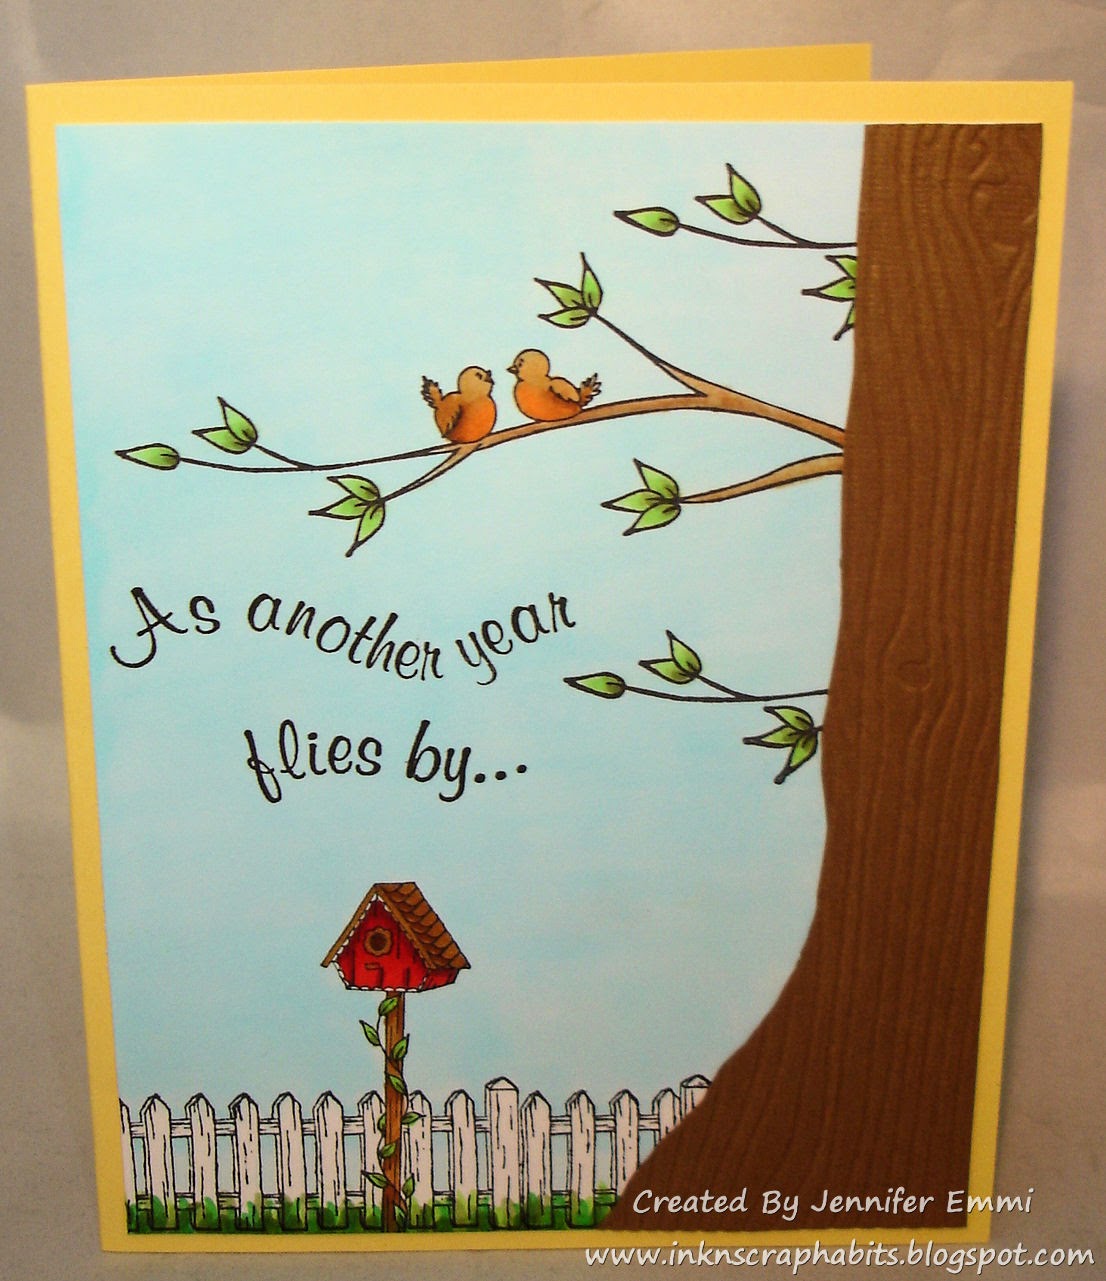
There's nothing better than having universal greeting cards in your stash that could be used for multiple occasions. Like this card I'm sharing with you today, it could be used as a birthday card for someone who likes birds, or an anniversary card because of the way the birds look on the Lovebirds Branch (413H). It would all come down to what the rest of the greeting inside read, and for now I'm going to leave that option open until I actually decide to use this card.
The scene I created here was started with a piece of white cardstock. I stamped the Lovebirds Branch 3 times in different places and at different positions coming from the right side of my card front. Next, I stamped the Single Bird House (406D) near the bottom, masked it and then stamped the Picket Fence (478P) in place over top. Everything here was colored with Copic Markers, including the sky and the grass. I hand cut a piece of brown cardstock and embossed it with a wood grain embossing folder for a realistic look, and adhered it in place on the far right side. The final touch was adding the Another Year Flies By (489F) Greeting right in the center. The card front was then added to a yellow cardstock base to make the card complete.
Have a great day,
Smiles,
Jennifer
Ha! There's a Birds and the Bees challenge posted on the DRS Designs Blog this week, and no, you don't have to be afraid to run over and check it out, LOL! I promise it's all G rated! ;-) DRS Designs has some new Spring stamps that fit the bill perfectly for this challenge and I'm showing some of them off today.
I know this card doesn't look like much, but I've used quite a few stamps on it:
Spring Bee Happy Greeting (367E)
I started my card front with light blue cardstock and stamped the Leafy Tree Branch and the Beehive branch so that it was emerging from the left side of the card front. The bee was first stamped on white cardstock, colored and then adhered in the empty space in the upper right corner with it's flying trail. After coloring them all with Copic Markers, I hand cut the tree trunk from brown cardstock and then embossed it with the wood grain embossing folder by The Paper Studio. It was adhered in place and then the sentiment was stamped at the bottom as shown. Finished card size is A2-4.25" by 5.5." I hope you like it!
Smiles,
Jennifer
Of course, Spring is the perfect time of year for a floral challenge and you can find the Bloomin' Beautiful Blog challenge this week over at DRS Designs. One of the most prevalent flowers in my yard right now are dandelions, so I thought this spring card made with the Dandelion Puff (380G) was a perfect fit!
This card was started by heat embossing the Dandelion Puff in fine, black embossing powder on vellum. Then I sponged each of the puffs with yellow ink. The vellum was adhered to white card stock and a decorative border punch was used at the bottom of it before adding a matching yellow ribbon. Then this was adhered to turquoise card stock to create the card front. I stamped the upper portion of the Spring Is Creeping Verse (759H) in the lower right corner before adding the card front to a turquoise card stock base.
I hope you have more than dandelions blooming in your yard!
Thanks for stopping by!
Smiles,
Jennifer
Wishing you all a very joyous Easter!
Smiles,
Jennifer
Yeah, It's April! Another month away from the cold weather and icky illnesses. However, I know a few families that are experiencing another round of the flu right now. Hopefully the weather will warm up a bit and we can all open the windows and air out our houses from all of the germs that have been festering all Winter!
Here's the card I made for a friend who has the flu and coincidentally, it's appropriate for this week's DRS Designs Blog Challenge too. April Showers bring May flowers as they say, and I can't wait!
I used the Ducks Decoration (565H) and the Raindrop Background (1012H) to create the scene for this Get Well card. The image was colored with Copic Markers and SU! Marina Mist was the blue ink used to stamp the raindrops. The upper portion of the Under The Weather Greeting (047G) was stamped at the bottom of the image as shown. I added some coordinating banners to the left side of the card front and added a paper flower and a violet pearl to the center to dress it up. Despite the rain shown on this card, I hope it cheers her up!
Have a great day!
Smiles,
Jennifer
There's a new color challenge on the DRS Designs Blog this week. The inspiration photo is below and it's all about Spring with pinks and greens!
I thought the Easter Daffodil Oval (663L) was perfect for this color combo.
The entire image was colored with Copic Markers. I used RV000, RV02, and RV23 on the daffodils. The leaves were colored with G00, G02, and G05. Y17, Y15, and Y02 were used for the background. I used RV23 to colored the image divider and the bottom was colored with YG06.
I built up the card front by layering green and pink cardstock. The green panel was embossed for texture and the pink panel was layered with a scallop border and some light green and white twine tied in s knot. Finally, I added some pearls around the matted image and ta da, it was complete!
Thanks for stopping by. I hope you'll be back soon!
Smiles,
Jennifer
Happy St. Patrick's Day to you all!
The Infinity Shamrock was colored with the Copic Markers G00, G02, and G05.
I hope your day is full of fun, happiness and lot's o green!
Smiles,
Jennifer
Hi Everyone!
With St. Patrick's Day right around the corner, I'm still playing with my shamrock stamps and I can't seem to get enough! Maybe it's the promise of Spring that gets me so excited about working with these stamps. I'm giddy that our weather seems to have made a turn for the weather and I can only hope that it keeps warming up from now on. Here's another card I made using one of my favorite stamps, DRS Designs new Four Leaf Clover Friends Greeting (284F). I love the assortment of greens on this card and I love when I can use stamped images as embellishments. Read on for my explanation...
.JPG)
I stamped the greeting on white cardstock and then used a banner die to cut it out. While it was in the die, I sponged green ink over the top of it to create the white border around it. Then it was matted with a dark green card stock banner. I colored the shamrocks from the Shamrock Swag (1080F) with Copic Markers and then fussy cut them out to embellish the top of the banner. For the backgrounds, I used stamps to create my own pattern papers. I started with the Lines O'Plenty Background (366H) on the white card stock and then distressed the edges was a little bit of green ink. It was then matted with light green card stock and next, the panel was adhered to the front of a dark green cardstock base. The next pattern paper I made was with the Shamrock Background (326H) which was stamped on a small panel of light green card stock. I added a white scalloped border to the bottom of it and then tied a green ribbon around the top before adhering it in place on the card front. I finished this card by adhering the banner in place on the right-hand side of the card front as shown.
Well, that's it for me today.
Thank you so much for stopping by.
Enjoy your day!
Smiles,
Jennifer
If your looking for free stamps this week I have 2 opportunities for you!
The first is with DRS Designs weekly Blog Challenge. The theme is "Button It!" How easy is that? Many of us use buttons as everyday embellishments anyways so this should be easy to complete.
That's exactly what I did for today's card. I used a button to embellish the bow I added to the bottom of my "Peep Garden." This Easter card uses the Simple Easter Bunny (347E), which I colored with Copic Markers. Then I fussy cut each of them out and arranged them as shown. I even made my own grass by stamping a piece of green card stock with the Easy Grass Background (059E).
The second opportunity for a chance to win free stamps is with Tuesday Morning Sketches. DRS Designs is their sponsor this week. One lucky winner will be picked to win a store voucher to DRS Designs online catalog for creating a challenge project with the sketch below.
Unfortunately, time was against me this week and I was unable to design a card using it, but I hope you'll get a chance to! Even better, use this sketch for your card layout and then embellish your card with some buttons to satisfy both challenge requirements! Someone has to win, why not you?
Good luck!
Smiles,
Jennifer
Can you believe this is the last week of February....already?!?!? That means that March is right around the corner and perhaps at some point it will turn to Spring and we can put this deep freeze behind us! I'm done with winter, can you tell? LOL! I have a bad case of cabin fever and I'm itching to get outside with my boys! One good thing about the weather still being yucky is that I don't mind being trapped inside if I can spend the time stamping. Today I'm sharing an Easter card I recently made during one of our recent Arctic Blasts, where the wind chill was -30 degrees!
I started by coloring the Three Wooden Crosses (1116K) with Copic Markers. I used E31, E33 and E35 specifically. I cut the image out using an oval Nestability die. Then, I masked it with a Post-it Note and sponged it with light blue ink, layering the ink, so that it was heavier toward the bottom of the crosses. The ground beneath the crossed was sponged with brown in k in the same manner. The colored image was layered with a dark brown scalloped oval and set aside while I worked on the rest of my card.
For one side of the card front I used Kraft colored cardstock that was embossed with a wood grain embossing folder to match the texture of the wooden crosses in the image. I used smooth blue cardstock for the opposite side and embellished it with a dark brown decorative border to hide the seam between the 2 card front panels. Then I stamped the I Am The Resurrection Greeting (303D) on the lower portion of the left side of the card front. The matted image was adhered in place just off center as shown and then I embellished the upper left portion of the card front with 3 different colored banners and a button tied with a blue twine bow. This card was then completed by attaching the card front to an A2 dark brown cardstock base.
I'm really happy with how this turned out, but blue and brown are one of my favorite color combinations, so I might be a little biased. I hope you like it too!
Thanks for stopping by!
Smiles,
Jennifer
Yeah! It's official, today is the first day of Spring and to celebrate there's a "Bloomin' Spring" challenge on the DRS Designs Blog this week. One lucky winner will win their choice of 2 stamps from DRS Designs! Here's what I created for the challenge.
I made this Springtime card using the Friendly Flower Frog (1115G) and the Goodbye Winter Greeting (384G). The frog was colored with Copic Markers and I split up the second half of the greeting to accomodate my layout. Yellow rhinestones were added to the flower centers to spice the image up a bit and a few pink brads wmbellished the embossed panels nicely. Finished card size is 4.25" x 5.5."
It's definitely time to watch the flowers grow and I'm so looking forward to it! Are you?
Have a great day!
Smiles,
Jennifer
Hi Everybody!
There are now new Spring and Easter stamps available for purchase from DRS Designs! Woo Hoo I love getting new rubber and I'm sure you'll like these new stamps too! Today I'm showing off the Tulip Bunny (1112K) on this Easter card.
I colored the image with Copic Markers and kept my layout rather simple. I embellished this card by adding a small panel embossed with the Swiss Dots folder that I lined with a decorative border punch and a beautiful pink satin bow complemented the image nicely. I stamped the Vertical Happy Easter (838D) on the sentiment banner and added it to the empty space to the left of the image. Finished card size is 5.5" x 4.25."
Hope you enjoyed seeing my card today and that you're looking forward to Spring as much as I am. It has to be right around the corner...right?!?!
Have a great day!
Smiles,
Jennifer
Hippity, hoppity Easter's on its way!
Yes, this is true, but it is still very hard to believe with the fresh 8" of snow we had dumped on us yesterday. Will this Winter ever end?!?!
Well, here's a little wishful thinking I guess--this is the Easter card I made while I was stuck in the house during the snow storm. I've made this for DRS Designs "You're A Good Egg" Challenge.
I created the line of Easter eggs by masking DRS Designs new Easter Egg With Bow (1108D) stamp. They were colored in Spring pastel colors with Copic Markers. I filled the empty space above the Easter Egg line up with the Medium Script Happy Easter (762F) sentiment and embellished the card front with some pastel borders and a button tied with twine.
So how's the weather where you live? I hope it's a lot more Spring-like than mine!
Thanks for stopping by and be sure to check out the Egg challenge HERE.
Smiles,
Jennifer
I've been so busy lately that I didn't even realize that we change the clocks this weekend until my son's teacher brought it up in class yesterday. Despite what majority of us see out our windows and what we feel when we're outside, it must mean that Spring is near. Right?!?!? At least it's a step in the right direction--Mother Nature has been cruel to us this Winter!

It was nice to create a card with a Springtime feel! I made this for DRS Designs "For the Birds" weekly Blog challenge. This is a sneak peek for one of the new Spring stamps that DRS Designs will have available for purchase very soon. The Bird Bath stamp (1127H) was colored with Copic Markers and sponged with yellow ink while in a Nestie die. Unfortunately, it is difficult to see in this picture, but I also used Diamond Glaze on the water to give it a realistic effect. I paired this image with the Spring Is Creeping Verse (759H). In order to accommodate both the image and the verse, I had to make this card a bit larger than usual. The finished card size is 6" x 4.5."
The first line of this verse explains our weather perfectly right now--Spring is creeping toward us, yet the only way we know this is by the calendar. It will be nice when the outside temps reflect this as well!
Hope you've enjoyed my post today.
Have a wonderful day!
Smiles,
Jennifer
Looking for another opportunity to win a $15 store voucher to DRS Designs? Use the (Oh, so cute!) inspiration photo below to create a card and then run over to the Cupcake Inspiration Challenge Blog to link it up for your chance to win.
On first glance, I was going to create an Easter card for my challenge project, but I decided on a Get Well card instead using the adorable Ducks Decoration image (565H).
Hope you like it!
Smiles,
Jennifer
Yeah, it's the First Day of Spring!
I'm ready to say "So Long Winter!"
The flower border was colored with Copic Markers and fussy cut. Then I adhered them in place above and below the sentiment as shown. The middle flower on the bottom panel was popped up for dimension.
How's the weather in your neck of the woods?
Are you ready to say "So Long" to Winter too?
Smiles,
Jennifer
Happy Friday!
Isn't Spring such an exciting time of year? I love seeing all of my flower beds begin to bloom and best of all you can't beat the warm, mild temps and all the sunshine! This spring card sums it all up perfectly!
The Spring Wording Square (669G) was recently released by DRS Designs. I created my own background by stamping the Single Flower Blossom (1065C) repeatedly. I added a fun border punch to outline my stamped background and embellished the card front with some Baker's twine that I recently added to my embellishment collection.
All of the coloring and edge distressing was done using Copic Markers.
I hope your Spring is in full bloom and that you take the time to enjoy it!
Thanks for visiting!
Smiles,
Jennifer
Welcome Spring!
I think Mother Nature has finally won the battle with Old Man Winter and the weather here has finally turned Spring-like. This new Daisy Basket (671L) from DRS Designs screamed Spring to me and I put together this card using the new one line Welcome sentiment (737B). Now, I know I made this to welcome Spring, but wouldn't it be a great card to give to new neighbors?
I colored the Daisy Basket with Copic Markers and thought it'd be fun coloring the blooms blue. What do you think--or do you prefer them traditionally white? I used a glue stamp pad and decorated the card front with the Polka Dot Background (688P) and then sprinkled the dots with blue glitter. I also added some white sheer ribbon and am really happy with how fun and cheery this card turned out!
Here's to hoping that you are enjoying Spring-like weather where you're at as well!


.JPG)


