Welcome to Ink N Scrap Habits!
I've created this blog to share my life & love of paper crafts with others. You will read bits and pieces of what goes on in my world and be able to see my paper craft creations! Please leave me a comment if you see something you like. I'd love to hear from you!
Can you believe Thanksgiving is next week? Time is flying by and I can't seem to catch up! Unfortunately I missed last week's DRS Designs Blog Challenge, but I'm glad I found time to play in this week's beautiful color challenge. Here's the inspiration photo:
I colored the image with Prismacolor pencils and sponged around it with brown ink. It was adhered on a red scallop square. I stamped the sentiment on the bottom portion of the center panel and then layered it with yellow cardstock and then again with red cardstock that was punched to create the decorative border. Three fishtail banners were added to the left side and the matted image was adhered as shown on the right side. The card base was made from brown cardstock to form an A2 size card and the layered panel was adhered in the center to complete this card.
Make sure to run over to the DRS Designs blog and check out all of the fabulous DT cards and enter your color challenge card to win a great prize!
Thank for stopping by!
Smiles,
Jennifer
Finally, sometime to myself to stamp and blog! Things have been so hectic here--we now have my 4 year old son into ice skating lessons, we are often fighting the temper tantrums of both boys, my Husbands crazy work schedule leaves me with all the house-hold chores more often than I'd like to count, and I'm already feeling the pressure of the holidays that has me shopping more now than I normally do. Did I mention how much homework a preschooler brings home?!?!? Makes me wonder what his homework load will be like in a few years!! Craziness!
At any rate, DH and I have really been making an honest effort to get both boys ready for bed around 7pm so they can hopefully be sleeping by 8pm. I know that probably sounds pretty routine for most families with little ones, but it's really a struggle for us, since we a just sitting down for dinner around 6:30pm. Thankfully, it's been working and it's allowed for a bit more "me" time, which I've been loving! This Happy Thankful People Greeting (612G) from DRS Designs couldn't be more true! I am thankful for my family and being with them makes me happy, despite the hecticness!

I created this card for the DRS Designs Blog Challenge from last week, but never got around to blogging about. The challenge was "Pile It High," using layers on your challenge entry. First I created the card front using light blue cardstock and then I stamped the Tree Limb (568P) vertically on the far right side and then the Autumn Leaf Pile (575F) was stamped in the center at the bottom. I sponged blue ink above the leaf pile and green ink at the very bottom edge for grass. Next, I stamped the leaf pile again on white cardstock, colored with Copic Markers, and then cut it out and adhered in place in the scene I created on my card front. The greeting was stamped in the empty space as shown and then I drew a line around the edge of the card front omitting the stamped portions to complete the look. The card front was matted with a piece of yellow-orange cardstock to match the color scheme before finally adhering it on to a turquoise cardstock base. I really like the look of this card as it was and decided not to embellish it any further. Sort of funny how this card has a few layers, yet it's still completely flat!
Thanks for stopping by!
Smiles,
Jennifer
I love the Fall and even more so, I'm really excited that Thanksgiving is right around the corner. Despite how hectic the holidays can be, I love all the togetherness! There's nothing more rewarding then lots of time with extended family and to me, that's what the holidays are all about.
Since I was in a Thanksgiving kind-of mood, I made this Thanksgiving card! for the new challenge on the DRS Designs blog this week, "Fall-ing For You."
I started by stamping and coloring the Autumn Flower Spray (452L) with Copic Markers. I used a Nestability die to cut it out and then sponged brown ink around it while it was still in the die. Next, it was matted with brown and yellow card stock cut from Nestability dies. I stamped the *NEW* Give Thanks Bible Verse (585E) on yellow card stock and cut it out with a fishtail die. The green card stock that was used to mat it was cut out the same way. The card stock base was made from brown card stock to form an A2 size card, and the stamped portions were adhered in place as shown. I cut a tab from green card stock and added three yellow pearls to embellish the upper left corner of the matted image and this card was complete!
I hope you like it!
Thanks for stopping by and have a wonderful weekend!
Smiles,
Jennifer
Happy Fall, y'all!
Can you believe it's the first day of Fall? Where has 2015 gone? It's hard to believe that Christmas is right around the corner, but for now, I'm excited for this time of year and for DRS Designs new Halloween stamps!
I stamped and colored the Witch Feet? (140H) with Copic Markers and paired it with the new Ghoul Friend Witch Greeting (536E). This greeting totally makes me chuckle and I know a few "ghoul" friends this would be perfect for! Once I had the focal image colored, this was a pretty quick and easy card to complete. The greeting was stamped with black ink and then cut out using a Nestability die. I used the die as a stencil and sponged the stamped portion with orange ink to match the color scheme. I assembled the card as shown and decorated the card front with a punched spider web at the top edge that was embellished with light green rhinestones, a few cardstock bats with green-dotted eyes, and a bright green grosgrain ribbon pulled it all together. I hope you like it!
Have a great day!
Smiles,
Jennifer
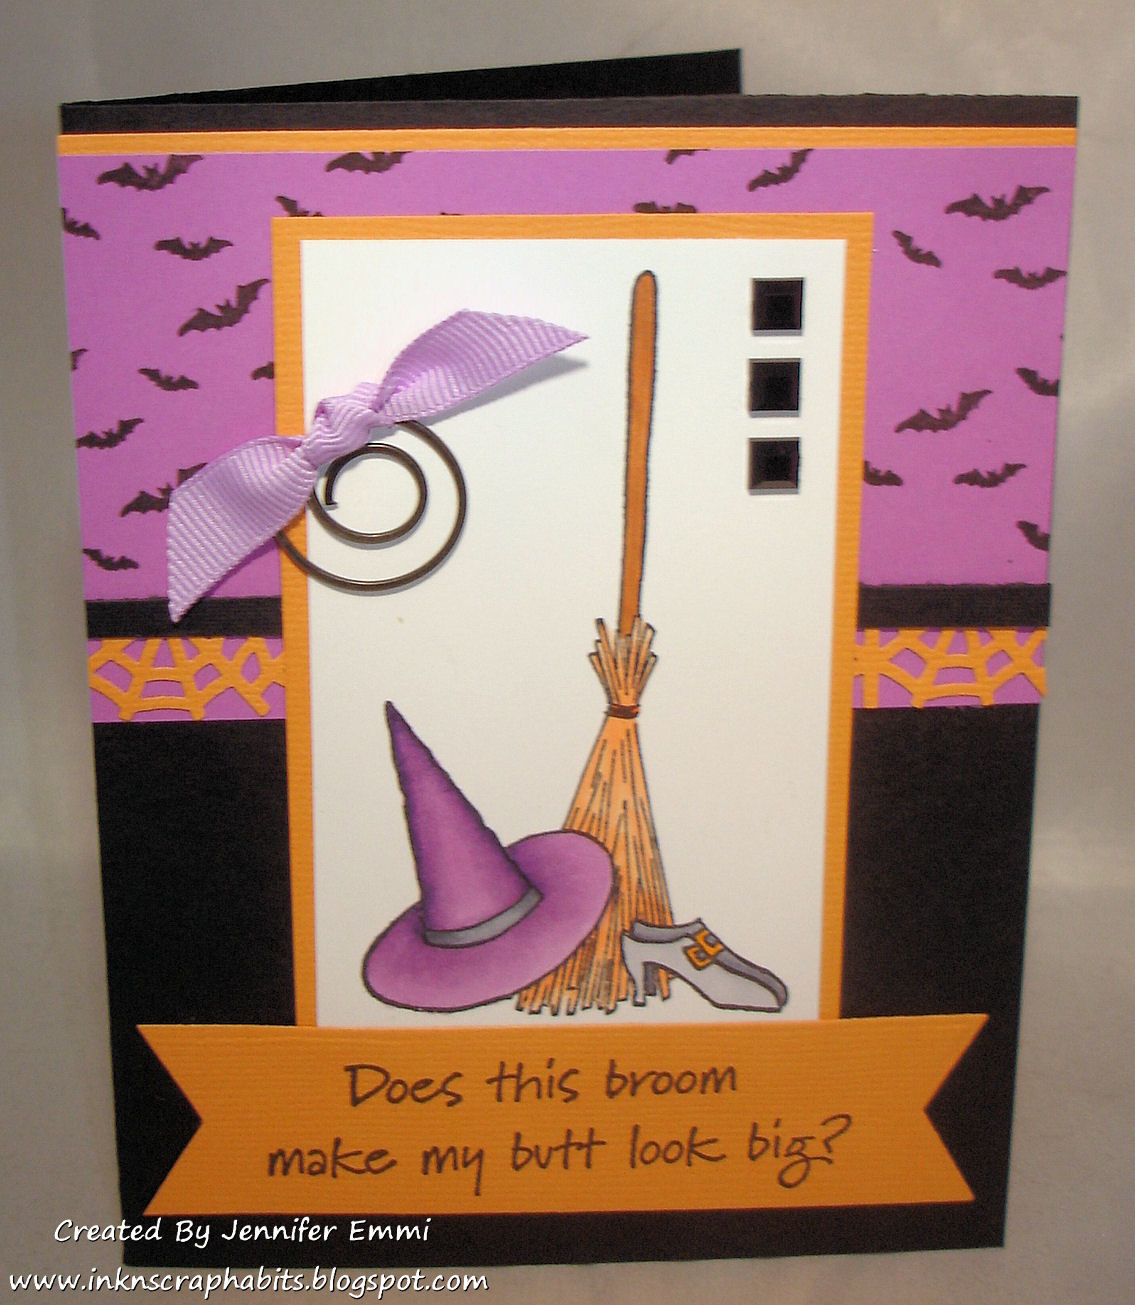
As I've mentioned previously I love this time of year, and my stamping has gotten a lot more fun recently with a new package of Halloween stamps from DRS Designs! Today I'm showing off one of their new sentiments for this weeks blog challenge using the color palette below.
These colors are perfect for a Halloween card, wouldn't you agree?
I started by coloring the Witchly Accessories (154K) with Copic markers. It was matted on orange cardstock and embellished with a spiral clip tied with violet ribbon on one side, and three black square rhinestones on the other. I created my own pattern paper panel using the Accent Bats (517A) and embellished it with a spiderweb punched out from orange card stock. The card base was created from a piece of black card stock to create an A2 size card. The pattern paper panel was adhered at the upper portion of the card base and then the matted image was adhered in place as shown. I stamped the "Butt Look Big Greeting (542E)" (Soon to be released) on a piece of orange card stock, cut it out with a metal die and adhered it at the bottom of the image to complete my card.
If you are interested in playing along in this color challenge, DRS Designs is giving away two stamps of your choice from their online catalog. Click HERE to enter.
Good luck and thanks for stopping by today!
Smiles,
Jennifer
My family and I took some time this past weekend to go to the local Cider mill. Despite the fact that it was 90° with high humidity, the taste of Fall was wonderful! We were out in the country where they were harvesting crops--there were apples and corn on the cob everywhere, and the smell of donuts and cider was absolutely mouthwatering! By the time we left, I decided I'm done with the Summer heat and I'm ready for Fall! I'm looking forward to decorating the house this weekend with my son. I can't wait to get out my sunflower wreath, decorate the mantle with my leaf garland, and put the scarecrow on the porch! Last night when I sat down to stamp I was inspired by our Cider mill visit and I brought my Autumn stamps out to make this card!

I used several DRS Designs stamps to create this card. I stamped the Scarecrow (566F) first, then I masked him and used yellow and burnt orange inks to stamp the Long Tall Wheat (590H) behind him. I used Copic Markers to color the image. It was matted with a brown scalloped rectangle and set aside while I worked on the rest of the card. The card front was created with orange and yellow card stock. The orange card stock was embossed with a leaf embossing folder and a wide brown ribbon hid the seam where the two colors came together. The matted image was placed just off center between the panels as shown and the Happy Fall Ya'll (635B) sentiment was stamped in brown ink and cut out with a decorative paper punch. As you can see, it was placed at the bottom, left-hand corner of the image. The final touch was adding a fishtail banner embellishment in the upper right corner and an orange paper leaf was added to the center. The card front was then adhered to an A2 dark brown cardstock base and my card was complete.
So, what are your thoughts about the change of seasons--do you prefer the Summer heat or are you ready for Fall?
Thanks for stopping by today!
Smiles,
Jennifer
A couple weeks ago I created today's card for the DRS Designs "I'm so hungry" blog challenge, but due to a nasty computer virus I was unable to get it uploaded onto my computer to share. I'm glad that's all in the past now because you can only do so much on a smart phone and I'm happy to have my computer back!
When I first sat down to create this card, I really wasn't giving it much thought and as this card progressed it turned out to be a Thanksgiving greeting using non-traditional colors! I really liked the way the olive green, mauve pink, and the yellow color combination came together. I first colored the Indian Corn (151H) with Copic markers. Then, the image was masked and light brown ink was sponged around the image while it was in a Nestability die. On the pink cardstock in the background, I stamped the new Silhouette Cornstalk (179B) repeatedly using Versamark ink to create my own pattern paper. The One Line Thanksgiving Greeting (841D) was stamped above the image, and I used a portion of the new Thank You Lord Greeting (165G) for the sentiment below it. The finished card size measure 4.25" x 5.5" and other than the knot in the ribbon, this card is nice and flat for mailing. Have you made your Thanksgiving greetings to send out yet?
Thanks so much for taking the time out of your busy schedule to stop by today. I appreciate your visit!
The challenge that was recently posted on the DRS Designs blog this past Thursday is to create a project for any Fall holiday. My challenge entry was created with Thanksgiving in mind.
Both the sentiment and the image on this card are by DRS Designs. I started with the Fall Leaf With Acorn (471F) and colored it with Copic markers. I used an oval Nestability die to cut it out, masked it and sponged light brown ink around the image while it was still in the die. I love the nice, clean, framed edge this creates around the image! I think it really helps to make the colors in the image pop! Then I matted it with an orange scallop oval. The vertical panel was started with craft card stock. The upper portion of the Autumn Is Calling Greeting (150F) was stamped at the top with brown ink and an orange ribbon was tied in a knot and wrapped around it. Next, it was matted with brown card stock and then again with orange card stock that had been decorated with a border punch. As you can see the matted image was adhered just off center on the vertical panel. The card base was cut for an A2 size card from dark brown card stock and then the card front was embossed with a leaf embossing folder, and assembled as shown.
Head on over to the DRS Designs blog for all the details regarding this challenge and how you can win a store voucher to shop for free from the DRS Designs online catalog.
Hope you all had a safe and spooky Halloween as well as a relaxing weekend!
Thanks for stopping by!
I'm not sure how you feel, but I think 2014 has flew by way too fast! Maybe it's just because I'm getting older, or maybe because I'm really enjoying life and as they say, "Time flies when your having fun!" Or, maybe it's because I'm the Mother of 2 small children. It makes me so sad seeing my 9 month old son growing so fast. Just after the holidays we will celebrate his first birthday and I just can't believe it! Seems just like yesterday that my Doctor was worried about me going into pre-term labor and his big arrival, 3 weeks early. Despite all of the changes and growth 2014 has brought into my life, I am more Thankful than ever! Thankful for being blessed with a wonderful Husband to share my life with and thankful for our 2 little blessings that help make our lives challenging and fun all at the same time!

In honor of the Thanksgiving season that is right around the corner, the new challenge on the DRS Designs Blog this week is "So Thankful," and this CAS card is my challenge entry. The focal point of this card was stamped with the new Giving Thanks Greeting (160H) and the Simply Pumpkin (304G) was stamped overtop of it using orange ink. I hope you like it!
What are you thankful for this year?
Thanks for stopping by!
Smiles,
Jennifer
Hi Everyone!
Today I'm showing off one of DRS Designs newest Autumn stamps, Indian Corn (151H). Lately, I've been all about diagonals and I've incorporated them into the last few cards I've made-- this one is no exception!

I started by coloring the image with Copic Markers and then fussy cut it out. I used Nestability dies to cut the oval and scalloped pieces of card stock out. The oval was embossed with an embossing folder to add some texture to the card front. I love this look and need to remind myself to do it more often! I think it's unique and it really makes the eyes focus on the image that lays in front of it. For the background, I created my own pattern paper by stamping the Splatter Background (855H) repeatedly using yellow, green, and orange inks to match my color scheme. I also embossed the green strip of cardstock that was used to hide the seam between the 2 background layers. The Small Autumn Greeting sentiment (422B) was stamped just below the divided border with black ink and for the final touch, 3 green rhinestones were placed in the lower right corner of the card front.
Thanks for stopping by. I appreciate your visit!
Gotta love technology these days! It's been about a week without my desktop computer thanks to a virus and some other unwanted programs. It only took me about five days to use the virus scan protection program on our computer to figure out what was wrong and to clear up the problem. I'm glad to be back online without having to squint to see everything on my little phone!
So without having a computer to distract me for the last week, I was actually able to get some stamping done! Here's my latest creation that I made for the latest DRS Designs blog challenge. It's for a color challenge that's perfect for Fall!
I used their new Sunflower Hurricane Candle (167K) as the focal point on this card. I colored it with Copic markers and used a new embossing folder in the background. I still had vellum laying out on my desk from one of the last cards I created and thought it would be perfect to highlight the Brilliant Fall Greeting (502D) on this card as well. Hope you like it!
Thanks for stopping by!
I have a fun post to share with you today! Not only am I showing off what I created for DRS Designs latest blog challenge, but I also get to show off one of their new Fall stamps!
The Autumn Is Calling Greeting (150F) was just released this weekend and is now available for purchase. I stamped it in brown ink and then matted it with dark brown card stock to make it pop. I love the play on words here where the word "falling" is actually falling off the text line.
Interested in seeing what other Fall stamps were included in this release? Check out their new stamp page HERE and/or stay tuned to my blog to see more in the upcoming days!
Thanks for stopping by!
Smiles,
Jennifer
It's the perfect time of year for the "Leaf It To Me" challenge on the DRS Designs blog this week! It's time to show off all different kinds of leaves, and, best thing about the card I made was that I was able to use a leftover embossed piece from a previous project! Woo hoo, half the work was already done!
The Fall Leaf and Acorn (471F) panel was embossed with copper embossing powder on ivory card stock and then colored with Copic markers. This panel was matted on orange vellum that was cut to size and then embellished with a decorative border punch.
I used copper card stock for my card front and embossed it with a leaf embossing folder. The One Line Beauty of Autumn (704D) Greeting was stamped with brown ink on vellum, decorated with a border punch, and adhered to the bottom of my card front. I embellished it with a spiral clip and brown ribbon. Three brown square Brad's were placed in the upper right corner for the final touch. The card front was then adhered on to an A2 sized ivory cardstock base.
I hope you'll be able to get out this weekend and enjoy the beauty of Autumn! I know I will!
Thanks for stopping by and have a great day!
Smiles,
Jennifer
Here is the card I made for my challenge entry, "Happy Fall Y'all!"
I created this as a note card which measures 3.5" x 5". The card base and card front was made using Ivory card stock. I stamped the Medium Silhouette Fall Leaf (701D), the Fall Leaf and Acorn (471F) and the Open Leaf (584D) randomly with Versamark ink and heat embossed them using clear embossing powder. Then I sponged a combination of yellow, orange and blue ink over top. Boy, did that make the Fall images stand out! Next, the Happy Fall Y'all (635B) sentiment was stamped with brown ink and an orange ribbon was tied in a knot at the bottom.
Hope you're enjoying the change of seasons as much as I am!
Thanks for droppin' in today!
Happy Thanksgiving to all of you who are celebrating this wonderful holiday today!
We have a big family party planned for today and our house smells wonderful with the turkey in the oven! How are you celebrating today?
Here is a card I created from inspiration I found on Pintrest for today's challenge on the DRS Designs website, Happy Thanksgiving. I love the simple layout and how the twine is wrapped around the background banner.
I started first by coloring the Autumn Wreath (429M) with Copic Markers and then I carefully cut it out. Next, I assembled the card base using Kraft cardstock. I wrapped the twine around the red banner, adhered it in place and used a corner rounder on a small piece of dark brown cardstock. Then I ran it through the Swiss Dots embossing folder and adhere it inplace on top of the red banner. I placed the wreath in the center and added a small twine bow to the far left side. As a finishing touch, Thanksgiving Blessings (637E) was stamped at the bottom of the cardstock base.
Well, that's it for me today. I'm off to spend some quality time with our family and cherish all that we are thankful for.
Have a wonderful Thanksgiving!
Smiles,
Jennifer
Can you believe it's the middle of November already?!?!?! With that, Thanksgiving is only 2 weeks away and, dare I say it, Christmas is only about 6 weeks away! Have you made any Thanksgiving cards yet?
I created this one for this weeks DRS Designs Blog challenge, Rip Torn. We are to use ripped or torn paper on our project. This is also to show off DRS Designs new Classic Turkey image (1033H) and classic it is! I just love this image and I love how his feathers turned out colored with Copic Markers!
I started with an A2 dark brown cardstock base. The card front was embossed with the swiss dots folder on the lower half and the Thanksgiving Arc (050E) was stamped near the upper portion. I used a corner punch on all 4 corners and distressed the edges with brown ink.
For the middle panel I stamped the Polka Dot Background (688P) on ivory cardstock and ripped the bottom edge. Then, I used a decorative border punch on the red cardstock panel and ripped the bottom layer of that as well. I simply tied some red and white twine to the middle before adhering it to the card front. Finally, I added some dimension to the the card front by adhering the turkey image with foam tape.
I appreciate you stopping by today and hope that you'll play along with our Ripped Torn challenge. Check out all the details HERE, including the great prize DRS Designs is giving away this week.
Have a great day!
Gobble, Gobble!
Smiles,
Jennifer
I love Fall! It's a great time of year! I love the smell of leaves and all of the beautiful colors, and who doesn't love all of the apple and pumpkin flavored treats that are abundant now? Yum!! Another of my favorites are scarecrows. I used them to decorate both inside and outside my house. I just love their adorable faces and this Large Scarecrow (426L) from DRS Designs is no exception!
I colored this scarecrow with Copic Markers and used the out-of-the-box technique while cutting it out with a Nestie die. Then before removing the die I sponged it with brown ink which created a nice white frame around it. I did the same sponging technique with the Happy Fall Y'all Greeting (635B). The card front was embossed with a leaf embossing folder and 2 red brads embellished the border at the bottom of it.
What are some of your Fall favorites?
I hope you're enjoying this time of year as much as I am!
Smiles,
Jennifer
It's Thursday already and time to show off another DRS Designs Blog Challenge card. The theme this week is Sunflowers!
I chose to use the Pumpkin with Leaves stamp (165K) for the qualifying element for this challenge. I carefully colored it with Copic Markers and then masked and sponged tan ink around it while it was in a Nestie die. I used this same technique to add color to the stamped One Line Happy Thanksgiving sentiment (841D). (See my own tutorial for this HERE.) I also stamped the plaid that I used in the background. This was done with the Woven Plaid stamp (613P). I used brown ink and stamped it in 2 opposite directions. It gives a warm and cozy feel to this card, don't you think? The final touch was to decorate the sentiment banner. I used a brown button, threaded with orange embroidery floss that I neatly tied in a bow.
Tis the season for sunflowers, won't you play along?
Smiles,
Jennifer
There's no doubt that Autumn is near. There are all kinds of colors seen in the trees in my backyard and looking at them was the perfect inspiration to create this card for the challenge on the DRS Designs Blog this week, "Inspired By Autumn." What I love best about this card is that it's clean and simple!

I started first by stamping the Tree Limb (568P) on ivory cardstock. Then I used Post-It Notes to mask off the area that I wanted to sponge with orange ink in order to highlight the sentiment. I started by sponging a light orange color first and then sponged a darker orange ink as I got closer to the bottom edge. I defined this area further by scoring a horizontal line just above and below the sponged area. Using my Stamp-A-Ma-Jig, I carefully stamped the Changing Leaves Thanksgiving Greeting (1122G) over the sponged ink next to the tree. I matted the card front with orange cardstock and then added 4 mini copper brads as shown before adhering the card front to a dark brown cardstock base. What do you think?
Has Autumn inspired you yet this year? Show us and enter to win a prize from DRS Designs HERE.
Thanks for stipping by. Hope you'll be back soon!
Smiles,
Jennifer
Yikes, it's October already! Definitely time for harvesting and I'm sure a harvest moon too! Speaking of a "Harvest Moon," that's the theme on the DRS Designs Blog this week. Show us a moon image for a chance to win a fun prize. Today's card is my challenge entry.
I started with white cardstock that was cut with the Top Note die. All of the coloring on the Fall Fence (176M) was done with Copic Markers. Then I sponged yellow ink for the area where the moon was shining down and the edges were inked with a darker blue ink to accent the evening sky. I then added the Shine On sentiment (470D) above the image. I matted the colored image with orange cardstock and added a leaf embossed orange panel to the top. It was wrapped and tied with Fall themed ribbon and it was all adhered to a dark brown cardstock base.
Thanks for stopping by and have a great day!
Smiles,
Jennifer