Welcome to Ink N Scrap Habits!
I've created this blog to share my life & love of paper crafts with others. You will read bits and pieces of what goes on in my world and be able to see my paper craft creations! Please leave me a comment if you see something you like. I'd love to hear from you!
With my shy personality, I normally don't like to be the center of attention and I sure don't like to cause a scene. However, this Hula Pig (879E) is causing a scene and telling everyone to get your 'hula on' for this week's DRS Designs Blog challenge! The theme is to create a scene using any image, die cut, paper, or technique.
This scene was created by using the masking and sponging techniques. The Hula Pig, the Sandcastle (090G) and the Palm Tree (886G) images were masked and then the sky and the beach sand were sponged. I used Copic markers to color in the stamped images. Next, I used the Top Note Die to cut out my scene from the white cardstock it was created on and then matted it with pink cardstock before adhering it in place on a light blue cardstock base. I stamped the Sending You Sunshine Greeting (094D) on a flag banner and embellished it with a small red flower that was held in place with a tiny pink brad. The final step was adhering it to the card front as shown.
Do you like to create scenes with your stamps? I encourage you to join me in the Create A Scene challenge and enter your creation to win a great prize from DRS Designs. Good luck!
Thanks for stopping by today!
Smiles,
Jennifer
For most of us, I'm sure sympathy cards are our least favorite to make. However, after a long battle with cancer, my best friends Mother recently passed away. I felt it was important to make her a card to send my condolences and today I'm sharing the Sympathy card I made for her.
The stamps I used on this card are by DRS Designs. I started by stamping the Brush Deepest Sympathy Greeting (588G) in light blue ink. It was cut out with an oval Nestability die and then matted with blue card stock cut from a scallop oval Nestability die. Next, I created my own pattern paper to decorate the card front. The Silhouette Branch Background (363H) was heat embossed on light blue cardstock using clear embossing powder. I then hand-cut the bottom scalloped edge and then layered it with white card stock cut the same way. The top of the white card stock was embellished using a border punch. A sheer white ribbon was tied across the middle, knotted on the left hand side, and then the matted sentiment was adhered in the center. Next, the card front was adhered onto a blue card stock base and three white pearls were adhered as shown in the bottom right corner. Finally, I decorated the inside a little bit by stamping the silhouette branch background with blue ink at the top and bottom edges of the white panel that was adhered inside.
It's little things like this that help us get through difficult times, and my friend was really happy to receive this card. I'm glad I took the time to make it.
Thanks for stopping by and have a great day!
Smiles,
Jennifer
Hey Everybody!
Have you seen the new color challenge on the DRS Designs Blog? I love it!!!! Here's the inspiration photo:
Maybe it's because I'm the Mother of 2 boys and I see colors like these all the time, but they inspired me to create a masculine card. I coordinated them with DRS Designs Lighthouse stamp (461G) and thought the yellow, orange and blue would make a gorgeous sunset. I think I was right! ;-)
I colored the image with Copic Markers and then used Nestibility dies to cut it out and layer it with coordinating cardstock. I embellished it with a spiral clip and tied some twine in a knot around it. The A2 size cardstock base was made from Navy cardstock and I layered half of it on a diagonal with orange and light blue cardstock as shown. I stamped the Small Birthday Wishes" Greeting (020B) at the bottom and adhered the embellished image in the center.
Too bad I don't have any masculine birthdays left for this Summer. This beauty will have to wait until next year! ;-)
Have a great day!
Smiles,
Jennifer
Hi Everyone!
One of my favorite color combinations is pink and brown, and after I stamped DRS Designs 4 in 1 Seashell stamp (473F) in various pastel colors, I knew that's how I wanted to proceed with this birthday card.
I used Copic markers to color the seashells and then fussy cut them out. I stamped the Beach Birthday Greeting (480G) and then cut it out using a Nestability die. I sponged it with light brown ink before removing the die to create the nice, white frame around it. I matted it with pink cardstock that was cut with a scallop die and then adhered the seashells around it as shown.
I used a piece of Kraft card stock for my A2 size card base and stamped the Sea Grass (128L) on the left-hand side and the Lighthouse (461G) on the right-hand side. Both were stamped using Versamark Ink. The embellished greeting was adhered in the center of the card front. I didn't want to take away from it, so I kept things simple and used a little bit of pink and white twine tied in a knot for the only embellishment.
I hope you like this clean and simple birthday card as much as I do!
Thanks for stopping by and have a great day!
Smiles,
Jennifer

I colored this image again with Copic Markers, but this time I also added Stickles to the flower. I wish I would have used Stickles on my previous Happy Mail card, but I guess changing things up a bit is what makes each handmade card unique!
I kept my layout simple and started by stamping the card front with the Interlocking Flower Background (813H). Next, I cut a piece of black card stock to fit the left-hand side of my card. I punched one side of it with a decorative border punch, and then embossed it with a floral embossing folder. I added three thin strips of green card stock from the right-hand side and then added a light blue brad at the opposite end of each one. Finally, I adhered the matted image to the center and my card was complete!
Interested in free stamps from DRS Designs? Play along in this challenge and link your card for a chance to win!
Thanks for stopping by!
Smiles,
Jennifer
I've been enjoying new stamps from DRS Designs. This release is fabulous and today I'm showing off the new Fleur De Lis stamp (421F)!
I created this Clean and Simple Friendship card by pairing the Fleur De Lis stamp with the Friendship Double Divide Greeting (1065F). As you can see, a Fleur De Lis image was stamped with yellow ink on either side of a white cardstock panel and the friendship greeting was stamped in black in the middle. I like how the Fleur De Lis images are "doubled" and "divided" just as friendship is described in the greeting. I used a border punch to decorate a black cardstock panel and attached it to the bottom of the stamped white cardstock panel. Then, yellow and white twine was cris-crossed across the black panel and tied in a bow. I adhered this panel onto a yellow cardstock base and then added 3 black rhinestones to the top for a pop of color and a bit of bling. I love the clean and simple design and I hope you do too!
Thanks for stopping by!
Smiles,
Jennifer
I created this cute "Thinking of You" card specifically for the challenge. I used the new Happy Mail (429G) by DRS Designs for my focal point. I colored it with Copic Markers and matted it on black card stock. Next I created my own pattern paper by stamping the Splatter Background (855H) in light blue and green inks on white cardstock that was cut on an angle. I then added it to the bottom of a light blue A2 card stock base. I lined the top of it with a small strip of black cardstock and placed my stamped image on top, just off to the left side.
To embellish this card, I threaded a black button with green and white twine tied in a bow and added it to the lower right corner. On the top, I used a punch to create black and green paper tabs, overlapped them a bit, and added a light blue brad to the center and adhered it in place as shown.
Easy, peasy and fun to make!
Thanks for stopping by!
Smiles,
Jennifer
One of the things I love about where we live in Michigan is that we are close to the water. Growing up as a little girl, it wasn't uncommon for us to spend the weekend on my Grandfather's boat. Swimming and picnic lunches were what the Summers were all about! This Seaside Dock image (1111K) by DRS Designs reminds me of those times. If my Grandfather was still alive, this would have been the perfect birthday card for him.
I colored the Seaside Dock and the Anchor (434G) with Copic markers. Both of them were matted in red and then with blue. I stamped the first line of the Beach Birthday Greeting (480G) just above the Seaside Dock image. The remaining portion of the greeting was stamped inside the card. I simply embellished this card with two red brads in the bottom right corner, and my card was complete!
Thanks for taking the time to stop by today, and have a wonderful 4th of July weekend!
Smiles,
Jennifer
We are getting ready to go on our Summer vacation in just a few short weeks, but oh, what I wouldn't give to be sitting in this chair right now! Doesn't this look lovely? I love the way this turned out! I can imagine myself sitting here, thinking of just about anything with an umbrella drink in my hand!
This little scene was created with several stamps from DRS Designs and lots of masking.
The clouds the water in the sun or all done by sponging colored ink. I added a little bit of color to the palm tree and the chair with Copic Markers. The sea grass was stamped at the bottom in green and brown inks. And a white gel pen was used to add some wave accents to the water. I split up the Sitting Thinking Greeting (398F) on either side of the stamped scene to accommodate the layout. I hope you like this as much as I do!
Do you have any plans by the beach this Summer?
Thanks for stopping by and have a great day!
Smiles,
Jennifer
I'm taking a break from playing with DRS Designs new stamps in order to participate in their blog challenge this week, Oh My Stars! Just as the theme implies, they want to see stars on your project this week. I broke out some fun patriotic stamps to create an Independence Day card.

Isn't the Tiny Patriot (801H) adorable? I think he's one of my favorites! I colored him with Copic markers and adhered this piece on a blue cardstock mat. Next, I created my own pattern paper by stamping the Interlocking Star Background (819H) with red and light blue ink, added a decorative border on the panel, and then adhered it on the left hand side of the red cardstock base. I added a red fishtail banner as shown and then embellished it with a blue ribbon bow. I stamped the Interlocking Star background again with just blue ink and then stamped "Happy Independence Day!" (822D) overtop before cutting it out with a decorative die. I placed it in the empty space in the lower right corner and my card was complete.
I hope you're all having a great Summer, but if you've got some time out of the sun and find some time to stamp, run over to the DRS Designs challenge to see all the details including a fabulous prize and link your card to be eligible.
Thanks for stopping by!
Smiles,
Jennifer
For some reason whenever I see a lighthouse, it makes me think of my Dad. I guess this is why I tend to go with beachy, seaside scenes when I pick my Father's Day cards, and that's exactly how I felt when I received the new Lighthouse stamp (461G) from DRS Designs new release. Of course, I had to use it to make this year's Father's Day card!
The colors I chose to make this card with were inspired by the color challenge on the DRS Designs Blog this week. Here's the inspiration photo:
The light house image was colored with Copic Markers, and I matted it with a red, scallop rectangle. The back ground was embossed with the Anchor Embossing folder and trimmed in red. I used a turquoise cardstock base and stamped the "On Father's Day" Greeting (034D) in the lower left corner. I assembled the background as shown and I embellished the matted image with a navy banner, layered with a smaller pink banner before adhering it into place just off center. As with all my cards, I know my Dad will love this!!!
Curious about this Lighthouse stamp and the others from this release? Go check them out on the DRS Designs website! they are now available for purchase!!!
Thanks for stopping by and have a great weekend!!
Smiles,
Jennifer
Yeah! Today I'm celebrating a new DRS Designs Blog challenge AND new stamps! Yep, DRS Designs has a new release coming out and it's screaming SUMMER!!! The new challenge posted for this week is perfect for showing them off--take a look at what I created for their "Just Beachy" theme!
I used the masking technique to add this new Mermaid (472F) to the Brush Beach Sunrise (768L). The way she's chillin' on the beach reminds me of one of my favorite Disney movies, The Little Mermaid! I colored the scene with Copic Markers and then stamped the Beach Birthday Greeting (480G) over top of the sand and water. This greeting is also part of the new release. The card front was simply embellished with a little matching purple fish brad placed in the lower right corner. Then, the stamped scene was adhered to violet cardstock and adhered onto a dark purple cardstock base.
Hope you like it as much as I do!
Thanks for stopping by!
Smiles,
Jennifer
There's a new, fun challenge over the DRS Designs Blog this week called "Over The Top!" The rules are to stamp the greeting or a portion of it on top of your image..or you can also have a die cut sentiment on top or use a vellum overlay! I used this technique to create this Golfer's Birthday card!
For my over the top image, I stamped the Silhouette Male Golfer (038G) in olive green ink, and then stamped "Happy Birthday" from the Back Nine Birthday Greeting (658F) using black ink. I used kraft cardstock for my card front and stamped the upper portion of this greeting in the upper left corner as shown. I embossed a small white panel with the Swiss Dots Embossing folder, but I adhered it on backwards so that the embossed dots resembled the pattern on a golf ball to match the golf theme of this card. Brown and white twine simply embellished the card front and it was attached to an A2 olive green cardstock base.
Run over to the DRS Designs Blog to see all the details for this challenge and the fabulous prize you could win for playing along!
Thanks for stopping by!
Smiles,
Jennifer
As another school year comes to a close, it's important to let teachers know how special and appreciated they are, especially after all of the hard work they put into teaching our youth. Today I'm showing off the cards I've made to go with the thank you gifts for my son's teacher and teaching assistant.
These pocket cards were started by cutting scalloped squares using large Nestability dies. I adhered the right, left, and bottom edges of two of them together to form the pocket. I decorated the fronts of each one by stamping the Interlocking Star Background (819H) with Versa Mark and the Starry Background (124H) with dark purple ink.
The inside message was computer generated and the tops of the message cards were embellished with a paper bow. A matching, layered flower embellished with a pearl in the center decorated each bow.
Once I had my ideas drawn up on paper and started to create these, everything seemed to fall right into place. I really had a lot of fun making these and I hope his teachers really enjoy them!
Of course, I hope you do too!
Thanks for stopping by and have a wonderful day!
Smiles,
Jennifer
Happy Thursday Everyone!
The new challenge this week on the DRS Designs blog is as Easy As 1-2-3!
You are to use one of something, 2 of something else, and 3 of another item. Here's the card I submitted for this challenge.
I used 1 butterfly, 2 rhinestones, and 3 scalloped borders.

The Large Single Butterfly (192G) was colored with Copic Markers and then fussy cut out. I double layered my card front and used a Nestability die to cut out the circle in the top panel. I embossed the bottom and then adhered the layered scalloped panels in place, and embellished it with silver ribbon. The Butterfly Kisses Greeting (399G) was stamped at the top. The top layer of the card front was adhered onto pale violet cardstock and then adhered onto a dark purple cardstock base. The butterfly was adhered in place in the cut-out circle with glue dots so that the wings were extended up from the card front making it 3D.
Click on this link to find the details for this Easy challenge and link your entry today for a great prize from DRS Designs!
Hope you have a great day!
Smiles,
Jennifer
A fun, Summery color challenge was just posted on the DRS Designs Blog today!
How fun and gorgeous are these colors?!?!?!?
I used them to create this "Thinking of You" card. I like that it could be a graduation card as well!
I created the sun by hand by tracing a large, circular object and cutting it out. Then I used a photo corner punch for all the rays. I sponged the edges a bit and stamped the Large Stained Glass (1133P) over top to create some dimension. I used light blue cardstock for my card front, and dressed it up a bit by rounding the corners and distressing the edges. I adhered the sun in the upper, left corner as shown and added a yellow gem. Next, I stamped the Sun Shine On You Greeting (417E) at the bottom of the card front and placed a white pearl on either side of the top line. Then I adhered the card front on to a white cardstock base and viola, this clean and simple card was complete!
Hope you like it and I hope you get a chance to play along with these beautiful colors as well!
Have a great day!
Smiles,
Jennifer
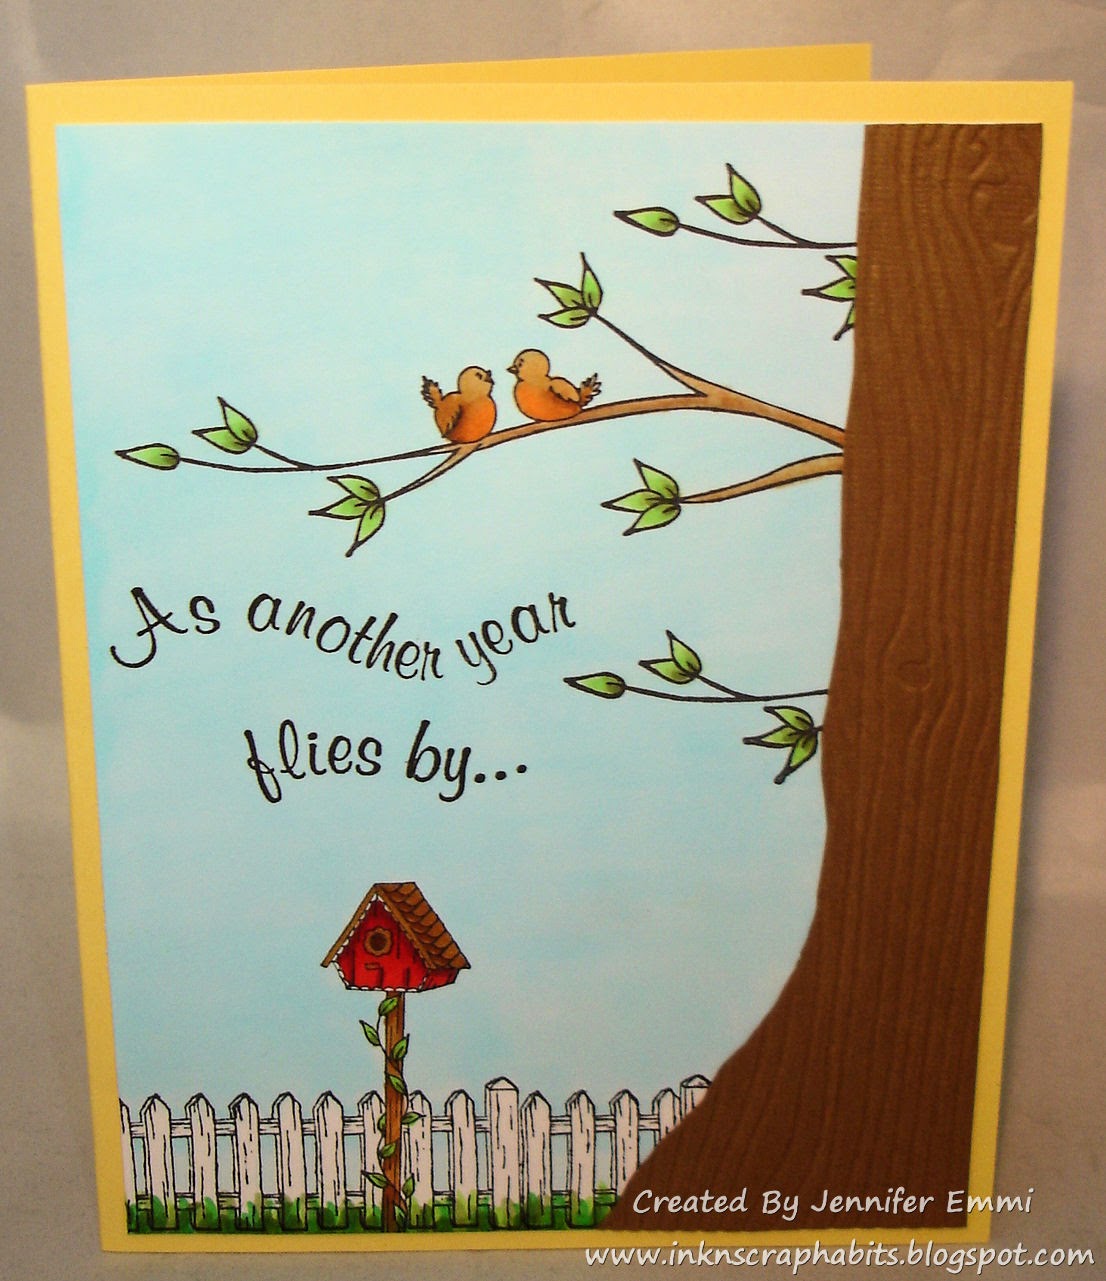
There's nothing better than having universal greeting cards in your stash that could be used for multiple occasions. Like this card I'm sharing with you today, it could be used as a birthday card for someone who likes birds, or an anniversary card because of the way the birds look on the Lovebirds Branch (413H). It would all come down to what the rest of the greeting inside read, and for now I'm going to leave that option open until I actually decide to use this card.
The scene I created here was started with a piece of white cardstock. I stamped the Lovebirds Branch 3 times in different places and at different positions coming from the right side of my card front. Next, I stamped the Single Bird House (406D) near the bottom, masked it and then stamped the Picket Fence (478P) in place over top. Everything here was colored with Copic Markers, including the sky and the grass. I hand cut a piece of brown cardstock and embossed it with a wood grain embossing folder for a realistic look, and adhered it in place on the far right side. The final touch was adding the Another Year Flies By (489F) Greeting right in the center. The card front was then added to a yellow cardstock base to make the card complete.
Have a great day,
Smiles,
Jennifer
Ha! There's a Birds and the Bees challenge posted on the DRS Designs Blog this week, and no, you don't have to be afraid to run over and check it out, LOL! I promise it's all G rated! ;-) DRS Designs has some new Spring stamps that fit the bill perfectly for this challenge and I'm showing some of them off today.
I know this card doesn't look like much, but I've used quite a few stamps on it:
Spring Bee Happy Greeting (367E)
I started my card front with light blue cardstock and stamped the Leafy Tree Branch and the Beehive branch so that it was emerging from the left side of the card front. The bee was first stamped on white cardstock, colored and then adhered in the empty space in the upper right corner with it's flying trail. After coloring them all with Copic Markers, I hand cut the tree trunk from brown cardstock and then embossed it with the wood grain embossing folder by The Paper Studio. It was adhered in place and then the sentiment was stamped at the bottom as shown. Finished card size is A2-4.25" by 5.5." I hope you like it!
Smiles,
Jennifer
I hope all you Moms out there had a wonderful and very Happy Mother's Day!!
Today I am sharing the Mother's Day card I made for my mom. Once again, my inspiration was fueled by the latest DRS Designs blog challenge--Beautiful Backgrounds. It's been a while, but I decided to get out my alcohol inks and glossy card stock to make the background for this card. My mom's favorite color is pink and I knew that that's what I needed to use on this card. So I selected a variety of pink and purple alcohol inks along with a metallic silver to create my beautiful background!
Hope all of you had a wonderful day spent with those you love!
Thanks for stopping by!
Smiles,
Jennifer
Graduation season is upon us and the latest DRS Designs Blog Challenge, "Put It In Neutral" inspired me to create this Graduation Card. I know the Rest Best of Life Greeting (385F) was originally meant to be a birthday greeting, but I think it's the perfect graduation greeting too. I think many graduates are so happy and excited that the long struggles of school are behind them that graduation is the beginning of the rest of their living life, with a career ahead, we hope!

I started by stamping the Rest Best of Your Life Greeting with black ink on white cardstock. I used a rectangle Nestability die to cut it out and then sponged tan ink over top of it while it was still in the Nestie die. It was matted with black cardstock cut out with the scallop-edged, rectangle Nestie die. I then put that aside and created the background panel. Starting with ivory cardstock, I stamped the Interlocking Star Background (819H) in black ink and the Starry Background (124H) in tan ink. This panel was also matted with black cardstock cut out with the scallop-edged, rectangle Nestie die. Next, I created the A2 cardstock base from tan cardstock and adhered the star panel to the far left side as shown. To break up the light colors a little bit, I added a fishtail banner in dark brown cardstock that was embellished with some paper flowers and petite copper brad. This was adhered so that the straight edge was flush with the right side of the card front. The greeting panel was adhered in placed just off center and this clean and simple card was complete!
So, I mentioned above that the "Put It In Neutral" challenge inspired this card. Has my post inspired you to play along as well? Create a card in neural colors (think white, ivory, tan, kraft, brown, black, gray) and link it up on the challenge post to be entered to win a great package of DRS Designs stamps! But hurry, this challenge ends to day at 6pm ET!
Thanks for stopping by and good Luck!
Smiles,
Jennifer