Welcome to Ink N Scrap Habits!

I've created this blog to share my life & love of paper crafts with others. You will read bits and pieces of what goes on in my world and be able to see my paper craft creations! Please leave me a comment if you see something you like. I'd love to hear from you!

Wednesday, October 20, 2010

S'more Goodness!

Not too long ago I posted a s'more card using the S'more Greeting (376K) seen below and the Smooshed S'more image (382E), both by DRS Designs.  Love s'mores and want more?  Well, how about adding this Smiling S'more image (390H) from DRS Designs to your collection as well?  I think he's adorable too!

My first step in making this card was to stamp, color, and cut out the s'more image.  While it was still in my square Nestability die, I sponged charcoal ink around the upper portion of it to create the frame and shading around it.  I matted it with brown cardstock and set it aside while I worked on the rest of my card.

I created the base from brown cardstock as well.  The S'more Greeting (376K) was stamped in brown ink on gray cardstock.  I used a border punch to create the decorative edge and added some fun brown ribbon, and adhered the image next to the greeting.  Once the card front was adhered to the base, I added 5 clear rhinestones below the image.  I colored them with a brown Copic Marker to make them match perfectly!

So, do I have you craving this yummy, ooey, gooey sticky treat yet?

Smiles,
Jennifer

Tuesday, October 19, 2010

Stamp, Play With Midnight Madness, and Win From DRS Designs!

Stamp, play, win! That's all you have to do to be the next winner of a DRS Designs $20 Voucher!  Read on for all the details...


Step 1: Create a card with this sketch. Of course we'd love it if you use DRS Designs stamps on your entry. *Please leave me a link here on this post if you do so I can personally check it out!

Step 2: Run over to the Midnight Madness blog and upload your card to be entered to win!

Step 3: Patiently wait until the contest ends and cross your fingers that you are randomly selected to win the prize--a FREE $20 shopping spree to DRS Designs!


Here's my take on the first sketch using DRS Designs new Witchy Frog Brew (386H) stamp. I colored this adorable image with Copic Markers and masked it to ink the grass and blue sky around it.


The background was created using the Eeeek Background (402H) and I added some Flowers and flourish dots as seen according to the sketch.  Some hand doodle dots and the Small Halloween Greeting (042A) made this card complete!


I hope you enjoyed it and I look forward to seeing what you do with this sketch!

Good Luck!

Smiles,
Jennifer

Sunday, October 17, 2010

Go Batty!

Well, if your schedule right now is as crazy as mine then, I think you'd "Go Batty" too! Sorry for not posting over the last few days, but things have been very hectic. Glad to say that hopefully things have finally quieted down a bit and I can blog and stamp more often now.


I find it so ironic that this is the card I have for you today. It's so fitting! This "Go Batty!" Sentiment (090D) and the Goofy Bat (381D) image are both by DRS Designs. I used the bat to stamp my own pattern paper with Versafine Onxy black and SU! Elegant Eggplant ink. The sentiment was heat embossed with bright orange embossing powder and I used orange ribbon as an accent.

That bat makes for such a cute card, doesn't he? Just look at that goofy grin!
I certainly hope that things are running smoothly in your neck of the woods, but if not, remember tis the season to "Go Batty!"
Smiles,
Jennifer

Tuesday, October 12, 2010

Have A "Fang"tastic Halloween!

Hi Card Makers!
Here's a little something different for you today! I'm getting bored making standard cards.  So, I'm trying to spice things up a bit and make a unique card once a week.  By unique, I mean something other than your standard A2 or 5" x 5" square cards. 


 Here's my first unique card thus far.  I used the Free Standing Pop-Up Card tutorial on Splitcoast Stampers and decorated it with DRS Designs new stamps for this "Fang"tastic Halloween card.

The tag was created by simply matting the orange cardstock with black and inking the edges with Charcoal chalk ink to give it a smoky look.  I stamped the "Fang"tastic Halloween Greeting (391F) with black ink and adhered cut-outs of the Goofy Bat (381D) around it.  The "pully" was created by folding a scallop circle in half and added a spiral clip with ribbon attached to to it. 


I colored the Precious Pumpkin (380F) with Copic Markers and cut it out as well to decorate the front edge of the base with it.  Some fun, black and orange ribbon finished this Pop-Up Card nicely.

I'll be checking for more unique cards on Splitcoast Stampers, but if you see a unique card in a card gallery or a tutorial some where out there in blog land, please leave me a link.  From all the links I receive, I'll draw a winner for a fun little prize from me!

Thanks for stopping by!

Smiles,
Jennifer

Monday, October 11, 2010

Happy Thanksgiving!

Happy Thanksgiving
 to all my Canadian Friends and Followers!
I hope this Thanksgiving is simply delicious!


Whether you celebrate your Thanksgiving today, or 6 weeks from now, I hope it's blessed with good food, family and friends! Have a very happy, and safe Thanksgiving!


Smiles,
Jennifer

The sentiment and image I've used on this card are by DRS Designs.  The Bountiful Basket (791L) was colored with Copic Markers and the Simply Delicious Thanksgiving Greeting (855G) was stamped with black Versafine ink. 

Sunday, October 10, 2010

Embossed Leaves

We are having a beautiful Autumn day here in Michigan today.  The sun is out shining brightly and the temperature is warm and so unlike the cool Fall that it normally is.  I think this is this what they call an Indian Summer. The best part is that we're having this weather on weekend days so everyone is out to enjoy it!

I thought this card was appropriate for today. Fun, Fall-like, and colorful just like the trees around us.  All of the stamps seen on this card are by DRS Designs.  I created my own pattern paper by stamping the Small Silhouette Leaf (C691), the Tiny Leaf (A1074), and the Small Autumn Greetings Sentiment (B422) repeatedly on white cardstock with Versamark ink.  I then heat embossed it with clear embossing powder.  I used a Brayers to add several colors of ink over the embossed images and then I sprayed it with Gold Glimmer Mist to make it shimmer.  I stamped the Changing Leaves sentiment (1122G) with brown ink.

Thanks for stopping by! I hope you're having beautiful Fall weather where you are as well!
Smiles,
Jennifer

Saturday, October 9, 2010

Get In The Halloween Spirit!

Hi Friends!
Hope you're all having a wonderful weekend! I've been stamping all week with some of DRS designs new Halloween stamps.  Here's one of my favorite Halloween cards I've made so far. 
Please let me introduce you to Spencer, the Not So Spooky Ghost (408D)!   I stamped him twice on white cardstock, and masked one of them so that I could create the background behind him using the Empty Spider Web (329G).  I used Copics on the second image to give him a bit of shadow and some pink lips and then adhered it on to the first image for added dimension.

I created my own patterned paper for the background panel using the new Eeeeek Background stamp (402H).  On both background panels I distressed the edges using Charcoal chalk ink to create a smoky and spooky look.  What could be paired more perfectly with Spencer than this Spirit of Halloween Greeting (389F)?  This is also one of DRS Designs new stamps.  I used several black petite brads and a black grosgrain bow to embellish this card perfectly. 

So, if Spencer isn't a spooky ghost, I guess that makes him a friendly one, right?  Just look at that face...of course he's friendly! He's just too adorable to be spooky!
Thanks for stopping by!

Smiles,
Jennifer

PS: Don't forget about DRS Designs new contest?  It's where you win FREE stamps first before you even get entered, but it's "By Invitation Only!" Check out all the details HERE and submit your nomination today!

Thursday, October 7, 2010

Delightful and Frightful Halloween!


Just a quick post today to show you a card I made using the new Spooky Bat Tree (406H) from DRS Designs.  I paper pieced the tree trunk and the moon, and sponged orange ink around the moon to give it a more authentic look.  The background was created using the Double Deal Bats and Stars (653P) Stamp and the Delightful, Frightful Halloween Greeting (215G).

Make sure to check out all of DRS Designs great Halloween stamps, and have you read about the 2 contests they currently have underway?  Hurry, the Operation Write Home contest deadline is October 23rd, and there's also the "By Invitation Only" contest where you can nominate your favorite card makers for a chance to be featured on the DRS Designs Blog!
Thanks for stopping by!
Smiles,
Jennifer

Tuesday, October 5, 2010

Come Visit For A Spell!

Are you going to have a Halloween party and get all dressed up this year? Well, I invite you to think about using DRS Designs new Halloween Party invite stamp (399M) when making your invitations!

Here's one I made to show it off. I used the Criss Cross Card tutorial on Splitcoast to make it. I decorated the card holder using the Empty Spider Web(329G), the new Eeeeek Background (402H), and the Spooky Eyes Background (647H).

The coolest part about using the Eeeeek Background and Spooky eyes Background together is that they inter lock and you can stamp one right over top of the other and they fit perfectly together. You can see this on the front of my criss cross card and just how well they match since I stamped them in 2 different colors.

The invitation inside was colored with Copic Markers and I used Martha Stewart's Spider Web punch to decorate the edges.


The band was decorated with the new Broomstick Stella (415H) image. I colored her with Copic Markers. The sentiment I added is the small Halloween Greeting (042A).


I really had a lot of fun making this invitation! Now, if only the costume I'm making for the party this year could come out looking just as great, I'll be all set!


Thanks for stopping by!
Smiles,
Jennifer

Monday, October 4, 2010

Pumpkin Cutie!

Oh my! Have you noticed all of the goodies being given away for this weeks Splitcoast Sketch Challenge? It's the 300th challenge and many companies have donated generous prizes that will be given out to challenge participants.  DRS Designs is one of them! They are giving away 2-$10 gift certificates.  Make sure to get your card posted in the SC300 gallery to be entered to win any of the prizes.

Here's the sketch you need to play with:

I played along and created this Pumpkin Cutie Halloween card! I used DRS Designs new Precious Pumpkin (380F) as my focal image. I colored him with Copic Markers and sponged light blue ink around him.  Isn't he adorable?!?! I just love that jolly look on his face!

I also used the Empty Spider Web (329G) and the Halloween Arc (043E) to decorate this card.
Hope your having fun making your Halloween cards this year.
 If you haven't started yet, make sure to check out all of DRS Designs Halloween stamps.  I know you'll find something you love!

Smiles,
Jennifer

Thursday, September 30, 2010

Card Patterns Sketch 83

Hello Friends and Happy Thursday to ya!
It's not too late to enter the sketch challenge sponsored by DRS Designs over at the Card Patterns Blog.  I created a second card using this sketch.

I used some of DRS Designs new stamps to create this card.  The Smooshed S'more (382E) and the  S'more Greeting (376K) worked perfectly with this sketch!


The image was colored with Copic Markers.  Can you believe I actually got my sewing machine out and added a bit of stitched detail to the layout!?!?!?  I wish I had the time to do this more often.  It added so much oomph!   I hope you enjoyed seeing it as much as I enjoyed making it!


Don't forget to link your take on this sketch HERE to be eligible for the prize!

Thanks for stopping by and have a wonderful day!

Smiles,
Jennifer

Tuesday, September 28, 2010

DRS Designs "By Invitation Only!" Contest

There's a new contest over at DRS Designs, have you heard of it yet? 


It's called "By Invitation Only"
It is a new stamping contest
that's won before a
card is ever stamped!
But, as the name implies
you have to be invited to play.

How, you ask??  It's simple!

We all have stamping friends
that impress us with every card
they make.  It's your job to
nominate them!! Email us the link
to their blog, website or gallery
and we'll check them out
and see if we agree with you!!

If we do, we'll invite them
to choose 1 to 3 unmounted
stamps from the
online collection.
To complete the contest,
they will stamp a card using
the chosen designs, post it to
their blog or gallery and send
it to DRS Designs.

Once our invitation is accepted
they will receive a cool
blinkie for their blog and
they'll also be qualified for our
Sunday Stamper blog post on the DRS Designs Blog,
where we'll feature one
outstanding card every week!

So.....
spread the word....
search the blogs.....
and send your nominations to:
invite@drsdesigns.com

Feel free to leave nominations in the comment section of today's post.  As the DRS DT Coordinator, I'm on the look out to send out invitations as well. 

Will you get an invitation??

Good Luck!

Smiles,
Jennifer

Monday, September 27, 2010

Too Early For Thanksgiving?

DRS Designs is sponsoring the Card Patterns Blog again. This time, you could win a $15 voucher to the DRS Designs Store and we'd love for you to play along! 


Too early for Thanksgiving? I think not! We're having the family party at my house this year and I've been busy decorating my house for the Fall Harvest.  I don't think I'm even going to do the ghosts and goblins this year--just the leaves, scarecrows, and pumpkins, and I'm even going to do some baking like this Happy Harvest Cutie Pie Girl (112F) from DRS Designs! 


I used Copic Markers to color the image and the sentiment, the Simply Delicious Thanksgiving Greeting (855G) is also by DRS Designs.


Thanks for stopping by!
Hope you have a wonderful Monday!

Smiles,
Jennifer

Friday, September 24, 2010

Ooey, Gooey, Sticky Treat!

It's the perfect time of year for warm campfires at night!
Chocolate, marshmellow, and graham cracker delight, everyone likes S'mores, right?

Ok, ok, I'm done trying to be a poet!  LOL!  Here's my take on this weeks Splitcoast Sketch Challenge SC299.  I've used DRS Designs Smooshed S'more (382E) image and the S'more Greeting (376K), both were just released this week and are now available for purchase!


The marshmellow part of the Smooshed S'more image was paper pieced--I stamped it first on gray cardstock and colored it with Copic Markers, and then stamped it a second time on white cardstock, colored only the marshmellow and then cut it out and adhered it onto the gray cardstock where it went on the second image.


Look at those chubby cheeks! Isn't he cute!?!?!
Thanks for stopping by!
Smiles,
Jennifer

Thursday, September 23, 2010

Operation Write Home

Unfortunately, I don't have a project to show you at the moment, but as soon as this post goes live, I hope to run off and play with this week's Splitcoast Sketch Challenge and show off more of DRS Designs new Halloween Stamps.  Have you checked them out yet?  I used 2 of them in my Halloween card yesterday, but you can see the entire collection HERE.

In the mean time, I wanted to share with you a contest being held by DRS Designs to benefit Operation Write Home.  Wouldn't you love to win big from DRS Designs?

I know this flyer is a bit difficult to read, but I'll list the details here on this post or you can see the link set up by DRS Designs HERE.

The Grand prize is is $50 Gift Certificate to DRS Designs and it goes to the person who donates the most greeting cards.  Create as many handmade cards as you can (NO GLITTER and blank inside), along with an envelope for each one as well and send them to DRS Designs before October 23rd.  The next 4 generous donors will win $25 gift certificates to DRS Designs.  The cards you send in will be donated to Operation Write Home.  This is an organization that donates the cards sent in to our nation's Armed Forces so that they can write home to their family and friends, as well as cards of gratitiude to encourage them.

Please join us for this great cause.  I'll be sending in my cards soon.  Will you?

Smiles,
Jennifer

Wednesday, September 22, 2010

Get in the Spirit!

The Halloween spirit that is! Brand new Halloween stamps from DRS Designs are now available for purchase! Today I'm showing off two of the new stamps on this Halloween card.  They are the Spirit of Halloween Greeting (389F) and Broomstick Stella (415H). I've also used DRS Designs Double Deal Halloween Bats and Stars stamp (653P) for the background.


Making this card took a bit of practice.  I admit, I worked on a rough draft to see if I could get everything to work out and look just right.  For this card, it was all about the masking!  I started by stamping Broomstick Stella on white cardstock and then I colored her with Copic Markers.  I then stamped the Spirit of Halloween Greeting next to her and colored the white portions of the word "Spirit" with an orange Copic Marker. I then created a Post-It Note mask for her and the word "Spirit."  Next, I stratigically stamped the Double Deal Halloween Bats and Stars around Stella.  I created a template for the moon and sponged it with yellow inks to color it.  At this point I didn't like how my scene looked with a stark white background, so I created a mask for the moon.  With 3 masks in place, I lightly sponged black ink around each image to create a smoky, Halloween sky.  I matted the scene with black cardstock, placed some yellow ribbon in the upper right corner and then applied it to a yellow cardstock base.

By this point you must be wondering why the Double Deal Halloween Bats and Stars are named that way...Well, believe it or not, this stamp can be used all year long! For all your Halloween cards, this stamp adds a beautiful moon, scary bats and a starry sky to your project as you can see on my card today, but it's not only for Halloween use.  For the rest of the year, inking only the stars on the right side of the stamp creates the perfect nighttime sky or star background!  It's like getting 2 stamps for the price of 1!


Don't forget all of the new Halloween stamps are now available for purchase. You can see them all by clicking HERE. 

Hope you've enjoyed todays post!  Thanks for stopping by!

Smiles,
Jennifer

Thursday, September 16, 2010

It's The Most Wonderful Time Of Year!

So, with a title like this I bet you think I'm getting ready to post another Christmas card, right?  I know you've seen nothing but Christmas on my blog since DRS Designs released their new Christmas stamps, but I'm actually going to change things up a bit!  The title of today's post refers to my love for the season of Autumn and everything that comes with--not for the Christmas song!


It felt so good to get my Fall and Halloween stamps out!  There's nothing that gets me in the mood to stamp more than these stamps! I used this weeks Splitcoast Sketch challenge SC298 for the layout on this card.


That cute doggie stamp is by Penny Black.  I colored it with Copic Markers and added Yellow Stickles to the Jack O' Lantern.  The "Boo" paper you see in the background I created myself.  The "Ghost face Boo" is by Stampabilities and the "Boo" alone is by Northwoods.  The "Spooky Greetings" sentiment is from Rubbernecker.


Stay tuned for more Fall and Halloween stuff coming very soon.  DRS Designs Halloween release is just days away!
Thanks for stopping by!
Have a great weekend!
Smiles,
Jennifer

A Fear of St. Nick?

Looking for another chance to win some free spending cash to DRS Designs?  Well, look no further and get ready to stamp! This week DRS Designs is sponsoring the sketch challenge over at the 365 Cards Blog. 


For your participation, you could win a $10 voucher just for playing along!
Here's my take on the sketch.


I split the 'Claus'trophobic Christmas Greeting (G367) into 4 separate stamps and stamped 2 lines in between the sections divided up by the red ribbon. 


This Santa image was taken from the Wintertime Buddies stamp (M362).  I colored it with Copic Markers and  and cut it out from the rest of the stamp.  I dressed him up by adding some Stickles to the his hat and finished off the card by adding a big, red bow just above him on the first line of ribbon.
Thanks for stopping by today, and Good Luck playing with this sketch.  Hurry! This challenge ends soon, so don't delay!
Smiles,
Jennifer

Tuesday, September 14, 2010

Getting Ready For Christmas!

Christmas is right around the corner and it's never too early to start getting ready for it. Have you started your holiday preparations yet?

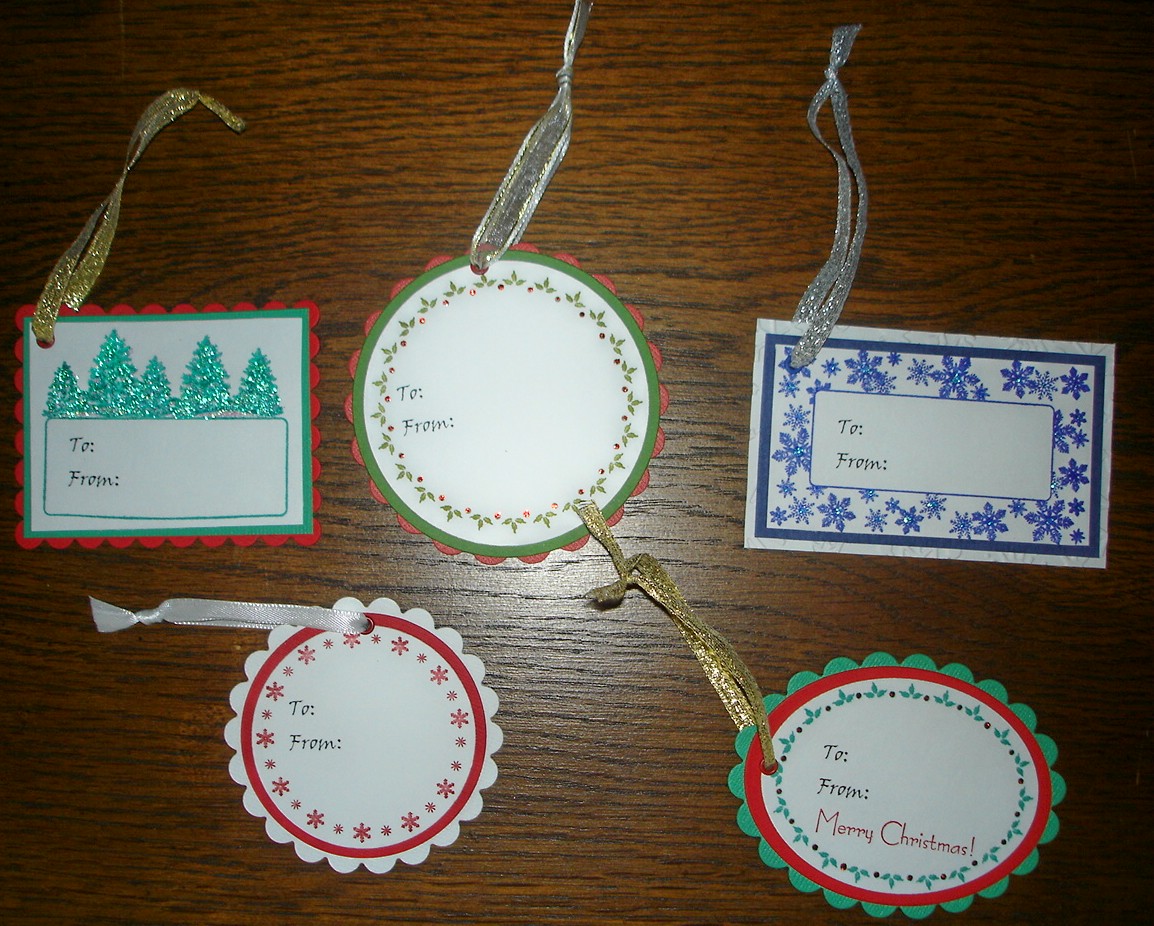
Just this past week I started making my holiday gift tags--the "To" and "From" tags that will go on every gift I give this year.  DRS Designs has a ton of stamps that are perfect for making these tags.  They were all quick and easy to make and best part is that I used a bunch of scraps! 

I simply typed out "To" and "From" on my computer and printed them out on high quality white cardstock.  Then I stamped each design around the text and simply decorated each one and added a matching ribbon.  Some even have a touch of Stickles! Here are 5 different ones that I've made so far.


I know the details are little difficult to see, so I took close up pics of each one.

This tag uses the Trees Address Label Frame (H106).  The original use for this stamp was envelope art, to decorate the area where the return address is put on an envelope.  However, I've creatively found another use for it!  The trees here were stamped with green ink and then I applied Stickles to make them snowy.


This tag shows off the Holly 3" Giga Circle (L120).  This stamp was designed for use with the Giga Circle punch--you'll get a perfect punch every time!  If you're a Nestability lover like me, you'll find they work well with them too!  This was stamped with Olive Green ink, and the dots were colored with red marker and then I applied Red Stickles to each of them to dress it up a bit.

As you can see, here is the Snowflake Address label stamp (K107).  I stamped it in bright blue ink and then added a Stickles to each of the snowflake centers.  The tag base was also embossed with a snowflake embossing folder.

How about snowflakes in red?  For this one I used the 2.5" Mega Snowflake Circle (H259). 


And finally for my last tag, I used the 3" Giga Holly Oval (K166).  Again, the dots were colored red with marker and then I added red Stickles to them to dress it up.  I wanted to make this one a bit different then the holly tag I made above, so I added the One Line Merry Christmas sentiment (B364) to this one. 

I hope you enjoyed seeing all of the different tags I made--this is only the beginning!  Get started on your Christmas tags today! You can find all of DRS Designs Envelope Art Stamps HERE and all of the other Designer Frames HERE.

Thanks for stopping by and have a wonderful day!

Smiles,
Jennifer

Monday, September 13, 2010

365 Cards Sponsorship With DRS Designs

Happy Monday to you all! I hope you had a great weekend! Can you believe it's the middle of September already!?!?!!?  This year is really flying by and I just can't seem to catch up!  I worked hard this weekend stamping away, so I hope to be able to get them all posted this week to share with you.


For my first project this week, I'm sharing my take on the 365 Cards Blog Sketch Challenge sponsored by DRS Designs.  Creating a card with this fun sketch could win you a great prize.  One lucky participant will win a $10 voucher!


I used DRS Designs Silhouette Snowflake Snowman (K247), the Christmas Music Background (P372), the Interlocking Snow Background (H015),  and the Small Merry Christmas Sentiment (B1014).  This isn't your traditional looking Christmas card, as I was going for a different look, but I really like the black accents against the white and red.

The Silhouette Snowman was heat embossed with red embossing powder.  Then I stamped the Music Background in Real Red ink on top of it.  The snowflakes stamped in the background were stamped with white Staz-On.  The sentiment was also stamped in Real Red.  A simple back ribbon is the scarf for my snowman and 3 black brads were added for his buttons. 

I look forward to seeing your take on this sketch.  Make sure to link your card up at the 365 Cards blog to enter the drawing for the $10 voucher to DRS Designs.  I'd love to see you win!

Good Luck!

Smiles,
Jennifer

LinkWithin

Blog Widget by LinkWithin