Welcome to Ink N Scrap Habits!
I've created this blog to share my life & love of paper crafts with others. You will read bits and pieces of what goes on in my world and be able to see my paper craft creations! Please leave me a comment if you see something you like. I'd love to hear from you!
Big Thanks to those who have served and those who continue to serve our country. We truly are Home of the Free because of the Brave!
Happy Memorial Day!
Smiles,
Jennifer
I colored the owl with Copics, used a glaze pen on his eyes and adhered him and the greeting with foam tape for some added dimension.
How does the photo above inspire you? Play along and enter your challenge card HERE for a chance to win a Store Voucher to DRS Designs.
Thanks for visiting!
Smiles,
Jennifer
Hi Everyone!
Hope you're all having a great week! Here's the card I made for the Masculine Card challenge on the DRS Designs Blog.
The combination of browns, blues and greens scream "boy" to me on this card! Both the Frog On A Log image (252H) and the Un"frog"ettable Birthday Greeting (1077G) that I used are by DRS Designs. This image was colored with Copic Markers and was a lot of fun to color. The greeting was one line too big for the area where I wanted it to go, so separated the last line and added it under the image.
Interested in playing along? You can find all of the challenge details and enter your masculine card HERE for a chance to shop for free with a DRS Designs Store voucher.
Thanks for stopping by!
Smiles,
Jennifer
Are you enjoying the new stamps from DRS Designs? They were just released yesterday and I'm showing off a few of them on today's anniversary card.
Have a great day!
Smiles,
Jennifer
Woo hoo!
You can check them all out on their new release page. I'm happy to show off one of the new greetings on today's card.
I think this is hilarious and it goes so well with the Witchly Accessories (154K) image. I colored it with Copic Markers and kept the embellishments rather simple. I think the ribbon sets off the greeting panel well and a few large purple brads fill in the empty spaces nicely.
Hope this made you smile today!!
Smiles,
Jennifer
I added the upper portion of the soon-to-be-released "Beat The Band" Birthday Greeting (056G) on the front, and then added the rest of it, "It's Your Birthday," to the inside below the Birthday Sheet Music (763P). I left just enough space to hand write a personal message. Best part about this card is that it's quick and very easy to make too!
Have a great day!
Smiles,
Jennifer
Happy Mother's Day to all you Mom's out there! I hope you are having a wonderful day!
I created this Mother's Day Gift Card Holder a few weeks ago during my girls weekend, but didn't want to show it until I gave it to my Mom. Way back in the day I posted the tutorial for these gift card holders and you can find it HERE. All of the stamps seen on this project are by DRS Designs.
I used the Flower and Butterfly Address Frame (002K) to decorate the front. Nice thing about this stamp is how versatile it is. You can use it as I've done here or use it as a true address frame for a return address or even to decorate an envelope with the recipient's address.
I colored it with Copic Markers and then cut it out including the center. I stamped the "On Mother's Day Greeting (035D)" on light purple cardstock and then used foam tape to adhere the address frame over top so that the wording was centered in the frame. The added dimension really makes the frame stand out.
This is how it looks when opened. I stamped it with the Script Gift Card Greeting (013D) and then hand wrote my personal message below it. I hope Mom enjoys the Amazon Gift Card I bought her! :-)
Smiles,
Jennifer
Hi Everyone! Hope you're having a great day!
Today's post has a double meaning. This card was created for this week's DRS Designs Blog challenge and it's a sneak peek for their new releases!
The theme for the challenge is "Music For The Soul." Your card must contain something related to music, like music notes, sheet music, instruments etc. It coordinates perfectly with the Marching Band Trumpet Image (056G) and Beat The Band Birthday Greeting (076E), both of which will be available for purchase very soon from DRS Designs.
I used the Birthday Sheet Music (763P) for the background and cut the band member out using anoval Nestabilities die. I shaded around the image using blue ink while it was still in the Nestie die and colored it with Copic Markers. I split up the sentiment to make it fit with my layout.
You can check out all of DRS Designs new releases HERE as soon as they become available.
Hope you enjoyed seeing my challenge card. Thanks for stopping by!
Smiles,
Jennifer
Happy Cinco de Mayo and Happy Graduation Day to my cousin!
She's graduating today from Michigan State University, which is also my Alma Mater.
Of course it only seemed right to make her card with MSU's school colors, green and white.
The greeting I used in the center of the card front is DRS Designs new Culmination Graduation Greeting (1126K) . I used only the top portion of it for the front of the card and then used the stamp-off technique to stamp the Brush Mortarboard (287G) over top of the greeting. The background panel was stamped with the Easy Graduation Background stamp (984H) and I colored it with Copic Markers. When I assembled the panels, I wrapped green and white twine beneath the greeting and adhered this panel using foam tape to give it some dimension. A few brads set off the card front nicely and it was adhered to a black A2 cardstock base.
I put the bottom portion of the greeting inside of the card, along with the Graduation Tassel (007D) that was stamped in green.
This card was also created for the Graduation card challenge on DRS Designs Blog this week. You could win some free stamps for playing along. See the challenge details HERE.
Hope you all have a great weekend!
Thanks for poppin' in!
Smiles,
Jennifer
After a fabulous girls weekend with my stamping friends, I'm glad to report that I made 14 cards while I was there! Some are for magazine submissions, but many of them you'll get to see here on my blog very soon. Today I have a card to share with you that I made for a stamping friend who we threw a surprise baby shower for this past weekend. I'm really happy with how it turned out and think it's one of my favorites!
I used this adorable Teddy Bear image from Holly Berry House and colored it with Copic Markers. Since she knows that she is having a girl, I chose to color the bow pink. I love the adorable Ribbon and Curls New Baby sentiment (111G) from DRS Designs and thought that it was perfect with the Teddy bear image. The finished card size is 4.25" x 5.5". I hope you enjoy seeing this card as much as I enjoyed making it!
Have a great day!
Smiles,
Jennifer
Hi Friends!
Hope your day is going well. I'm overly excited today as I have the next 5 days off of work and I'm heading to a yearly get-away with stamping friends for the weekend. I'm a little nervous though...this is my first time being away from Anthony since he was born. My Husband has a day of Daddy-Duty and then Anthony is off to Grandma's for the weekend since Hubby has to work. I know the time away is good for me and Anthony is in good hands. I'm looking forward to a couple night's of uninterrupted sleep(!) and 36 hours of time to myself to stamp, stamp, stamp!!!!!! If all goes well I'll have lots of projects to show off in the upcoming weeks!
As I'm sure you are very aware by now, every Thursday DRS Designs posts a new blog challenge. This week the DT wants to see Get Well cards. I've recently used this Dogwood Branch (1092H) for a Mother's Day card and I'm seeing that this can be a very versatile stamp by just changing up the sentiment. I've seen some of the DT members use it as a beautiful background stamp and I'd like to try it that way as well. I apologize this photo is a little on the dark side. The colors I used for this card are yellow, turquoise, and brown.

The shading around the Dogwood was done by masking the image and then sponging yellow ink around it while it was in a Nestability die.
Interested in seeing what the other DRS DT members created for this Get Well challenge? Check out their challenge cards and the rest of the challenge details HERE.
Thanks for stopping by!
Smiles,
Jennifer
It's official...I've lost my mojo for layouts. I've tried designing new cards all day and I didn't like anything I came up with. I turned to the Splitcoast Stampers sketch challenges for inspiration.
I found the layout of sketch SC375 to look interesting--not too complicated and it worked well with the stamps I wanted to show off for today. Here's my take on this sketch...
I used DRS Designs new 4 in 1 Poker Suits stamp (1128D) to create my own background.The red suits were colored with Copic Markers. Isn't it perfect with the 5 cards (157D) image that I used as my focal image? The horizontal and vertical panels were embossed with the Swiss Dots embossing folder, but it's hard to see in the picture.
If you haven't seen DRS Designs new stamps, take a looky HERE. I'll be showing off more of them soon!
Thanks for stopping in! Have a great day!
Smiles,
Jennifer
The new challenge on the DRS Designs blog is Sports! It's been a long time since I've played with any of the sports stamps from DRS Designs. I concentrate on so many of their new releases that I'm glad their challenges force me to use the "oldies but goodies" too.
I really love how this card turned out--I think it's the colors that I like most. I thought I'd try something a bit different by stamping the silhouette image in a color other than black. I think it looks just as good!
The prize up for grabs for this challenge is your choice of 2 stamps from DRS designs. I hope you can play along and I hope you win too! ;-)
Thanks for stopping by and please visit again soon!
Smiles,
Jennifer
DRS Designs just released new stamps this past Saturday. This release contains many sentiments and word designs that would be great for making Mother's and Father's Day cards as well as birthday and graduation cards. You can see them all HERE.
With May right around the corner and 3 Mom's to create cards for, I had to get started on my Mother's Day cards ASAP! This card uses the On Mother's Day Greeting (035D) from the new release. I stamped the pink cardstock with the Polka Dot background (688P) using Versamark ink and the Dogwood Branch (1092H) was colored with Copic Markers. Both of these stamps are also by DRS Designs. I kept my layout simple, but I think the colors really make this card POP!
Need an easy gift idea? Don't forget to check out this week's DRS Designs Gift Card Holder challenge for some inspiration or enter your version to win!
Have a great day!
Smiles,
Jennifer
Interested in seeing sneak peeks from the next stamp release over at DRS Designs? Well, that's exactly what's going on for the DRS Blog Challenge this week. The theme is Gift Card Holders, but many of the stamps used on the challenge projects by the DRS DT are brand new and will be available for purchase this Saturday April 14th.
The inside has a white panel for writing your own personal message. I stamped it with the Silhouette balloon again to decorate the lower left corner. To create the gift card flap, I stamped the soon-to-be released Birthday Candle Address Frame (010K) on white card stock and colored the candles with Copic Markers to match. Inside the empty space where you would hand write an address, I stamped the Birthday Wishes Greeting (020B) instead, which will also be released this Saturday.
Next, I matted this piece with teal cardstock and then used a circle Nestability die to create the thumb cutout. I adhered the gift card flap to the bottom panel of the trifold card by adding adhesive to the sides and bottom only, so that the gift card could easily slide into and out if the pocket. Finally, to make it appear as if each candle was really lit, yellow Stickles were added to the candle flames.
If you'd like to play along and enter to win a $10 store voucher to DRS Designs, make sure to check out all of the challenge details HERE. Don't forget to check out the new stamps while you're there too. If you've come to this page on or after April 14th, 2012, make sure to check out all of DRS Designs new stamps HERE.
Thanks for stopping by!
Smiles,
Jennifer
Hi Everyone!
Hope you all had a great Easter. We enjoyed spending the weekend with our family and celebrated with lots of good food. It was definitely something to give big Thanks for! So, as promised, I'm showing off one of the cards I made recently made.
This Thank You card uses the Brush Thank You (1095H) stamp from DRS Designs current release. I stamped it in the center of the Triple Teardrop 3" Giga Circle (045L) using my stamp positioner so that it fit perfectly. I matted this stamped circle with a scalloped circle cut with a Nestability die and added a black dot to each scallop with a permanent marker. I love how this highlights the sentiment! The white panel in the background was punched with a border punch and then embossed with the Swiss Dots folder. A yellow bow and 2 black brads were the only decorative embellishments used on this card.
I've entered this card into the Crafty Ribbons challenge to use Black & White with one other color. Wish me luck! They have a great bag of Spring ribbon up for grabs, and I know, you can never have too much! ;- )
Thanks for stopping by and have a great day!
Smiles,
Jennifer
Lucky for me (and you!), I just realized that I have a bunch of cards that have not been shown on my blog yet. I'm going to try and get them all posted for you soon. I have one of them to share with you today.
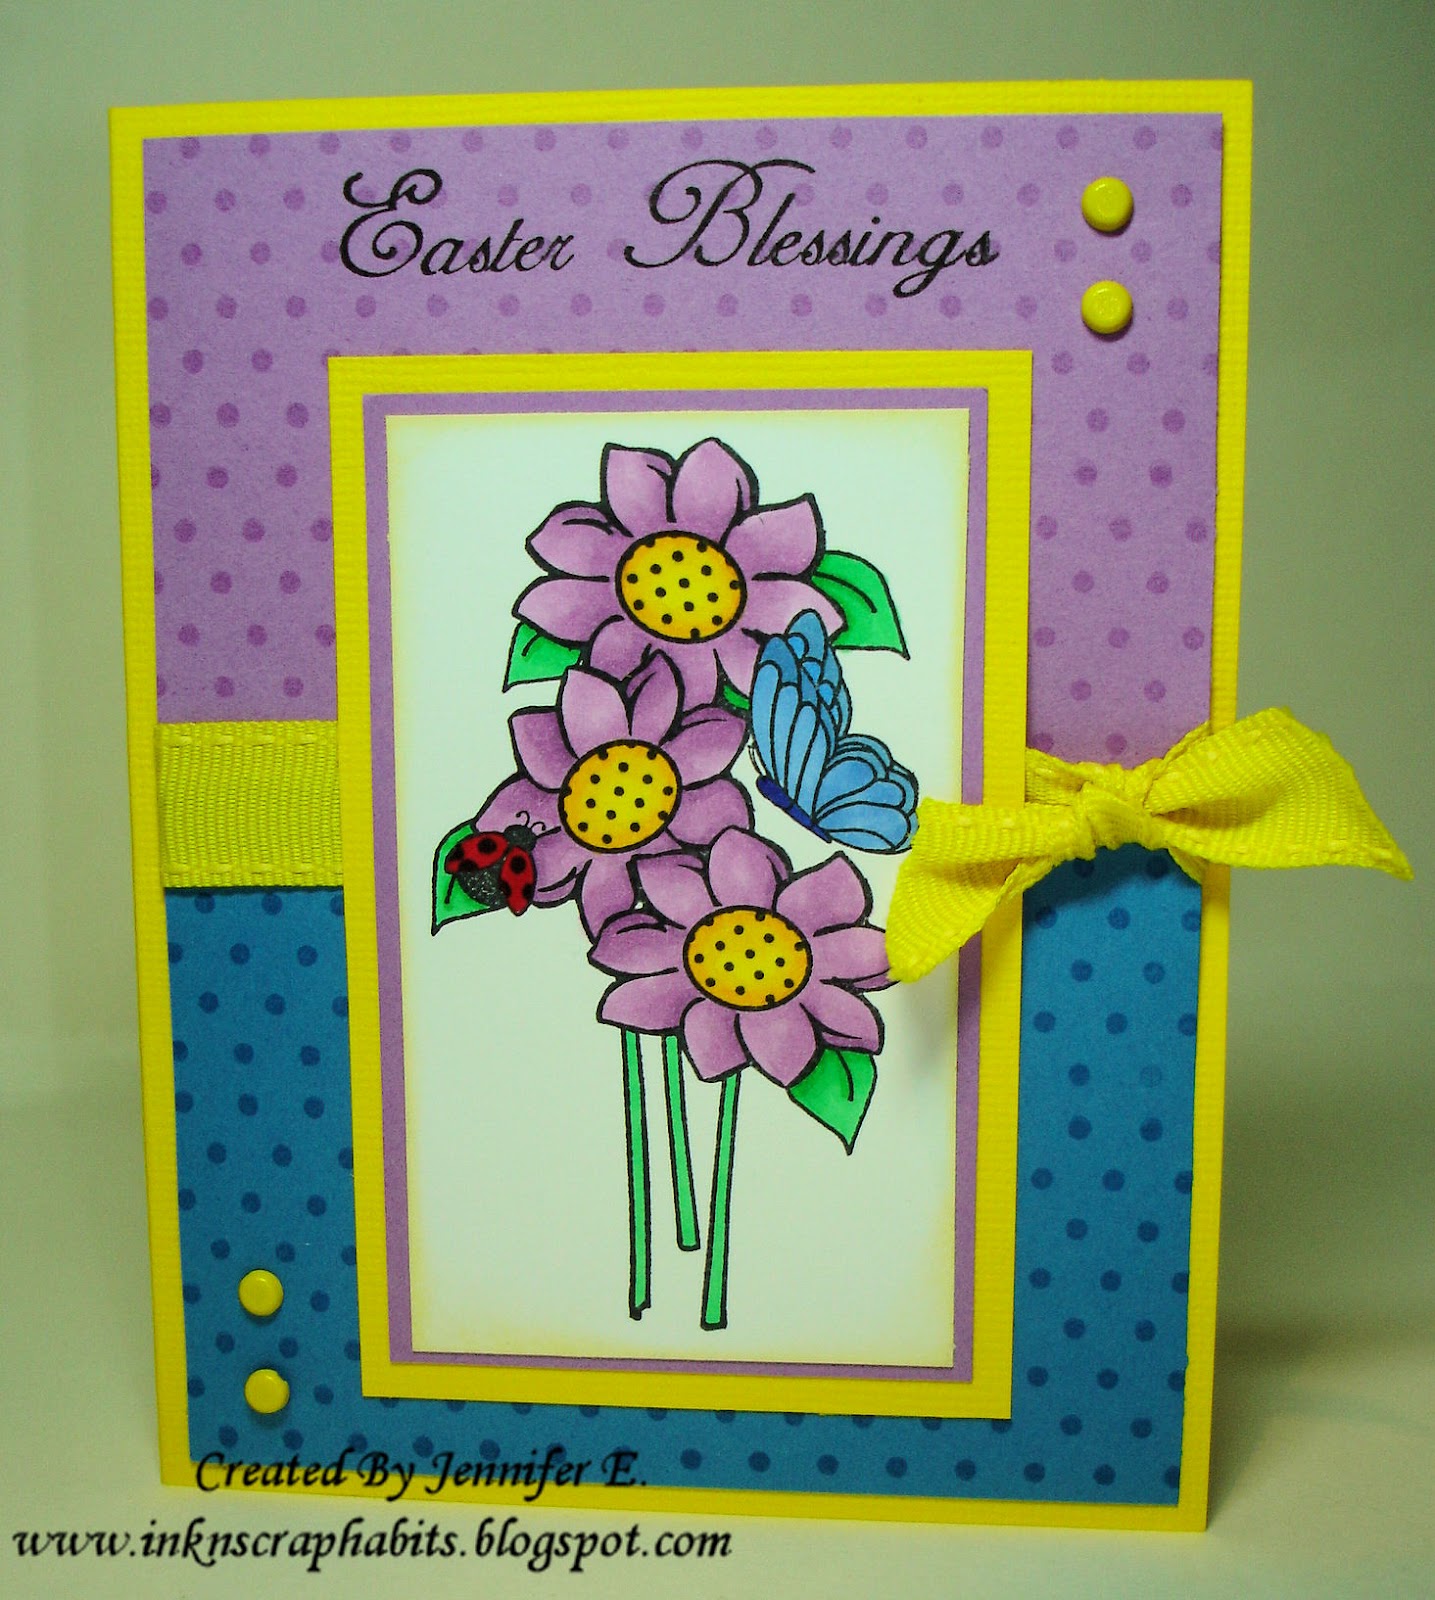
All of the stamps used to make this Easter Blessings card are by DRS Designs. I often think of purple and yellow as Easter colors, so those are the Copic colors I used on this Polka Dot Flower image (1036K).
I also used the Polka Dot Background stamp (688P) on this card to make my own coordinating pattern papers. I stamped it with Versamark ink on purple and blue smooth cardstock. The Easter Blessings Sentiment (1029D) stamped at the top is one of my favorite Easter stamps. I love the font and think it gives an elegant feel to any project.
Since the polka dots keep this card pretty busy, I kept the embellishments simple. The polka dot papers were separated by a band of wide yellow ribbon tied in a knot, and a couple yellow brads filled in the empty space in the upper right and lower left corners of my card front.
I hope you've enjoyed seeing this card and I hope you have a wonderful and blessed Easter.
Thanks for stopping by!
Smiles,
Jennifer
Last week for DRS Designs Shape Up Challenge, I started Working on this cupcake card, but I had forgotten about the note I wrote to myself to try the Teepee card that was featured in the April issue of Scrap and Stamp Arts magazine. In the meantime, the cupcake card was put on the back burner and I started on my Teepee card from scratch. Luckily, this week's challenge on the DRS blog is all about food, so my cupcake card fit right in! Best part, is that I was already half done with this week's challenge project!
The first step to make this card was to hand draw the cupcake silhouette on white cardstock that was folded in half. The card opens upward, so the card fold is located under the cherry. Next, I created a template by tracing the cupcake silhouette on scrap paper. I cut it into two pieces, one for the bottom and the other for the top portion of the cupcake.
I used the bottom portion to cut the cupcake wrapper from brown cardstock. The edges were inked with Vintage Photo and then I stamped it with the Lines O' Plenty Background (366H). The upper portion of the cupcake was cut from pink cardstock and the edges were inked with Worn Lipstick. Then I stamped the frosting repeatedly with the Raindrop Background (1012H) in multiple colors to resemble sprinkles. The cherry was papercrafted by cutting a red cardstock circle with a Nestability die and hand drawing the center line. I added Diamond Glaze to it to make it look realistic and added a brown cardstock stem.
DRS Designs has a great food-themed prize to give away this week. Check out all the details for the challenge here, link up your Food For Thought card, and win!
Have a great day!
Smiles,
Jennifer
Hello Everyone!
I hope this post finds you all well.
I hope you all have a great day and I appreciate you stopping by!
Smiles,
Jennifer
Happy Friday everyone!
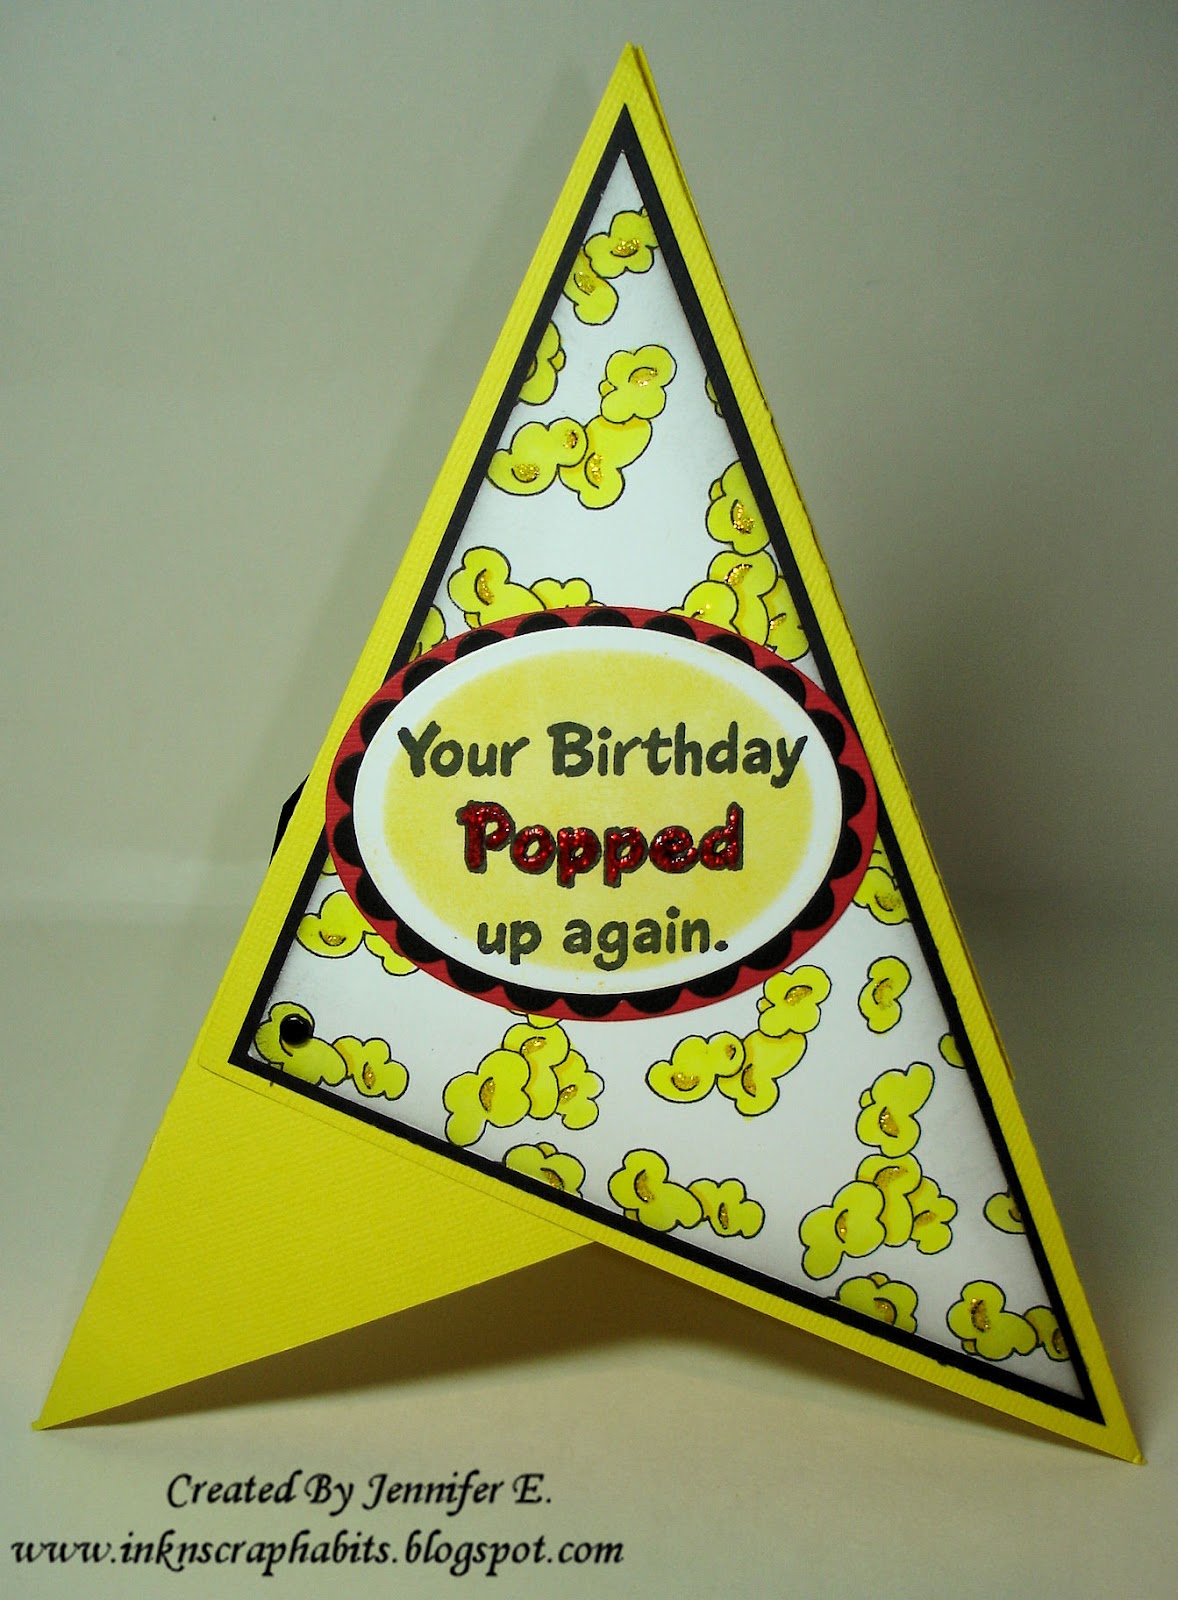
This week's DRS Designs challenge is all about shaped cards--no square or rectangle cards allowed. I really had to think about this one since anything but square cards tend to be difficult for me. I'm sure you can imagine my excitement when I found the tutorial for a Teepee card in the April issue of Scrap and Stamp Arts. It's perfect for this challenge! I, however changed the theme from a reindeer card to this Popcorn Birthday card.
Knowing that I needed some patterned paper for this card, I created my own using the Easy Popcorn Background (1124H). After cutting it to size, I matted it with black cardstock and then colored each kernel with my Y06 and Y08 Copic Markers. I also added a little Stickles to them. It really brightened up each panel. It almost made it look as if warm, melted butter glistened on each piece. Yum! Is your mouth watering yet? LOL! I assembeled the teepee as shown according to the tutorial and added stamped embellishments to each side.
The first side I stamped with a portion of the Popped Up Again Birthday Greeting (924H). The word popped was coloed with my R29 Copic marker and then I added red Stickles to the word "popped" to make it pop!
The next side was embellished with the Popcorn Bowl image (1131G). After coloring it with Copic Markers, I cut it out and adhered it to a black cardstock oval. The popcorn on this image also has Stickles on it.
Finally, here's the last side. The image used here is the Popcorn Box (920H). It was colored the same way as the other images and of course, Stickles were used again as well. Do you wish you could just reach in a eat a hand full of that deliciousness?!?!
If you'd like to play along and win some free stamps. Link up your Anything but Square card HERE.
Thanks for stopping by and have a wonderful weekend! Smiles,
Jennifer