Welcome to Ink N Scrap Habits!
I've created this blog to share my life & love of paper crafts with others. You will read bits and pieces of what goes on in my world and be able to see my paper craft creations! Please leave me a comment if you see something you like. I'd love to hear from you!
I created a Graduation Celebration ATC for the post I shared yesterday. For today's post, I've used that ATC to create the tag for the "Tag, You're It!" Challenge on the DRS Designs blog. I love how my tag turned out and how all the details on this card came together!
For instructions on how the ATC was created, please see yesterday's post. To create it into a tag, all I did was cut a white piece of cardstock down to size and then ran just the upper portion through the Cuttlebug using one of the labels dies. Then I used the Horizontal slot punch to make the opening at the top of the tag for the ribbon tail and adhered the ATC to it.
The card base measures 4.25" x 5.5". On the cardfront, I used Versamark and stamped it with the Graduation Background (984H). Then I embossed a small back panel with the Swiss Dots folder and added a white decorative border, and adhered it just off center as shown. The tag was then adhered on top on an angle. I heat embossed the ConGRADulations Greeting (867D) on vellum, decorated it with a border punch and adhered it to the bottom of the card front. Don't you agree this all came together nicely?
Thanks for stopping by to check out how I incorporated yesterday's ATC into today's card!
Have a great day!
Smiles,
Jennifer
It's been awhile since I've made an ATC but since DRS Designs is this week's sponsor for the Wicked Wednesday ATC challenge, I decided to give it a try. One thing I really like about ATC's is the small space you have to work on, which makes them quick to complete! For those of you who are unfamiliar with them, they measure only 2.5" x 3.5". The size alone can be a challenge in itself! The theme for this sponsorship is "Quotes and Words" with the focus being on the sentiment. I used this challenge to create this Graduation Celebration ATC.
I used the upper portion of the Culmination Graduation Greeting (1126K) as the focal point of my ATC. I thought the wording was a little plain on the white cardstock so I stamped the Brush Mortarboard (287G) using the stamp-off technique with green ink on top of the wording. Then I embellished it with a green decorative border on both ends and green grosgrain tied in a knot at the bottom. To finish it off, it was adhered to a black base.
I plan on using this ATC to complete another project. Please check back to see it in a future blog post. In the meantime, give this ATC challenge a try! Check out all the details HERE for a chance to win a great prize from DRS Designs.
Have a great day!
Smiles,
Jennifer
Happy Easter to you all!
Yesterday we went to the local greenhouse for their Easter event and took this picture of our oldest son with the Easter Bunny. This was the only picture we took and I'm over the top excited about it because it is perfect! We never get pictures of him where his head and eyes are both facing directly at the camera along with a perfect smile on his face!
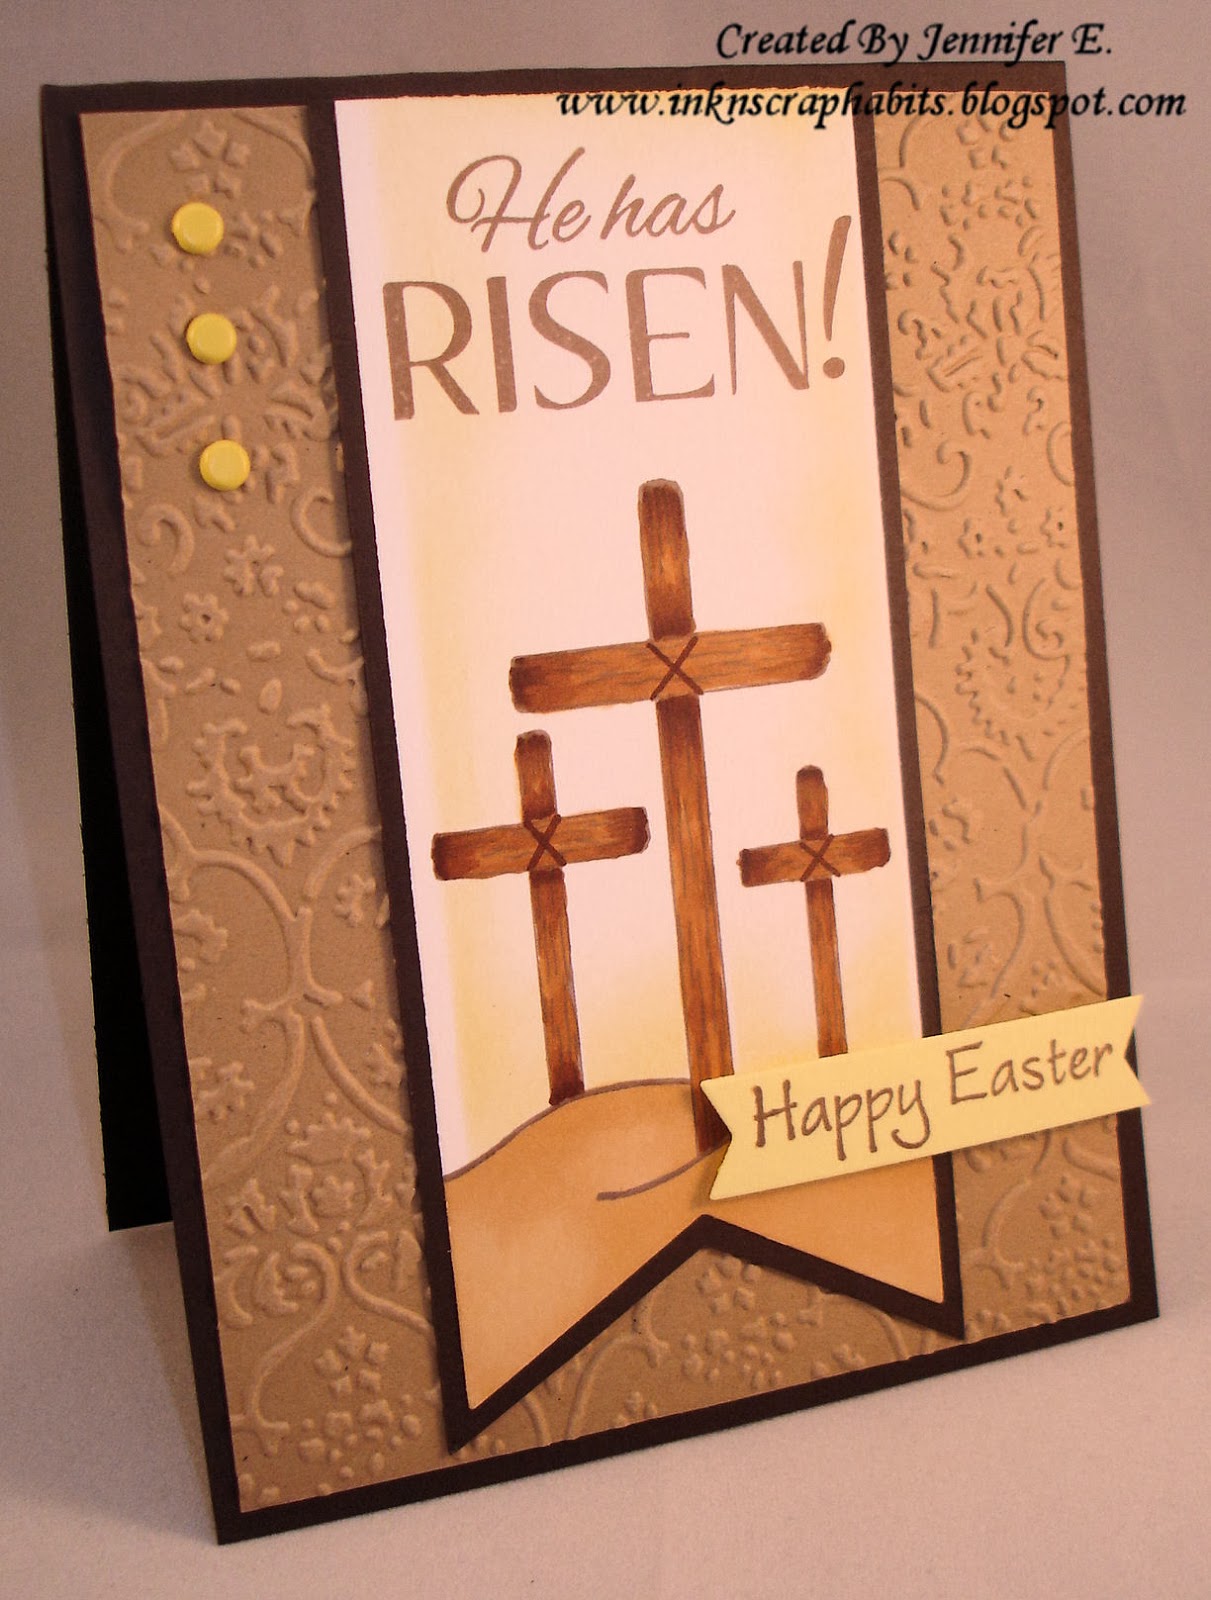
Despite visiting the Easter Bunny, cleaning house, preparing food, and dying Easter Eggs, I even had time to stamp up this CAS card. Both the image and sentiment are by DRS Designs. The Three Wooden Crosses (1116K) were colored with Copic Markers, masked, and then sponged with yellow ink behind the crosses and brown ink for the dirt. He Has Risen (1138E) was stamped in the smooth section below the image. I love the decorative flair this Nestie die gives this card overall and how it really shows off the image. I hope you like it too!
Thanks for stopping by and have a wonderfully blessed day with your family and friends!
Smiles,
Jennifer
There's a new challenge on the DRS Blog this week. The "I Get Around" theme is all about circles. I saw a similar layout on Pintrest and gave it a try for this card. I like how the circle cut-out frames the sentiment.
Smiles,
Jennifer
Once the seasons change over to nicer weather, wedding season begins as well. Right now my calendar is already filling up with wedding showers and this Summer I have 2 weddings and a wedding anniversary party to attend. I'm using DRS Designs new wedding stamps to make my cards ahead of time. Here's one of them:
I chose to do this in red, black and white to follow the brides color scheme. I started by cutting out a banner from white cardstock and stamped the Silhouette Bride and Groom (026G) in the center. I used Versamark ink to stamp the Love Is Patient Greeting (201H) repeatedly over top of it. Then I matted it with black cardstock and colored the bride's flowers red. Two red brads were added to the left side for a bit more color.
Next, the A2 card base was cut from red cardstock. I stamped Eat, Drink, and be Married Greeting (024F) in the lower right side as shown. The banner was adhered above it, to the left and a small silver bow and silver heart embellishments made it complete.
I hope you've enjoyed today's card. Thanks for stopping by!
This week DRS Designs has a color challenge on their blog. It's to use black and white and 1 other color of your choice. I am having a blast with this challenge! Not sure if it's just coincidence or the themes of the cards I've been making lately, but many of them would fit this challenge. Unfortunately, most of them I won't be able to show off until a later date. Good things come to those who wait, right?
One of the best things about this kind of challenge is that regardless of what you pick for your third color, it makes for a really elegant card. Here's a wedding card I made for this challenge using a soft pink for my third color.
Click over to the Challenge post for all the details. One lucky winner will receive their choice of 2 stamps from DRS Designs online store. Will it be you?
Thanks for stopping by!
Smiles,
Jennifer
I've seem to have lost my mojo over the last few weeks, but it seems that the only thing keeping it alive right now is the inspiration I'm finding with challenges. This weeks DRS Designs Blog challenge inspired today's card as well.
The challenge is Who's the (em)Boss? Clever, huh? Your entry needs to have embossing on it--heat or dry embossing will do! I went ahead and used the Cuttlebug Birthday folder for the background on my card.
For the focal area on the card front, I stamped the Single Birthday Candle (258B) repeatedly and colored it with Copic Markers. Then, I stamped the Small One Line Happy Birthday (250B) in the space at the bottom that wasn't embossed with the folder. I added some purple and white twine, tied with a bow, to show the separation between the embossed and non-embossed areas. I took this card one step further and stamped the One More Candle Greeting (481E) in the inside to complete it.
Check out DRS Designs challenge HERE for all the details on how you can win a $10 DRS Designs store voucher just for playing along!
Thanks for stopping by and have a great day!
Smiles,
Jennifer
There's a lot going on over at DRS Designs this week. I'm excited to tell you that they are gearing up for another release. Many of the DT members are sharing some sneak peeks, myself included :-)
I used some of the new stamps to create my challenge entry for the Shabby Tea Room blog challenge, "Pretty in Pink." DRS Designs is their sponsor this week and the challenge is to create a card inspired by the photo using white/cream, pink, green flowers and lace or ribbon.
I stamped the Wedding Ring Ensemble (028G) on to ivory cardstock and then paper pieced the the candles and the ribbon in the image so they were white. It was a tedious task, yes, but I had to make them stand out. The rest of the image was colored with Copic Markers. The To Have and To Hold Greeting (1171G) was stamped as shown to the upper right of the image. I added some pearls to the bottom of the the greeting and the ivory cardstock was trimmed with a white decorative border. Some iridescent ribbon was added to the bottom and the card front was adhered to a pink 5.5" x 3.5" cardstock base.
One lucky winner will win a $10 store voucher to DRS Designs. Check out al;l the details and link your entry HERE.
Good Luck and have a great day!
Smiles,
Jennifer
PS: DRS Designs new stamps will be available for purchase this Saturday April 5th!
Hi Everyone!
I used a banner to show off these stamps on my card front. As you can see, the crosses were stamped at the bottom and the greeting at the top. I used Copic Markers to color in the crosses. Then, I masked the edges of the banner and the crosses with Post-It Notes and sponged the area around the image with yellow ink. Next, the banner was matted with dark brown cardstock. I used a kraft piece of cardstock for the card front and embossed it for added texture. The banner was adhered to the center and I added 3 yellow brads to the upper left corner. As the final touch, the One Line Happy Easter (665B) sentiment was stamped on a yellow banner and adhered as shown with foam tape.
Easter is just 20 days away. Have you made your Easter cards yet?
Thanks for stopping by!
Smiles,
Jennifer
I was an avid scrapbooker before I got into card making and stamping. But one of the reasons I love both of these papercrafts is the fact that nothing is ever wasted and it's always a bonus when you can actually use up some scraps! I did just that on this card for this weeks "Leftovers Again" challenge on the DRS Designs Blog--to literally use your scraps!
I used the Tulip Bunny (1112K) as the main focus of my card and colored it with Copic Markers. I had some left over banner tags that didn't work on a previous card and used it to show of the Some Bunny Loves You Greeting (1140D). Two pink brads simply embellished the upper left corner of this 5" x 3.5" note card.
I hope this challenge inspires you to use up your scraps as well and play along. Check out the details HERE!
Thanks for stopping by!
Smiles,
Jennifer
I used it as a color challenge and created this cute card using pink and green and I picked this Friendly Flower Frog (1115G) image because the flowers he's holding matched the flowers in the inspirational photo.
I used Copic Markers to color the image and then die cut it with circle Nestabilities. As you can see the pink cardstock was embossed with a flower embossing folder and I created my own pattern paper by stamping the Large Original Plaid (641P) with Versamark ink in 2 different directions. The seam between the 2 background panels was hidden with a strip of dark green ribbon and a few green and pink rhinestones were added for some bling. Finally, I stamped the Un'Frog"ettable Greeting (266E) on a pink banner die cut and adhered it in place with foam tape.
This card screams "Spring," doesn't it? I hope the Mother Nature starts to cooperate with what the calendar says and that Spring-time temps get here soon!
Have a great day!
Smiles,
Jennifer
Yeah! It's official, today is the first day of Spring and to celebrate there's a "Bloomin' Spring" challenge on the DRS Designs Blog this week. One lucky winner will win their choice of 2 stamps from DRS Designs! Here's what I created for the challenge.
I made this Springtime card using the Friendly Flower Frog (1115G) and the Goodbye Winter Greeting (384G). The frog was colored with Copic Markers and I split up the second half of the greeting to accomodate my layout. Yellow rhinestones were added to the flower centers to spice the image up a bit and a few pink brads wmbellished the embossed panels nicely. Finished card size is 4.25" x 5.5."
It's definitely time to watch the flowers grow and I'm so looking forward to it! Are you?
Have a great day!
Smiles,
Jennifer
Hi Everybody!
There are now new Spring and Easter stamps available for purchase from DRS Designs! Woo Hoo I love getting new rubber and I'm sure you'll like these new stamps too! Today I'm showing off the Tulip Bunny (1112K) on this Easter card.
I colored the image with Copic Markers and kept my layout rather simple. I embellished this card by adding a small panel embossed with the Swiss Dots folder that I lined with a decorative border punch and a beautiful pink satin bow complemented the image nicely. I stamped the Vertical Happy Easter (838D) on the sentiment banner and added it to the empty space to the left of the image. Finished card size is 5.5" x 4.25."
Hope you enjoyed seeing my card today and that you're looking forward to Spring as much as I am. It has to be right around the corner...right?!?!
Have a great day!
Smiles,
Jennifer
Hippity, hoppity Easter's on its way!
Yes, this is true, but it is still very hard to believe with the fresh 8" of snow we had dumped on us yesterday. Will this Winter ever end?!?!
Well, here's a little wishful thinking I guess--this is the Easter card I made while I was stuck in the house during the snow storm. I've made this for DRS Designs "You're A Good Egg" Challenge.
I created the line of Easter eggs by masking DRS Designs new Easter Egg With Bow (1108D) stamp. They were colored in Spring pastel colors with Copic Markers. I filled the empty space above the Easter Egg line up with the Medium Script Happy Easter (762F) sentiment and embellished the card front with some pastel borders and a button tied with twine.
So how's the weather where you live? I hope it's a lot more Spring-like than mine!
Thanks for stopping by and be sure to check out the Egg challenge HERE.
Smiles,
Jennifer
The entire image was colored with Copic Markers and I couldn't help but make this Irish man have a red beard!
Smiles,
Jennifer
I've been so busy lately that I didn't even realize that we change the clocks this weekend until my son's teacher brought it up in class yesterday. Despite what majority of us see out our windows and what we feel when we're outside, it must mean that Spring is near. Right?!?!? At least it's a step in the right direction--Mother Nature has been cruel to us this Winter!

It was nice to create a card with a Springtime feel! I made this for DRS Designs "For the Birds" weekly Blog challenge. This is a sneak peek for one of the new Spring stamps that DRS Designs will have available for purchase very soon. The Bird Bath stamp (1127H) was colored with Copic Markers and sponged with yellow ink while in a Nestie die. Unfortunately, it is difficult to see in this picture, but I also used Diamond Glaze on the water to give it a realistic effect. I paired this image with the Spring Is Creeping Verse (759H). In order to accommodate both the image and the verse, I had to make this card a bit larger than usual. The finished card size is 6" x 4.5."
The first line of this verse explains our weather perfectly right now--Spring is creeping toward us, yet the only way we know this is by the calendar. It will be nice when the outside temps reflect this as well!
Hope you've enjoyed my post today.
Have a wonderful day!
Smiles,
Jennifer
Whenever I've lost my cardmaking mojo I always turn to sketch challenges to spark my inspiration. That's what happened this past weekend--I had a few hours to myself to spend in my stamp room but my creative juices just weren't flowing. After browsing Splitcoast Stampers and Pintrest for what seemed like hours, I eventually found a sketch challenge that inspired this St. Patrick's Day card.
I used the Troubles Be Less Greeting (693F) as the main focus of my card. I fussy cut out and distressed a shamrock and then stamped the sentiment on it. I used the Large Original Plaid stamp (641P) to create my own pattern paper using light and dark green ink and embellished the card front with 3 green rhinestones and a bit of ribbon to match.
What do you do to spark your creative juices when you're in a crafting slump?
I hope I've inspired you to try a sketch challenge and get inky today!
Thanks for stopping by!
Smiles,
Jennifer
Hi All!
The new challenge on the DRS Designs Blog is to use Buttons! Here's my challenge entry, which was inspired by the Splitcoast Stampers Sketch challenge SC476.
I used the Shamrock Circle (619L) to decorate the top of my tent topper card. It was colored with Copic Markers and then fussy cut out. I split up the Great Joys Irish Greeting (1094G) and stamped the upper portion inside the middle of the Shamrock Circle. The lower portion was stamped on the card front as shown. I decorated the card front with 3 different sized banners that were embossed with the Swiss Dots folder and I used twine to tie the button onto a green bow to make my card complete!
Check out all the details for the Button challenge and to see what fabulous prize is being offered to 1 lucky winner HERE!
Thanks for stopping by!
Smiles,
Jennifer
DRS Designs released some new stamps a little while ago and in that release is their own version of PePe Le Pew. It's the Skunk With Flowers (1035G) that I've used on today's Friendship card.
I've made this CAS card pairing him with the Big Thing Friendship Greeting (284H). Kind of an oxymoron since you'd never consider a skunk to be your friend!
Enjoy and have a great day!
Thanks for stopping by!
Smiles,
Jennifer
The Chips Ahoy challenge on the DRS Designs Blog this week got me out of my comfort zone. I've never used a paint chip before when card making, but I love it and have been inspired to use them more often!

I started with an A2 dark green cardstock base. Then I cut off the writing on each paint chip and used each shade to create a pattern on the bottom of my card front. I embossed them with the Swiss Dots folder for texture and simply embellished my card with polka dotted green ribbon. The top of the card front was decorated by stamping the Four Leaf Clover (890A) repeatedly with watermark ink. I didn't think it was appropriate to have a St. Pat's Day card without a Shamrock on it some where. The background was perfect for this! The main focus of my card is the Blessings Outnumber Irish Greeting (1100G) which was stamped in dark green ink, die cut, and then sponged with a lighter shade of green ink while still inside a Nestie die. I adhered the greeting with foam tape for some added dimension.
Have you ever used a paint chip while stamping or card making before? Let the DRS DT inspire you and enter the Chips Ahoy challenge today to win! :-)
Have a great day!
Smiles,
Jennifer