Welcome to Ink N Scrap Habits!
I've created this blog to share my life & love of paper crafts with others. You will read bits and pieces of what goes on in my world and be able to see my paper craft creations! Please leave me a comment if you see something you like. I'd love to hear from you!
Even though St. Patrick's Day and Easter are right around the corner, I'm taking a break from creating cards for those holidays at the moment. I'm thinking Spring and Summer right now, cause they're right around the corner too! Today's weather inspired me to create this Golfer's Birthday card. It was a rather Spring-like day with temperatures about 60 degrees and with this kind of weather, I know many of my family members are eagerly thinking "GOLF!"

Since it was so nice out, I kept things CAS so that we had time to go outside for awhile. Both stamps are by DRS Designs. I stamped the Silhouette Male Golfer (038G) on the pennant. The inked frame was created by masking off the edges with Post-It Notes and sponging blue ink around the image and I inked the edges of the white card front as well with the same ink. I used a border punch for the decorative layers in the background and once the layout was in place on the card front, I stamped the Back Nine Birthday Greeting (658F) in the space next to the pennant. Finished card size is 5.5" x 4.25."
Are you inspired by this card, but want to make it more feminine? No problem! Use pink cardstock instead of the blue and stamp the
Have a great day!
Smiles,
Jennifer
It's that time of year where Leprechauns get excited for St. Patrick's Day and I know the big Leprechaun in my house (My Hubby) can't wait to pull out his bag pipes and celebrate!
DRS Designs is celebrating a bit too. Their challenge this week is Shamrocks and 4 leaf clovers. Here's my challenge card.
I created this as a note card that measures 5" x 3.5." All of the elements you see (other than the brads, of course) were stamped. The Background was created with the Shamrock Background (326H). I used the Petals Of A Shamrock Greeting (459G) as my focal point and I gently sponged it with green ink while it was still in a rectangle Nestie die. I made my own embellishment with the Silhouette Clover (453C) by sponging it, die cutting and matting it, and then popping it up on foam tape.
Well, I'm off and running today with a busy day ahead. Hope you've enjoyed this card!
Until next time...
Smiles,
Jennifer
Hi Everyone!
DRS Designs has several opportunities to win free stamps right now and I'm going to tell you about a few of them today.
For starters, DRS Designs is sponsoring the Tuesday Morning Sketch this week! Up for grabs is a $15.00 Store voucher to DRS Designs for playing with the sketch below.
I used it to create another Easter card that shows off the Jelly Bunny Bean (221M), the Large Original Plaid (641P), and a portion of the Abundance of Spring Greeting (527G). The bunny was colored with Copic Markers and the plaid stamp was used to make my own coordinating paper in with blue and pink ink on purple cardstock. I also used it to create the lines in the background on my card front that were simply stamped with Versamark ink.
Also, don't forget that the Stamp-A-Versary contest is still going on over on the DRS Designs Blog. Click the link in the description below to read all the details, enter the contest, and see pictures of the fabulous prizes.
Find the 4 current stamp designs that were featured in our
original stamp catalog way back in 1992 and win prizes!
Click here for all the details
Hurry, there's only a few days left to guess the 4 original stamps in their current catalog. Grand prize is a package of 20 DRS Designs stamps!
Feel free to contact me in the comments section if you have any questions.
Thanks for stopping by!
Smiles,
Jennifer
I can't believe it's March and the Easter Holy season is already underway! Where does the time go? Seems like Christmas and New Years were just last week! Perhaps it all feels so rushed because Easter is early this year. Well, regardless it's time to start showing off my Easter cards (St. Patty's Day too, stay tuned!) before it's too late! And, that's exactly what I have in store for you today!
I used the Easter Promise Greeting as my focal point. I stamped it in purple ink and used the same ink to shade around it while it was in a Nestie die. I decorated it with a few purple rhinestones and matted it with an oval scallop made from shimmer purple cardstock.
I used a 4" x 4" piece of light purple cardstock for the middle layer and embossed it with the Cuttlebug Textile Texture embossing folder. The bottom was punched with the Treading Water border punch. I decorated it by adding a pearl to each of the holes created by the border punch, and white grosgrain ribbon was tied in a knot just above the border. I used smooth white cardstock for the background layer and stamped the bottom portion 3 times with the Cross In A Cross stamp.
Finished card size measures 4.25" x 5.5".
Don't forget to run over to DRS Designs and check out today's clue for the Stamp-A-Versary contest! DRS has several prizes up for grabs including a 20 stamp grand prize package. Make sure to enter today!
Thanks for stopping by. I appreciate your visit!
Smiles,
Jennifer
It is both unfortunate and ironic that I need a sympathy card this week while DRS Designs is holding their Sympathy challenge. I don't normally like to have to make a sympathy card when one is actually needed, but a friend of mine over at the Stamp Shack posted a card in the gallery that inspired today's card. (Thanks Amy!)
I created the background by inking a small acrylic block and stamping it directly on my cardstock with 3 different colors. Then I heat embossed the Sea Grass (128L) and the One Line In Sympathy (262B) sentiment over top.
I added natural twine tied in a knot to the focal image and then added a small panel behind it that was dry embossed with the Swiss Dots folder. This is a small note card, finished card size is 5" x 3.5."
Thanks for taking the time from your busy weekend to visit my blog!
Smiles,
Jennifer
Well, we all know that it's better to create sympathy cards ahead of time rather than trying to make one when your heart is heavy. The Sympathy challenge on the DRS Designs Blog this week is the perfect opportunity to work on a few.
I didn't have a lot of time when I sat down to make my challenge card. I knew coloring an image was out of the question and since I haven't played with glossy cardstock in a while, I decided to get it out and do a little heat embossing.
I heat embossed the Silhouette Majestic Pines (757L) with black embossing powder and then sponged it with blue ink for the sky and green ink for the ground. I used a yellow Copic Marker for the moon. The Tiny With Sympathy sentiment (263A) tag was also heat embossed and sponged with ink. I added a dry embossed layer of polka dots to the background and each layer was matted with black. The light blue cardstock base measures 4.25" x 5.5."
I hope I've inspired you to stamp today! Thanks for stopping by!
Smiles,
Jennifer
Hi Friends! Hope you all had a wonderful weekend!
I had a nice restful weekend at home--visiting with family, got a massage and even had some time to myself to get a some stamping done! Here's one of the cards I made. I think these beer stamps from DRS Designs are hilarious! They make a perfect masculine birthday card or they could be great for St. Patrick's Day too!

I used the Large Beer Mug (557H) here as my focal point and colored it with Copic Markers. I created a banner to show off the bold part of the Beer is the Answer Greeting (486G) and embellished it with a button and twine. I popped it up with some foam tape and adhered it over the image as shown. I stamped the rest of the greeting on the bottom of my card front and added 2 black brads to the upper left corner.
For a realistic look, I added Diamond Glaze to the beer mug to make it look like glass. I love what Diamond Glaze adds to the elements on a card! I'm amazed at how real it looks and I often find myself admiring the finished product by running my fingers over the shiny area repeatedly. Do you like it as much as I do?
Hope you enjoyed today's card and I hope you'll be back to visit soon!
Thanks for stopping by!
Smiles,
Jennifer
This week's challenge on the DRS Designs blog is "Plaids." Oh, what fun I had creating this cute "Toad" card for it!! (or is it a frog because I've colored it green? LOL!) I recently received the Large Original Plaid (641P) stamp and I'm really enjoying making my own backgrounds and plaid patterns with it. (For another example, please see my Stacked Love Valentine HERE.)

The plaid seen here was created by stamping the Large Original Plaid stamp in both, the vertical and horizontal directions. I stamped it one way with dark green ink and then for the other way I used a light green ink. The Singing Frog (138H) was colored with Copic Markers, masked, cut out with an oval Nestability using the Out-of-the-box technique, and then sponged while it was still in the die. I've also created the polka dot background here using Versamark ink and the Polka Dot Background stamp (688P). It matches that polka-dotted frog pretty well, doesn't it? I got creative with the sentiment and split up the "Toad"ally Wonderful Day Greeting (455E) in to 3 parts to fit my layout. Finished card size is 4.25" x 5.5."
***I also have to tell you about the new contest DRS Designs has going on now. You have a chance to win some great prize packages which include a grand prize of 20 stamps from DRS Designs! All you have to do is visit the DRS Designs Blog from February 20th to March 11th and collect the 20 clues that will identify 4 stamps from DRS Designs original catalog that was printed in 1992. Each of these 4 stamps are still currently available for purchase today. Additional details for this contest can be found HERE. Have some fun, play along with us, and win!
Thanks for visiting today!
Smiles,
Jennifer
Hi Stampers!
Here's a fun Birthday card I've created to share today!

All stamps are from DRS Designs and this was created using the Birthday Flower Circle (377H). The sentiment in the middle is part of the stamp. However, the wheels in my head are turning...if you used the unmounted or cling mounted version of this stamp, you could easily cut out the middle of the stamp and change the theme by stamping another sentiment in it's place. You could consider the Tiny Belated Birthday sentiment (495A), the Gift For You Greeting (514B), the Enjoy Today Sentiment (1145C), the I love You Greeting (608B), or even the Tiny Happy Anniversary Greeting (340A). The possibilities are endless!
For the background I stamped the Interlocking Flower Background (813H). The part I liked best is that there wasn't much to color--at least that's how I chose to proceed with the elements on this card. I used Copic Markers to color in some of the flowers and then only part of the petals on others. I used a white gel pen to color in the flower centers, the dots and some of the smaller flowers in the background.
I hope you enjoyed seeing this card--It's one of my favorites!
Don't forget today begins the Stamp-A-Versary contest over at DRS Designs! click on the photo above for all the details. You have a chance to win a 20 stamp prize package from DRS Designs in honor of their 20th Anniversary!!! Run over there now to play!
Have a great day and thanks for stopping by!
Smiles,
Jennifer
Hi Everyone!
Since Valentine's Day is today, I think it's only appropriate that I share a Valentine's Day card with you. Today's card was also created for DRS Designs very own Blog challenge. The current theme is to use the word "Love" somewhere on your card. Run over and check it out. This contest is open until February 20th, so you still have a lot of time to enter...and win!
The layout I used is from last week's sketch challenge on the 365 Cards Blog, and I've used the following stamps from DRS Designs to create it:
Large Original Plaid (641P).
The Stacked Love was colored with Copic Markers and I sponged pink ink around it while it was in a Nestabilities die. Doesn't the background paper look like it's store bought? I repeatedly stamped the Large Original Plaid on smooth pink cardstock using red ink. I'm not sure how I was able to get the lines so straight. I didn't even use my Stamp-A-Ma-Jig! I love the look so much that I've even kept the scraps that I trimmed off to use on another card. They'd make a great border to decorate the inside of a card like this to match!
I'm also trying to spread the word about DRS Designs 20th Anniversary Celebration. They are celebrating by giving away stamps--lots of them!!! This contest begins in just one week!!! So mark your calendar and check the DRS Designs Blog to see how you can win a great prize package!
I hope your Valentine's Day is wonderful!!
Smiles,
Jennifer
With Valentine's Day right around the corner I've been stamping a lot of hearts lately, and with the challenge on the DRS Designs Blog being the word "Love" my challenge card is no exception.
I couldn't resist adding a little diamond glaze to their eyes to make them realistic--or does it make them a even more goofy?!?! LOL!
Hope you enjoyed seeing it!
Smiles,
Jennifer
After what feels like forever, I'm finally trying to get back to participating at the Stamp Shack. I've joined a few swaps and one of them is "The Flood." Every month 2 names are drawn from the participant list and they get "flooded" with cards from everyone else. Over the course of the month those selected receive 24 hand stamped greeting cards! I can't wait until it's my turn!
Here is the card I sent out to each of the January "Flood-ees."
I got the idea from a card on Splitcoast to use the Large Octagon Nestie dies to create the honeycomb look of a bee hive. I thought the look of a bee hive would be cute with the Bitsy Bumble Bee (1020A), the Happy Bee (561C), and the Latest Buzz sentiment (621D). I tied a little yellow and white twine through a tiny black button for the embellishment on the sentiment tag.
The bees were dressed up with glitter wings and then adhered with foam tape for dimension. I really like how they turned out and really hope my flood partners like them as well!
Thanks for stopping by!
Smiles,
Jennifer
Do you ever get so excited after seeing a sketch that it inspires you immediately? That's what happened when I saw this sketch challenge (SC421) last week on SCS.
I sat right down and used it to draw up my card in my sketch notebook and then later I was able to whip up this card and everything fell right into place!
I stamped the Chocolate Chip Background (361H) for the vertical panel and decorated it with a pink and red banner tied with twine as seen in The sketch. Three little heart brads were the final embellishment and the card front was adhered to a dark brown cardstock base that measures A2 size.
Happy Monday to you all! I hope your week is off to a great start!
Thanks for stopping by!
Smiles,
Jennifer
Hi Friends!
Well, it's Thursday again, or should I say already?!?! Things have been really hectic lately and I'm feeling like I'm bearly staying above water. Just when I think I've got a good handle on this card making and blogging thing, life throws me a curve ball. So please accept my aplogies for not posting as often as I'd like to.
I found this Valentine's Day card in my stash to use for the Brads challenge on the DRS Designs blog this week. This was a card I made awhile ago and I submitted it to 2 different magazines for publication. Unfortunately, it was never selected, so its never been shown off on my blog before...until now!
Both stamps are by DRS Designs. The focal image is the Valentine Tree (976H) and the sentiment is the One Line Valentine Greeting (996D). The hearts on the tree were colored with Copic Markers and then I added Diamond Glaze to each one. I love how it makes them all look like tiny glass hearts! I think the light pink sponging around the tree makes it look really elegant too! This is one of my favorite cards yet!
I know brads are pretty much a card makers/stampers staple nowadays, so run over to the DRS blog and link up your latest creation to win! **Stamps by DRS Designs are not required!
Good luck and thanks for stopping by!
Smiles,
Jennifer
Hi Stampers! Happy Wednesday to you!
Today I'm sharing a masculine Birthday card that I made over the weekend. I know many Stampers struggle with masculine themed cards since many of us are so used to embellishing our cards with lace, ribbon, flowers, and bling! Unfortunately, those embellishments don't work well for the guys, but when the Double Tall Pines (741P) came out in DRS Designs latest release, they immediately screamed "masculine" to me. I challenged myself to give a masculine themed card a try and I love how this one turned out!
This was fairly easy to create. More or less, the most involved part was all of the coloring and shading...Time consuming, but not difficult. To start, I stamped the pines on the far right side of a piece of white cardstock and colored them with Copic Markers. I used a Post-It Note to mask off the bottom so that I could sponge the ground with brown ink and then distressed the edges all the way around with the same ink. Next, I stamped the Buck Bust (319K) on a separate piece of white cardstock and colored it with Copics as well. I used an oval Nestabilities die to cut it out and sponged brown ink around it while it was still in the die. After matting the image, I adhered it in place as shown, slightly overlapping the pines. The Birthday Sentiment that I stamped above the Buck image was part of the Birthday Multi Greeting (219P). I matted the card front on brown cardstock and embellished the bottom with some natural hemp cord (used for jewelry making) that was wrapped around twice and then tied in a knot. It was finally adhered to a green cardstock base.
I hope I've inspired you to get creative and stamp some masculine cards. I find they are easier to make when I'm not under the pressure of actually needing one.
I challenge you to give it a try!
Smiles,
Jennifer
Lucky me, I've been able to do lots of stamp-related things over the last 2 days! I was able to take my time shopping at a local scrapbook store and Hobby Lobby 'kid-free' (big thanks to my Hubby for that!), I sketched a bunch of layouts in a notebook and now with new supplies in-hand, I was also able to get inky and watch some of those drawings come to life! I'll still have a lot more cards to finish up, but I'll hopefully be showing many of them off in the upcoming week! Now that's lucky for you! LOL!
In the mean time, this owl card I have for you today was one I put together about a week ago. I was playing around with the Double Tall Pines (741P) and found that I like them as a background the best. I think they make for some really great masculine cards. For the card front below I used the masking technique to create the background so that the pines overlapped a bit. I used a Post-It Note to section off the area I wanted for the ground and sponged it with Vintage Photo ink. I used the same ink to distress the edges all around the card front as well.

I used Oswald the Owl (132H) for my focal point. He was colored with Copic Markers and I used the Out-of-the-box Technique to cut him out. If you look close, his tail is sticking out from the oval frame. I sponged beige ink around him to create the frame while he was still in the Nestie die. I did the same thing with the Whooo's Special Greeting (142B), but when I adhered it in place, I used foam tape to pop it up and add some dimension to the card front. I added 2 brown brads to the upper left corner and then adhered the card front to a dark green cardstock base. Finished size is 4.25" x 5.5."
Thanks for stopping by and have a wonderful weekend!
Smiles,
Jennifer
Wow, It's Thursday again already! The weeks are flying by and we're almost to the end of January. Can you believe it? Now, it's time for another challenge on the DRS Designs blog and the new theme is ...Pigs!
I created this fun Valentine last night and chose to use the Pig in Puddle (374F) image. I colored it with Copic Markers. I stamped the background using the Checkerboard Background stamp (342P), and embossed the vertical panel with the Heart Blocks Cuttlebug Embossing Folder. I added decorative trim using an EK Success border punch and embellished it with some pink and white twine. The sentiment is the newly released "Hogs and Kisses" greeting (785B). I added a brown brad to each side and adhered it using foam tape so that it popped up above the image.
DRS Designs is giving away a your choice of 2 stamps for FREE! Won't you play along? Check out all the details HERE and link your card for a chance to win! Good Luck!
Thanks for stopping by!
Smiles,
Jennifer
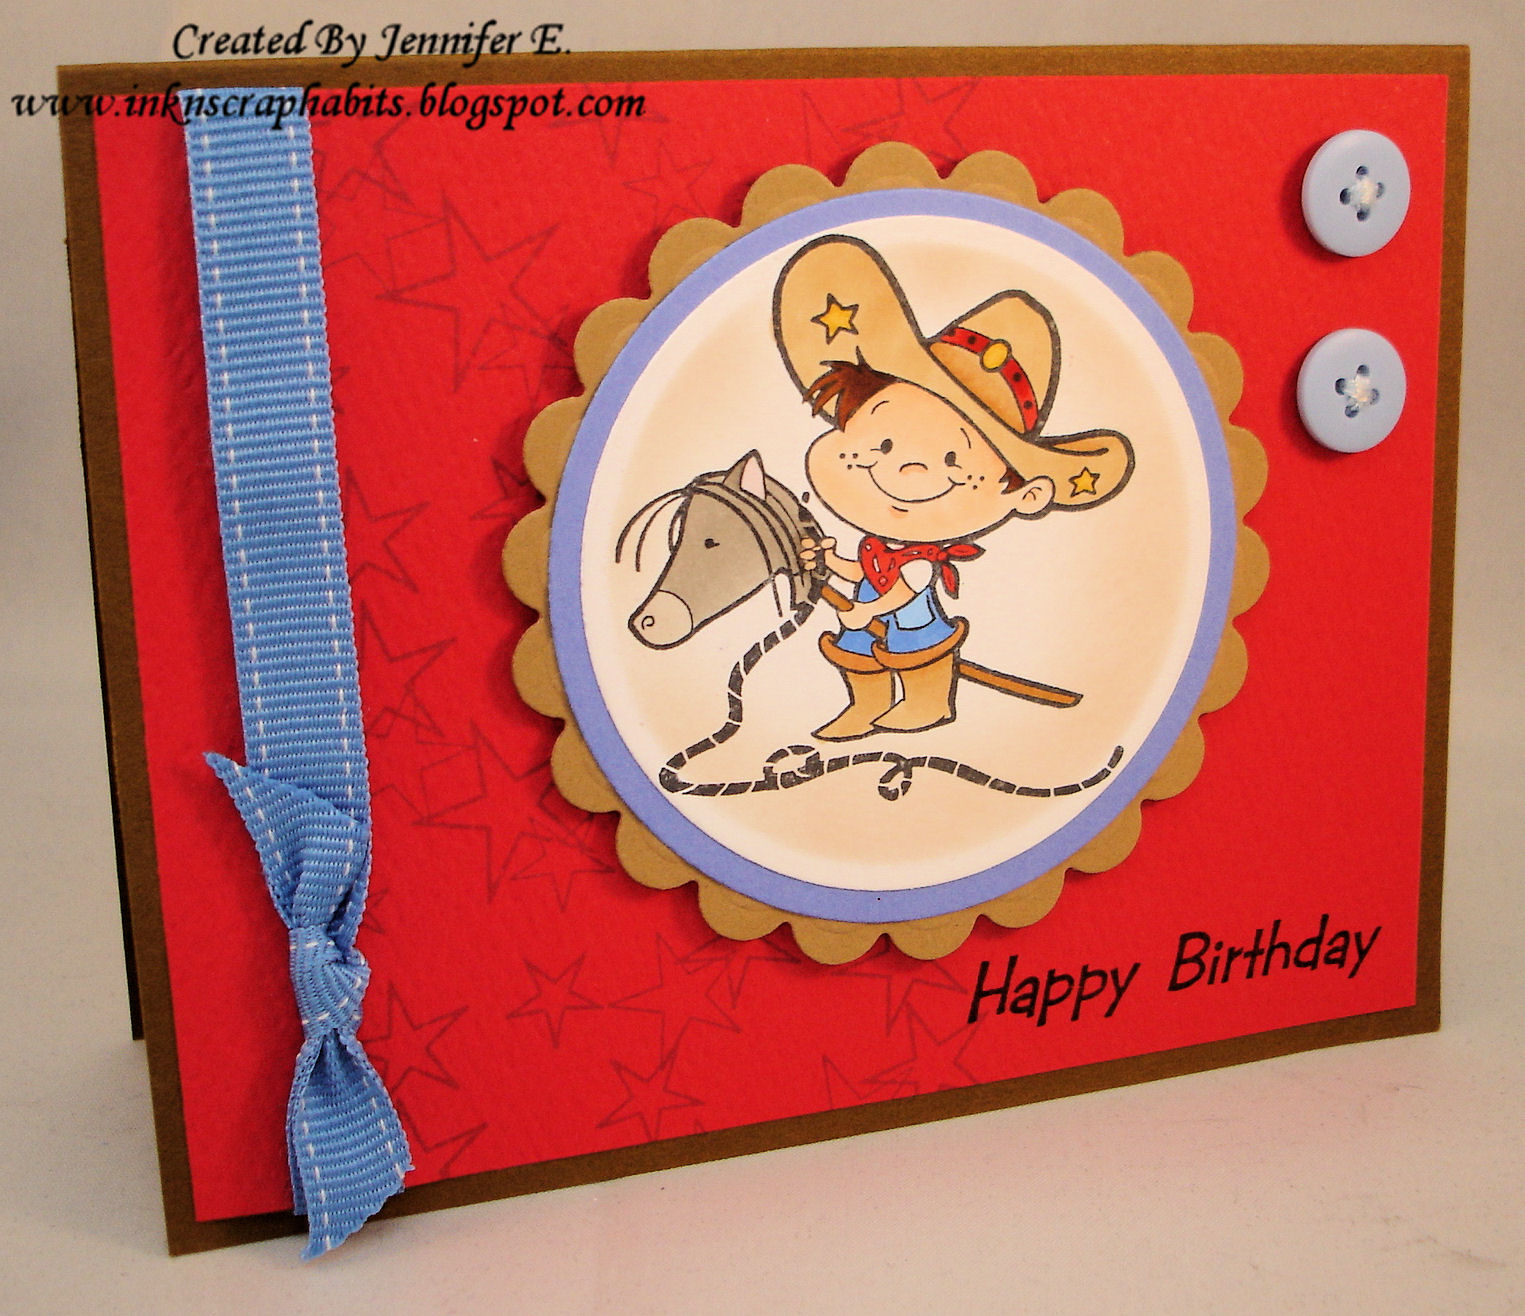
I started first by coloring the image with Copic Markers and then I sponged light brown ink around it while it was in a circle Nestability die. I layered it as shown and next I decorated the red cardstock for my card front. I stamped the Interlocking Star Background (819H) on the left hand side with blue ink and I used one of the greetings from the Birthday Multi Greeting (219P) for the sentiment. I adhered the image in the center of the card front using foam tape. I added some ribbon to the far left side and a couple buttons on the upper right side. Finally, I adhered the card front to an A2 brown cardstock base. Cute and fun, wouldn't you say?
If you're interested in playing along in the "Gone Country" challenge you only have a few more days to do so. Check out all the details HERE.
Thanks for stopping by and have an awesome weekend!
Smiles,
Jennifer
The DRS Designs Blog this week has challenged us to create Trifold cards. I had some sympathy stamps that I've never used so I decided to get them inked up for this challenge.
I started with a dark brown cardstock base for my trifold card. I stamped up my own background paper using the Polka Dot Background (688P). For the top flap, I stamped the polka dots with Versamark ink and for the bottom they were stamped with Momento Rich Cocoa ink. The edges of both panels were distressed with Vintage Photo ink.
I created the opening by layering the Sealed With A Prayer image (1010D). I colored it with Copic Markers and attached it to the top flap of my card. I added a small piece of Velcro so that it could be opened and closed repeatedly. The bottom flap was decorated with a strip of dark brown cardstock that was layered with light blue grosgrain ribbon. The silver metal cross I added was a left over embellishment from my son's Baptismal invitations. Love that I have found a great way to reuse them! It was attached by placing a silver brad through the ring at the top of the cross.
I stamped the Extending Sympathy Greeting (1090G) on the inside and embellished it with the praying hands image from the Sealed With A Prayer stamp. I colored them with Copic Markers, fussy cut them, and then used craft glue to adhere them above the inside greeting. The edges of the inside panel were distress with light blue ink and as you can see there is plenty of space to write your own heartfelt message.
Well, that's it for me today. Thanks for stopping by! I appreciate your visit and hope you'll check out all the challenge details and the great prize up for grabs on the DRS Designs Blog!
Smiles,
Jennifer
I've started to make my Valentine's Day cards, have you?
Here's a fairly quick and simple one I whipped up this past weekend. I love that it didn't require any coloring! Don't get me wrong, I LOVE to color, but I'm pretty certain I've never made a card like this before!
All of the stamps I used are by DRS Designs:
Interlocking Heart Background (808H)
The background is made up of 3 different panels. The top was simply stamped with the Interlocking Heart Background. The bottom was embossed with the Heart Embossing Folder from Bringing Crafts-Too You. The seam between them was layered with red and pink cardstock embellished with a white satin ribbon which was tied in a knot.
I used SU!'s Real Red for all of the stamping, except for the sentiment which was stamped in Onyx Black Versafine. The Dotted Heart was stamped twice--once in the center of the Giga Heart Circle and then again on pink cardstock. I then paper pieced it in the center as shown. The layered and stamped image in the center was adhered with foam tape for added dimension. The card front was adhered to an A2 red cardstock base.
I think I've inspired myself to create more non-colored cards with this one. Hope you like it as much as I do!
Thanks for stopping by!
Smiles,
Jennifer


.jpg)