Welcome to Ink N Scrap Habits!

I've created this blog to share my life & love of paper crafts with others. You will read bits and pieces of what goes on in my world and be able to see my paper craft creations! Please leave me a comment if you see something you like. I'd love to hear from you!

Tuesday, May 24, 2011

First Holy Communion

 Today I have a Communion card I made for my Godson to share with you.   He made his First Holy Communion a couple weeks ago and I was so glad to see that DRS Designs had the perfect stamps so I could make him a card.  I'd much rather make the cards I give away then buy them.  It's a lot more fun that way too!

The first step I did in making this card was heat emboss the Praying Boy Silhouette (899F) with black embossing powder on light blue cardstock.  I matted it with a white cardstock scalloped oval to use as the focal point on my card front.  I stamped the First Holy Communion Greeting (913G) with black ink on white cardstock and inked the edges around it with light blue ink.  I created the card front from black cardstock that I dry embossed to add a little texture to my card.  I assembled the stamped pieces as shown and used the notched corner punch on all 4 corners.  I added a light blue ribbon and 3 light blue brads as embellishments and then threaded metallic silver string through the notched corners. The entire card front was then adhered to an A2 sized light blue cardstock base.  

I decorated the inside similar to the card front.  On white cardstock I used the notched corner punch on all 4 corners, inked the edges with light blue and I also added a strip of light blue ribbon near the bottom.  I stamped the Communion Greeting (401F) for the inside message.  
  
Thanks for stopping by and have a great day!
Smiles,
Jennifer

Sunday, May 22, 2011

CAS Thinking of You

Hi Friends!
Today I'm sharing with you a simple Thinking of You card I made using 2 stamps from DRS Designs previous release.


I used just a small portion of the Medium Daisy Bloom (668H) three times, cut in different spots with a Nestability die. I colored them with Copic Markers and matted them on an orange cardstock rectangle. I created the card front by distressing the edges of the white cardstock panel and matting it with peach-colored cardstock. I arranged the 3 bloom squares vertically on the left side of the card front and then stamped the Vertical "Thinking of You" (690D) on the right side of the card front. After adding some brads and some twine threaded buttons to the flowers, I attached the card front to an A2 sized orange cardstock base. Such a bright and cheery Thinking of You card perfect for Spring and Summer, don't you agree?  Hope you enjoyed it!

Thanks for stopping by!

Smiles,
Jennifer

Friday, May 20, 2011

Baby Shower Thank Yous

Last month when I went on the stamping weekend with the girls from the Stamp Shack, they all threw me a surprise baby shower. I was very, very surprised and shocked to learn that they had been planning it since January!  With all that has been going on, it's only taken me a month to finally make and write out their Thank you cards!


One of the girls gave me a cute set of Inkadinkado clear stamps called "Baby Love" and I thought the little swaddled bunny was perfect for their cards! I made 13 of them and had to mail them so I didn't want to add any extra embellishments. I colored the image with Copic Markers and then paper pieced the blanket after I ran it thru the Swiss Dots Cuttlebug folder to match the pattern I used on the background panel.  The "Thanks" sentiment I used on the bottom is by Serendipity Stamps.


To all of you Shackapalooza girls who follow my blog, thank you again for the surprise shower and for all the goodies you all so generously gave me! I greatly appreciate your thoughtfulness!

Smiles,
Jennifer

Wednesday, May 18, 2011

Happy Father's Day!

I am just head over heels for DRS Designs newest stamps! The characters that just came out in their Retirement collection are so much fun to play with!  I made this card for the White Space challenge over at the 365 Cards Blog that DRS Designs is sponsoring this week. 


The challenge is to keep all of the decorations on your card towards the black portion of the sketch and keep the white space free.  Play along in any of their challenges this week and you could win a $15 DRS Designs store voucher! (see below for more info)

I couldn't help but use Rascally Russell (777M) for a Father's Day card! Just look at that old guy dance!!!   I colored him with Copic Markers and then added the "Happy Father's Day" portion from the Ten Mile Fathers Day Greeting (280G) to the empty space at the bottom.  The background was stamped with the Polka Dot Background (688P) in Apricot Appeal ink.  A layered photo corner embellished with twine and a matching brad made this card complete!

Here are the challenges thus far at the 365 Cards Blog to play along for $15 voucher:

All Week: Sunday Sketch 17
Monday: White Space
Tuesday: Pretty In Pink-ing
Wednesday: Fabulous Fringe

Thanks for stopping by and good luck winning the $15 store voucher from DRS Designs!
Smiles,
Jennifer

Tuesday, May 17, 2011

Butterfly Birthday!

Over the last few days I've been busy with DRS Designs new releases.   Have you seen them yet? They are so much fun! To be honest, I've gotten lost in them over the last week...planning layouts in my sketch book, coloring up a few digi designs and preparing for when my package of rubber actually arrives--which should be today, I hope!


In the meantime, with that and all that is going on preparing for the baby's arrival, I completely forgot about this Happy Birthday card I made about a month ago.  The Butterfly Oval (749L) and the Three Butterflies stamp (744F) are both from DRS Designs previous release.  I love that the Small Script Happy Birthday (159D) as well as a number of other sentiments from DRS Designs fit inside the Butterfly Oval perfectly!

I created my own background paper on this card by clear embossing the Three Butterflies stamp repeatedly and then rubbing the Distress Stain Stick in Broken China (from Tim Holtz) over the embossed butterflies.  The Butterfly Oval was colored with Copic Markers.  Purple brads, purple satin ribbon and some bakers twine finished off this card nicely.  I love the teal blue and purple colors together...aren't they yummy!?!?!


I know it's been awhile, but there's a new sponsorship opportunity currently underway from DRS Designs and the 365 Cards Challenge Blog.  Every day at the 365 Cards Blog there's a new challenge to inspire you and for playing along in any of their daily challenges, you could win a $15 store voucher for DRS designs!  ( and yes, you could shop the new releases for FREE!) The challenges start HERE with a sketch.  Make sure to check back with them every day to see what the next challenge is!
Good Luck and thanks for playing along!


 Smiles,
Jennifer

Tuesday, May 10, 2011

Yee-Haw! I've Been Published!

About 9 months ago I submitted this card for the Stamp and Scrap Arts Magazine's call for Country Western projects.  I had a feeling it was selected for the magazine because I sent a stamped return envelope with it and never received it back!  Woo Hoo! You can see it in the July 2011 issue on page 30.

All of the stamps used on this card are by DRS Designs.  The Cowboy Garb (1121K) was colored with Copic Markers.  Don't you just love the colors on this card?  Nothing says Country Western to me like brown and teal! I masked off the edges around the image with Post-It Notes and then sponged around it with light teal ink. I matted it with teal and brown cardstock and added a fun brown and white polka dot ribbon to the bottom of the matted image.

The card front was simply made from teal cardstock.  I adhered the matted image on an angle to the center of the card front and stamped the In The Accessories Greeting (155D) on an angle as well just above it.  I embellished the lower right and the lower left sides of the card front with brown petite brads as shown. 


The star embellishment was actually created using the Star Ribbon Slide (963D).  I heat embossed it with teal embossing powder and then after cutting it out, I tied the brown and white polka dot ribbon thru it.  I matted it on a brown scalloped Nestie circle and then adhered it to the upper right portion of the stamped image.  The card front was then adhered to a brown A2 sized cardstock base. 

Really like this card? Then you might also like this other Country Western card I made with some of the same stamps, but in red and brown.  You can see it HERE.
Thanks for letting me share my good news with you today!
Hope you have a good one! 
Smiles,
Jennifer

Monday, May 9, 2011

Welcome!

Happy Monday!
Hope you all had a great weekend and a wonderful Mother's Day to all you Mother's out there!!  Here's a "Welcome" card I made for new neighbors!  Spring is a great time for new beginnings and I've seen several moving trucks in my neighborhood recently.

 The one line Welcome stamp (737B) used here is from DRS Designs latest release.  I love this Shoe House (1069L) stamp and it's fun to color too! It's perfect for a card like this!


I colored the Shoe House image with Copic Markers and distressed the edges with Vintage Photo ink.  The decorative horizontal panel was first stamped with the new Polka Dot (688P) Background and then I used a border punch to dress it up.  I distressed the edges of this panel as well before matting it on a dark brown piece of cardstock that was punched with the same border punch. I added gathered ribbon across the center and then tied the end with a small piece of hemp jewelery cord around it to match.  Some dark brown brads and a decorative corner punch made this card front complete.  Finished card size measures A2 size, 5.5" x 4.25."

Thanks for stopping by.  Have a wonderful day!
Smiles,
Jennifer

Friday, May 6, 2011

Caught a Bug?

Well, once again, time has just flown right by and I can't keep up. It's been 3 weeks already since I went on the girls stamping weekend and I have yet to stamp since then! I've been on a cleaning frenzy since I got back--thought with majority of my stamping supplies all packed up, that this was a good opportunity to make a dent in cleaning out my stamp room for our new baby. (The baby, who will be here in just 8 short weeks!) I'm happy to report that I've made enough progress to make room for the crib and tall dresser on one wall but I still have my large craft table on the opposite wall. It seems like my Husband reminds me daily that we have the changing table dresser and rocking chair in our living room!! So, I've been slowly making room for those pieces recently.  Unfortunately with my time spent elsewhere, I've been a blog slacker.  Sleep, work, and cleaning/organizing are priorities, but for no apparent reason today I was up bright-eyed and bushy-tailed at 4am. So, I'm trying to make the most of this energy before I crash and burn with a nice, long morning nap!

I created this "Caught a bug?" card a few weeks ago.  I'm really loving DRS Designs new Polka Dot Background (688P).  I'm sure you can tell, as I've been using it quite a bit lately.  Here, I heat embossed it with white embossing powder, used the ticket corner punch, matted it with white cardstock and then added 2 small black rhinestones to the corners to create the background panel.


For the focal image, I stamped Ant Betty (1035B) along with the new One Line "Caught a Bug" saying (755D).   I used a square Nestie die to cut them out together and then used a very fine point black marker to draw in the square die border around the image and saying.  I sponged light red ink inside this border and Ant Betty was colored with Copic Markers.  To finish it off I used the ticket corner punch on all 4 corners, matted it on a black, scalloped square  and added a petite red brad to each corner. 

I used red cardstock for the card front.  I wrapped it with black and white twine, and used the ticket corner punch on all 4 corners again to match the detail in the rest of the card elements.  I adhered it to a black A2 sized cardstock base.  I then decorated a large photo corner with red twine and a white brad and assembled the card front as shown.  Hope you like it!

 Please stay tuned to see more of the baby's room (and more of my card projects!) as I make more progress in cleaning it out. It shouldn't be too much longer now! ;-)
Thanks for being patient with my sporadic blogging and for stopping by today!  I'm always grateful for your visits!

Smiles,
Jennifer

Friday, April 29, 2011

Spring!

Happy Friday!
Isn't Spring such an exciting time of year?  I love seeing all of my flower beds begin to bloom and best of all you can't beat the warm, mild temps and all the sunshine!  This spring card sums it all up perfectly!


The Spring Wording Square (669G) was recently released by DRS Designs.  I created my own background by stamping the Single Flower Blossom (1065C) repeatedly.  I added a fun border punch to outline my stamped background and embellished the card front with some Baker's twine that I recently added to my embellishment collection. 


All of the coloring and edge distressing was done using Copic Markers. 

I hope your Spring is in full bloom and that you take the time to enjoy it! 
Thanks for visiting!

Smiles,
Jennifer

Monday, April 25, 2011

You're on my mind

No one likes to make Sympathy cards, but unfortunately every now and then we need them. I prefer to have them made up ahead of time--it seems to make having to use them a bit easier.  I made this one recently using the new Background Branch (721K) from DRS Designs.    


I didn't even know this stamp was a "background" until I started writing this post. Regardless, colored with Copic Markers, it's made a lovely focal image for this sympathy or thinking of you card.


If you look closely, you'll also see that I clear embossed the white background with the brand new Polka Dot Background (688P). I then distressed the edges with light green ink which helped make the polka dots more visible. I stamped the Mind and Prayers Greeting (676F) with green ink at the bottom of the card front. Since I think simple is better for these types of cards, I kept the embellishments on the simple side: a few matching brads, a decorative border punch, and some elegant ribbon pulled everything together nicely.


Thanks for visiting today!

Smiles,
Jennifer

Sunday, April 24, 2011

Easter...The Promise of God's Love

Happy Easter!

I hope you all have a wonderful day with family and friends!  

Today, I'm taking a break from playing with some of DRS Designs newest Easter images and brought out an oldie but goodie, you might say! This Praying Bunny image (407L) is one of my favorite stamps from DRS Designs.  I colored it with Copic Markers and used the masking technique to sponge blue ink around the image creating the sky. Every now and again I'd ink blue around a small portion of a scalloped circle to shade in clouds. Next, I stamped the God's Love Easter Greeting (974F) in the empty space above the image. Then the image was cut out and layered using Nestabilites. I created the background by scoring lines in both diagonal directions on my Score Pal and then using a decorative corner punch on all 4 corners. A olive green cardstock base was created measuring 5" x 4.5," and I used 4 yellow brads and an olive grosgrain bow as the only embellishments.

I hope the Bunny was good to you today!

Thanks for stopping by!

Smiles,
Jennifer

Friday, April 22, 2011

Jelly Belly!

Happy Good Friday! 
Are you all set for the coming of the Easter Bunny? 
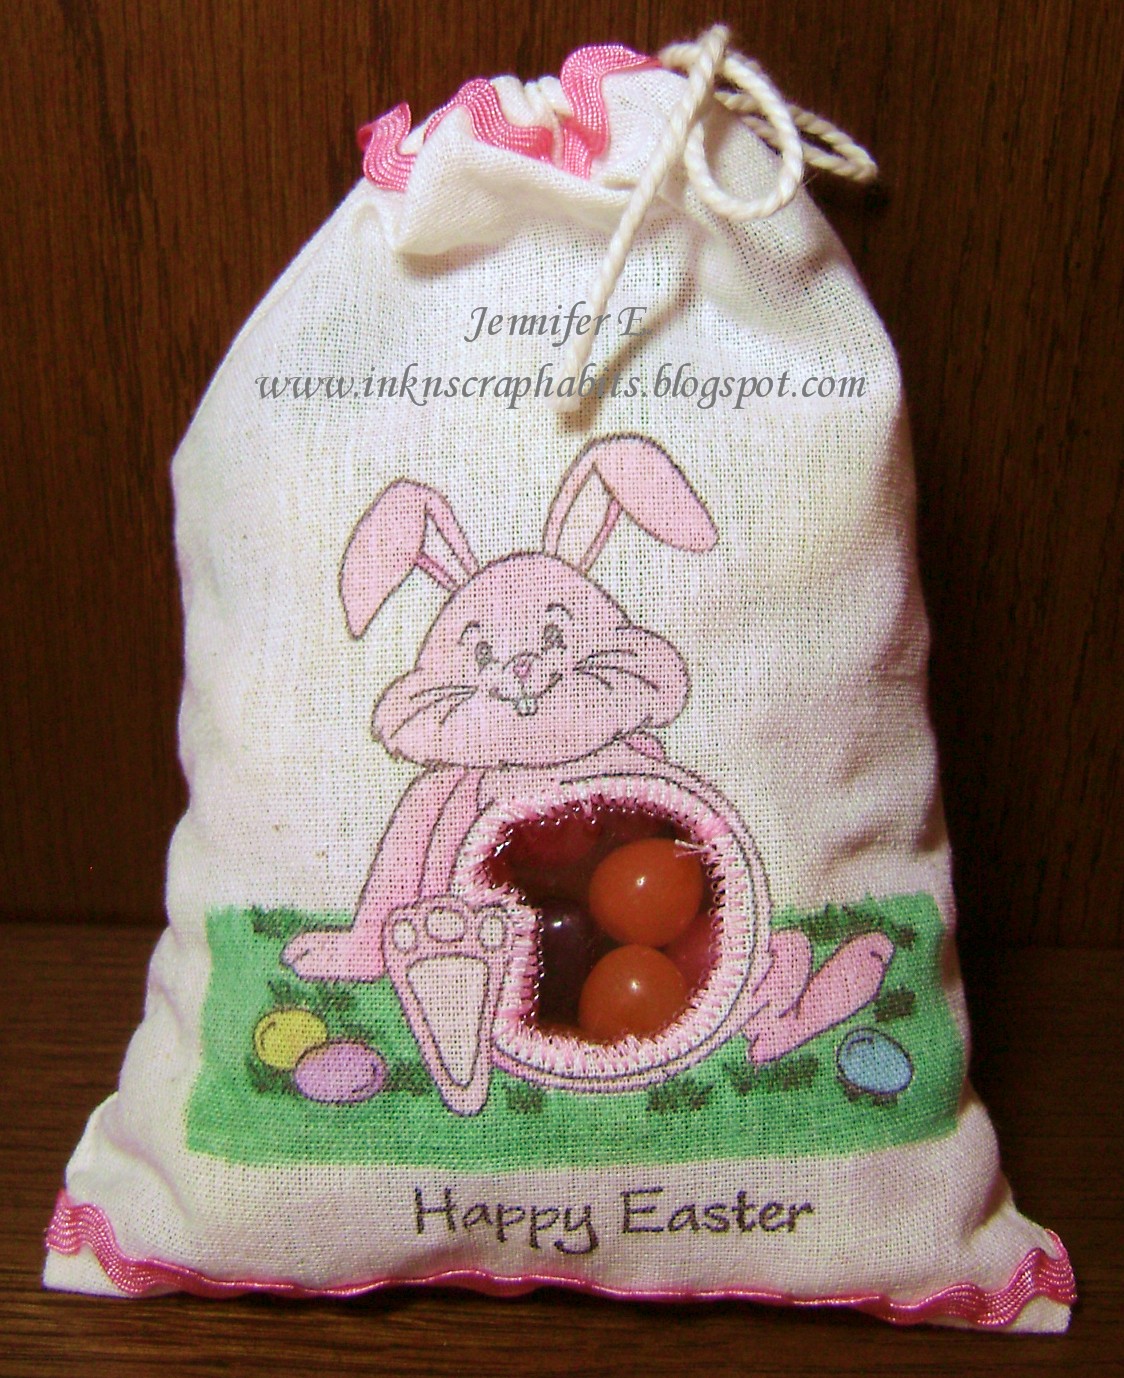
I'm getting ready by creating some of these Easter Bunny Jelly Bean gift bags.  You can purchase these canvas bags from DRS Designs.  They measure approx. 6.5" x 5" when completely flat and have a drawn string closure.  They are available in 10 packs for $4.95.  Here is mine unfilled so you can see what I did to decorate it. 


I tried thinking out of the box and did a bit more than just stamping the bag as I had with the St. Patrick's Day bag I made.  After stamping and coloring the Jelly Bunny Bean (221M) image with Copic Markers, I opened the side seam and then used scissors to cut out the fabric from the bunny's stomach.  I used a sewing machine to sew an acetate panel in it's place to create a see-thru window.  I then sewed the side panel back up, stamped the One Line Happy Easter Greeting (665B) and then adhered pink ric-rack ribbon to the top and bottom of the bag.  Last, but not least, I filled the bag with jelly beans!    

Now I know why that bunny has such a big tummy...look at all the jelly beans he ate! LOL!

Hope you all have a wonderful Easter!

Smiles,
Jennifer

Wednesday, April 20, 2011

As another year flies by...

...It is so true..."All Good Things Must Come To An End!"  This past week I got together with 12 friends from the Stamp-Shack at the Potawatami Inn in Indiana.  This is an annual get together we've titled Shackapalooza!  We rented out a conference room for 4 days and stamped away our long weekend.  We had a blast!  It's amazing how you can spend 13+ hours in a conference room for 4 days and not get bored!  It goes by with a blink of an eye!  There's nothing like spending time with good friends stamping, eating, chatting, laughing and enabling one another!  I wish we could get together more often, but as this years' event has flown by, I'm definitely looking forward to our next Shackapalooza in April of 2012!

One of the things I planned for this stamping weekend was to try a few techniques I'd seen on Splitcoast stampers and give them a try.  One of them was the Faux Silk technique and this is the card I made using it.  What do you think?

I stamped DRS Designs new Three Butterflies stamp (744F) repeatedly on tissue paper and then lightly colored them with Copic Markers.  Then, as per the tutorial, I crumbled up the tissue paper, smoothed it out and adhered it to white cardstock to create the background.  The Another Year Flies By sentiment (489F) is also by DRS Designs.  How do you like that rosette embellishment?  I was enabled by Chelsea over the weekend with her new Tim Holtz dies that I used to make it.  I used a light blue button and some bakers twine to finish the flower and dark pink rhinestones outlined the border nicely!  

Hope you like it!
Smiles,
Jennifer

Monday, April 18, 2011

Easter!

Happy Monday friends! Hope you all had an enjoyable weekend! I was busy in my stamp room this weekend and one of the cards I created was this Happy Easter card for today's post.  Are your Easter cards done yet?  One of the best things about this card is that it looks really involved, but honestly since I had colored the image previously, just putting the layout together didn't take me long at all!


I colored the Easter Daffodil Oval (663L) with Copic Markers.  Even though daffodils are one of my favorite flowers, I get bored coloring them yellow all the time.  I thought they looked pretty in pink! There are pink daffodils in real life,right? LOL! Hopefully so, but if not, I'm really happy with the soft pastel colors on this card!


I created the card front using light yellow cardstock, and stamped the Blooming Easter Greeting (660F) in the upper left corner. Then I embossed it with a Cuttlebug folder and added 2 score lines between the sentiment and the embossed dots.  To add a bit more decor to this card front, I created a small vertical panel from pink cardstock that I matted with blue and then added 2 yellow brads and yellow plaid ribbon.  After adhering it to a pink A2 cardstock base, I was done, and so pleased with the results!  

Thanks for stopping by and have a wonderful Monday!

Smiles,
Jennifer

Saturday, April 16, 2011

Bee Well!

  Have you seen the latest additions to the DRS Designs catalog? You can see all of the new releases HERE. I think some of them have come out just in time for all of the Spring colds out there! I'm still trying to get over a sinus infection that I've had for over 3 weeks and many of my family and friends have had Spring colds recently as well.


This "Bee Well" card I created for today uses 2 of DRS Designs new stamps.  One is the "Bee Well" sentiment (761B) itself.  It goes perfectly with the Bitsy Bumble Bee (1020A) or the Happy Bee (561C) which I've used here. The other new stamp is the Polka Dot background (688P).  It measures 6 inches from left to right, plenty long enough to cover most stamping surfaces and simulates the swiss dots embossing folder! No need for an extra (heavy) machine with this stamp! Best of all you can use it with any color ink to match your project.  I see lots of polka dots in my future--I'm really gonna have fun with this one!  

 Hope your day is great and full of stamping fun! Thanks for stopping by. 

Smiles,
Jennifer

Tuesday, April 12, 2011

Welcome Spring!

Welcome Spring! 
I think Mother Nature has finally won the  battle with Old Man Winter and the weather here has finally turned Spring-like.  This new Daisy Basket (671L) from DRS Designs screamed Spring to me and I put together this card using the new one line Welcome sentiment (737B). Now, I know I made this to welcome Spring, but wouldn't it be a great card to give to new neighbors?


I colored the Daisy Basket with Copic Markers and thought it'd be fun coloring the blooms blue. What do you think--or do you prefer them traditionally white? I used a glue stamp pad and decorated the card front with the Polka Dot Background (688P) and then sprinkled the dots with blue glitter. I also added some white sheer ribbon and am really happy with how fun and cheery this card turned out!


Here's to hoping that you are enjoying Spring-like weather where you're at as well!

Thanks for stopping by!


Smiles,
Jennifer

Monday, April 11, 2011

F.R.O.G.

Sorry for the lack of posting over the last week. The internet has been down at my house and there's only so much you can do on a smart phone these days without going cross eyed! Unfortunately, blogging with (decent) pictures is one of them, so I chose to wait until it was fully up and running before attempting to post. Good thing about the internet being down is that it forced me to make better use of my time--I got a lot of housework done, some cooking and played often with DRS Designs new images!! Now you'll be seeing all of my finished projects fairly often! Yeah! Without further adieu...here's one of the cards I made:

All of the stamps used on this card are by DRS Designs. The new ones are the Fully Rely On God Greeting (740D) and the Polka Dot Background (688P).  Adorably cute wouldn't ya say? That cute Tiny Frog (420A) is from a previous release. I used Copic Markers to color the images on this card, and the polka dots were created using Versamark ink.  I also lightly distressed both frog panels with green ink.

The rhinestones were clear and I colored them with Copic Markers to match the color theme. 

Thanks for stopping by...I hope you have an unfrogettable day! (Sorry, couldn't resist!)

Smiles,
Jennifer

Friday, April 1, 2011

You've Caught A Bug!

Good things come to those who wait right? Well, it's been a while since DRS Designs last release and tomorrow, April 2nd you can expect to see the next batch of new stamps! This "Get Well" card uses the new Caught A Bug Greeting (752G). I used the tiny ants from the Picnic Basket (1104K) to create a border around my card front and I also used Ant Betty (1035B), which was colored with Copic Markers. 
I couldn't help but chuckle when I saw that this release fit with a "Get Well" theme.  I've been battling a sinus infection for about 3 weeks now and it seems like all of my co-workers and family have had their fair share of Spring colds as well. Perfect timing for this release I suppose! 

Here's a sneak peek of one of the greetings you'll see on the new release page as soon as the new stamps become available. 


Make sure to click HERE to shop for all of DRS Designs new stamps!
Hope you all have a great weekend!

Smiles,
Jennifer
Wednesday, March 30, 2011

Snapdragon Draggin'!

Well, it's official now...Spring has sprung! But, it seems as if Old Man Winter is still winning the weather fight! After the long Winter we've had this year, I'm sure you're all ready for the nicer weather just as I am. I now feel it's appropriate to share cards I've made with flowers...Sharing them during the cold and snowy Winter months just didn't seem right!


For example, here's a funny birthday card I made awhile ago using the Snapdragon Diamond image (008H) from DRS Designs. I stamped it twice and colored both images with Copic Markers and then layered one on top of the other for dimension. I split up the Snapdragon greeting (012G) into 2 parts to fit better with my layout. A decorative border punch, ribbon and some rhinestones made this card complete. Hope you like it!

Happy Spring to you all! Thanks for stopping by!

Smiles,
Jennifer

Monday, March 28, 2011

Transition Part 1

As I'm sure I've mentioned before, the transition is underway for my Stamping room.  It will soon become our Nursery!  Although I am sad to see it go (still trying to figure out where I will be creative once baby gets here) I am also very, very excited to meet our little one!  Not too mention the 12 weeks I will have off of work during the Summer is a nice added bonus as well.

Of course, I can't have a post like this without pictures so, just to show you what I've been busy doing over the last few weeks, here's the first picture of the nursery.  As you can tell it is still very much my messy (very messy!) stamping room. 


I've cleaned out a quarter of it to make room for the crib.  The table in the far back/left side was taken out and that area was reorganized to make room for it. As you can see in this picture, you can still see some of my paper folders.  It's a little awkward having a crib in there, but it's definitely growing on me quickly!


If I would just get in there to make room for the dresser that is in our foyer, my Husband would be a very happy camper!  Soon and very soon, I should have Transition Part 2 for you!

Hope you have a wonderful Monday!

Smiles,
Jennifer

LinkWithin

Blog Widget by LinkWithin