Welcome to Ink N Scrap Habits!

I've created this blog to share my life & love of paper crafts with others. You will read bits and pieces of what goes on in my world and be able to see my paper craft creations! Please leave me a comment if you see something you like. I'd love to hear from you!

Wednesday, March 30, 2011

Snapdragon Draggin'!

Well, it's official now...Spring has sprung! But, it seems as if Old Man Winter is still winning the weather fight! After the long Winter we've had this year, I'm sure you're all ready for the nicer weather just as I am. I now feel it's appropriate to share cards I've made with flowers...Sharing them during the cold and snowy Winter months just didn't seem right!


For example, here's a funny birthday card I made awhile ago using the Snapdragon Diamond image (008H) from DRS Designs. I stamped it twice and colored both images with Copic Markers and then layered one on top of the other for dimension. I split up the Snapdragon greeting (012G) into 2 parts to fit better with my layout. A decorative border punch, ribbon and some rhinestones made this card complete. Hope you like it!

Happy Spring to you all! Thanks for stopping by!

Smiles,
Jennifer

Monday, March 28, 2011

Transition Part 1

As I'm sure I've mentioned before, the transition is underway for my Stamping room.  It will soon become our Nursery!  Although I am sad to see it go (still trying to figure out where I will be creative once baby gets here) I am also very, very excited to meet our little one!  Not too mention the 12 weeks I will have off of work during the Summer is a nice added bonus as well.

Of course, I can't have a post like this without pictures so, just to show you what I've been busy doing over the last few weeks, here's the first picture of the nursery.  As you can tell it is still very much my messy (very messy!) stamping room. 


I've cleaned out a quarter of it to make room for the crib.  The table in the far back/left side was taken out and that area was reorganized to make room for it. As you can see in this picture, you can still see some of my paper folders.  It's a little awkward having a crib in there, but it's definitely growing on me quickly!


If I would just get in there to make room for the dresser that is in our foyer, my Husband would be a very happy camper!  Soon and very soon, I should have Transition Part 2 for you!

Hope you have a wonderful Monday!

Smiles,
Jennifer

Monday, March 21, 2011

BINGO!

The DRS Designs DT is playing BINGO this week with the ladies from the Forever Friends Challenge Blog.  One lucky winner will win a $10 store voucher to DRS Designs just for playing along. 

Here are the details:
Using the color chart above, create your own color challenge by choosing 3 colors vertically,
horizontally or diagonally from the color box.  For example, one of the color possibilities is using black, yellow and white.  Those are the colors I chose for my challenge card.


I used Bitsy Bumble Bee (A1020) and the Happy Bee (561C) both from DRS Designs for my focal image.  After coloring them with Copic Markers, I added Stickles to their wings to dress them up a bit.  I cut the panel down to size and used a fun corner punch on all 4 corners.  I    stamped the Bee Cause You're Special sentiment (544F) (also from DRS Designs) on the panel below it, and separated the 2 panels with fun black and white plaid ribbon.  For the background I used the Cuttlebug Divine Swirls folder and also used a corner punch along with black brads.  After attaching my card front to an A2 black cardstock base, I added a bow to the bottom of the image panel and my challenge card was complete!
Hope you like it, and hope to see you play along with us.  I'd love for you to win the $10 DRS Designs Store voucher!

Thanks for stopping by, I appreciate your visit!

Smiles,
Jennifer

Friday, March 18, 2011

Happy Easter Bunny!

After the past week, I've quickly learned that being sick and pregnant is no fun at all! I've come down with an icky upper respiratory infection and after sleeping practically 2 whole days away, I'm glad to say that I'm feeling more like myself.  Never realized how much I rely on over the counter meds when I was sick until I had to stay away from most of them!


I did find some time today to get back in my scrap room to create this fun Easter card for this week's Card Patterns Sketch challenge #106.  
The image, sentiment, and background design are all by DRS Designs.  I added some pink and light gray accents to the Big Bunny Face (639G) with Copic Markers and cut it out for my focal image. 


This is a first for me--I usually color this bunny completely, but I've seen some of the other designers leave it white and I think it's adorable this way!  The plaid in the background was created using the Woven Plaid stamp (613P) with yellow and pink ink, and I used the Word Window Punch to cut out the One line Happy Easter Sentiment (665B).  I love the way this card turned out--fun colors, cheery image and perfect for Easter.  Have you been busy making Easter cards?

Thanks for stopping by!
Have a wonderful weekend!
Smiles,
Jennifer

Thursday, March 17, 2011

Happy St. Patty's Day!

Happy St. Patrick's Day to you all!
I hope you all have a wonderful day planned with lots of green! Unfortunately, I have to work, but I'll be wearing my St. Patrick's Day scrub top to the hospital today. I love wearing festive uniforms to work--I think my patients really enjoy them too!

Here's my last St. Patrick's Day card for the year. I've used DRS Designs Paddy Bear image (638H) again. I colored this cutie with Copic Markers and cut it out and matted it using plain and scalloped Nestie rectangles. I stamped the Shamrock background (326H) repeatedly on the light green cardstock to create my own pattern paper for this card front. Then I added an embossed line with my Score-Pal and stamped the one line St. Pats Day greeting (636D) below it. I added 3 clear(!) rhinestones to each side of the sentiment and then colored them with a dark green Copic Marker (Love this money saving tip!). I attached the card front to an A2 green cardstock base and added a horizontal panel decorated with a border punch and some bright yellow ribbon.


I placed the Teddy image just off center to the left and my card was complete.

Thanks for stopping by today!
May the luck of the Irish be with you today and always!

Smiles,
Jennifer


Tuesday, March 15, 2011

Wearing Of The Green!

 Are you ready for St. Patrick's Day?


Today, Lucky Larry Leprechaun (643H) is dressed in green in honor of St. Patrick's Day!  He was colored with Copic Markers, and all of the white cardstock was distressed with green ink.  I ripped the white panel he was stamped on and the green panel I used to mat him with.  I haven't done that in a long time and I've forgotten what a unique look it adds to paper projects! I created a tag to show off the Tiny St. Pat's Day Sentiment (249A), and the yellow panel was stamped using the Celtic Knot image (651D) using SU! Apricot Appeal ink.  I used some brads and dark green grosgrain ribbon embellishments to dress up my card front.       

Will you be wearing green on St. Patrick's Day?
Smiles,
Jennifer

Monday, March 14, 2011

Working on Canvas

In our recent package of goodies from DRS Designs the DT was given a challenge. Each member was given several cute canvas bags to stamp up. Talk about a challenge!! It took me about two weeks to get the courage to start thinking out of my comfort zone-anything but a card and my brain has a tendency to freeze up and my creative mojo goes elsewhere! Considering the size of these bags they are not too much different than working on a card front-they measure approx. 6.5" x 5" when completely flat and have a drawn string closure. Once I put my mind to it however, the ideas came to me rather easy. The challenge was then how I was to overcome technical difficulties to get my ideas on that canvas work space!


What kind of ink should I use?
Will Versafine bleed?
Will Staz On be dark enough or will it look purple on the canvas?
What about if I use Copics, will Momento run on the canvas?
Will Copics work or will they bleed along the tiny canvas threads?
What other kinds of coloring mediums can I use?

Eeeek! These were a bunch of the questions that popped into my head as I brainstormed about how to get my ideas onto these little bags.  The first thing I did, was email some stamping friends and get their opinions. This helped me get started as many of the questions I listed above were answered. I then took the plunge to see what I could come up with.


This fun, St. Patrick's Day goodie bag was the outcome of my first brainstorm attempt. I began by first stamping Sean and the Rainbow (L521) with Momento ink and coloring it very lightly with Copic Markers. Considering the challenges and questions I had getting started, I was pretty happy with the result. Next, I stamped the One Line St. Pats Day Greeting (636D) below the image and then stamped the Shamrock Background (326H) all over to fill the empty space with SU! Handsome Hunter ink. I was so happy with the result that I created a matching card to go with it.   
What would you create with these fun little canvas bags?


Smiles,
Jennifer

Friday, March 11, 2011

Open Your Heart At Easter

One of the things I really enjoy about the stamps DRS Designs has, is the wide selection they offer for just about any occasion.   With the Easter season upon us, I find myself making more religious cards now than any other time of year.  Today I'm sharing my latest creation showing off the newly released Faith Open Heart Greeting (657H) that I've paired with the Cross with Flowers image (103K)

I colored the cross with Copic Markers and then carefully cut it out.  I adhered it to a piece of matted pink cardstock that was dry embossed with the Textile Texture Cuttlebug folder.  I used a sheet of smooth pink cardstock for the card front and inked the edges with Colorbox Rouge Chalk Ink.  After using a corner rounder, I stamped the sentiment along the upper left side and adhered the matted image next to it.  I stamped the One Line Happy Easter Greeting (665B) at the bottom of the card front and added pink and white plaid ribbon and a bow just above it.  I then adhered the card front to a brown A2 sized cardstock base.  A touch of pink glitter added to the flowers finished this card nicely.  Hope you enjoyed it!


For those of you who are interested you can see DRS Designs entire Easter Collection HERE, and all of their religious stamps HERE.

Thanks for stopping by and have a wonderful weekend!

Smiles,
Jennifer

Saturday, March 5, 2011

Drunken Stampers

Quite a unique title wouldn't ya say?  Well, I can't imagine that drunk stampers would really do a great job at stamping, but the girls at the Drunken Stampers Blog know just what they are doing!  DRS Designs is their sponsor this week and they have some great projects to share with you. 

So, what can you do with the colors teal, purple, and orange?  That's the Drunken Stampers Challenge this week, and you could win a $10 store voucher to DRS Designs for playing along.   Here's my entry for this color challenge and the layout follows this weeks Splitcoast Sketch challenge SC322 as well.


I used Copic Markers to color the Butterfly on Eggs (533L) image from DRS Designs.  Since this is an Easter card, I decided to use the pastel version of the challenge colors.  I really like the soft look.  I created a tag using the One Line Happy Easter sentiment (665B) but split it up so that the 2 words were on top of one another to fit on the tag.  I created the background by stamping the Interlocking Flower Background (813H) and heat embossed it with clear embossing powder.   A few teal brads finished this Easter card off nicely.

Thanks for stopping by and have a great weekend!
Smiles,
Jennifer

Friday, March 4, 2011

Larry Leprechaun


Here's my take on last week's Card Positioning Systems Sketch #206. I used DRS Designs Lucky Larry Leprechaun (643H) as my focal image and colored him with Copic Markers. The hardest part was coming up with the arced piece in the background--Larry was too big for my circle Nesties and there was no way that the circle I hand cut would be straight enough to look half decent. TG for my Cricut! I haven't used it in forever and the George and the Basic Shapes Cartridge had just what I needed to cut out a circle big enough to fit the layout! I really wanted to lay a yellow scalloped circle behind it, but that was beyond the capabilities of the cartridges that I have, so I defaulted to using some ribbon bits instead. The Happy St. Patrick's Day sentiment (G393) stamped in the background is also by DRS Designs. While I was stamping with Kimmy the other day, I've played around with some of her distressing inks by Tim Holtz and distressed quite a bit on this card. What a difference the Ranger Inkssentials mat makes when using them! Gotta add that to my shopping list!

Thanks for stopping by!

Smiles,
Jennifer

Wednesday, March 2, 2011

Not too Far Away!

Happy March to you all!
2011 is just flying by isn't it? Being 22 weeks pregnant this makes me a bit nervous, as our little Firecracker, due July 4th will be here before we know it.  As a matter of fact I just took some pictures of my stamping room to show that room as the "Before Baby" pictures since it is soon to become our nursery. 


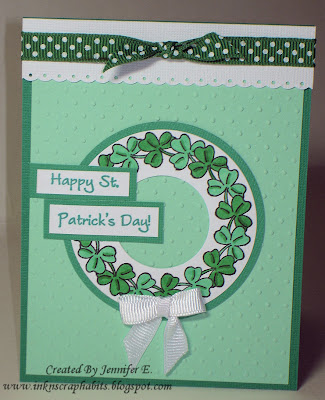
On another note, St. Patrick's Day is not too far away either.  Here's another card I made using DRS Designs Shamrock Circle (619L).  I colored it with Copic Markers and I've treated it here as a wreath by adding a white grosgrain bow to the bottom of it.  I also used the One Line St. Patrick's Day Greeting (636D), that I split up to create a 2-lined sentiment.  The layout I followed for this sketch is from the 365 Cards Blog challenge on January 23rd but uunfortunately I didn't get it finished in time for the challenge :-(  I really liked the sketch though, and had to put it to use! 


Hope you've enjoyed it! Thanks for visiting today!
Smiles,
Jennifer

LinkWithin

Blog Widget by LinkWithin