Welcome to Ink N Scrap Habits!
I've created this blog to share my life & love of paper crafts with others. You will read bits and pieces of what goes on in my world and be able to see my paper craft creations! Please leave me a comment if you see something you like. I'd love to hear from you!
Have you seen the new Stamps for St. Patrick's Day and Easter that DRS Designs has recently released? The card I made for today shows off the new Infinity Shamrock (281E) and the Lucky To Have You Greeting (317E). Although I've used some of the new St. Patrick's Day stamps here, this isn't necessarily a St. Patrick's Day card. It's nice when stamps can be versatile like this--It's more bang for your buck!
The Infinity Shamrock was colored with the Copic Markers G00, G02, and G05. I layered it with light and dark green cardstock that was cut from Nestability dies, and then set it aside while I worked on my card front. The card front was created from light green card stock that was stamped with the Splatter Background (855H) and dark green ink. The edges were also distressed for a little definition. A white scalloped border was added to both the top and bottom, and a sheer green ribbon embellished the top.
The card base was made from dark green card stock that was cut to make a note card. The finish card size measures 5" x 3.5". The card front was adhered in place on the card base, and the matted Infinity Shamrock image was adhered on the left-hand side to make it complete.
It's really nice to finally start thinking about making cards for the Spring holidays and moving away from all of the cold Winter ones. Don't you agree?!?!?
Thanks for taking the time to visit today!
Smiles,
Jennifer
The new challenge posted on the DRS Designs blog this week is "White out!" It was definitely a challenge for me since I was working outside my comfort zone. I've seen numerous 'white on white' cards all over Pinterest and have found them very appealing, but until now I never had a real reason to create one. Here is the "White Out" Valentine I created for this challenge, and I have to say, I'm pretty happy with how it turned out!
.JPG)
The stamped elements on this card are by DRS Designs and include the Interlocking Hearts (247F) and the Sweet Valentine's Day Greeting (257D). The first step in making this was thinking about how I wanted to design the card front. I rounded the edges of a piece of white cardstock and then stamped the greeting in the lower right corner. Above it, I added a scalloped border and then hid the seam with white satin ribbon. I scored 2 lines with my Score-Pal and then masked everything on the bottom half of the card front. Next, I stamped the upper portion with the Interlocking Hearts. My embellishments are a white satin bow and some heart die cuts that I decorated with a single rhinestone and then adhered with foam tape for dimension. The card base measures 5.5" x 4.25" and for some additional dimension since the card front was the same color as the base, I adhered the card front with foam tape as well.
Have you ever created a 'white on white' card? Now's your chance to do so and try to win from stamps from DRS Designs. Check out the link above and enter your card to win!
Thanks for stopping by! Have a great day!
Smiles,
Jennifer
This cute Valentine's card I have to share with you today fits the requirements for three challenges! I didn't really plan it that way, but that's how it worked out!
*The layout follows last week's Splitcoast Stampers Sketch Challenge SC524.
*The "Cherries" inspiration photo from this weeks Cupcake Inspirations Challenge was the basis for my card theme. DRS Designs is their sponsor this week and 1 lucky winner will be picked from all the challenge participants to win a $10 store voucher for stamps at DRS Designs online catalog!!!
*Finally, the challenge this week on the DRS Designs blog is "So Shapely!" You are to use at least 2 different shapes on your project. I went with a circle and hearts.

Both the Cherry Top Cupcake (463E) and the Sweet Valentine's Greeting (257D) are by DRS Designs. The image was colored with Copic Markers. The card front was embossed with a heart embossing folder and then I inked it with pink ink to make the hearts stand out. Then, I randomly added small heart die cuts to some of the embossed hearts and embellished them with a small pearl in the center. Next, I assembled the rest of the layout as shown. The greeting banner was adhered with foam tape to pop it up for some added dimension. Finished card size is 4.25" x 5.5."
Hope you enjoyed my card today!
Thanks for stopping by!
Smiles,
Jennifer
Hi Everyone!
Hope you're doing well and staying warm!
Anyone else excited that January is just about over?? Only about 50 more days until Spring!! I've had enough of the cold and although we haven't had much snow this Winter, my thoughts and prayers go out to everyone on the Northern East Coast. I can't imagine getting 1, 2, or even 3 feet of snow with a single snow storm, let alone have several of these kinds of storms over a single Winter!! I'm sending a Warm Winter Wish to all of you with my Snowman card today!
The card front was created using an image and sentiment from DRS Designs. The Medium Mr. Snowman (242H) was colored with Copic Markers. Both the image and the Warm Wishes Greeting (611D) were cut out using Nestability dies. Then, before removing the dies they were sponged with light blue ink. They were both matted with dark purple cardstock and then set aside while I worked on the card front.
I embossed the light blue card front with a snowflake embossing folder and then sponged the edges with purple ink. It was matted with white cardstock and then a crimped white panel, lined with purple cardstock was added to the lower portion. Snowflake ribbon embellished the crimped panel and then I adhered the snowman image and sentiment in place as shown.

The card front was adhered to an A2 (4.25" x 5.5") purple cardstock base and I embellished the back of it with the Especially For You Snowman (239C), to let everyone know that I made this card!
Thanks for stopping by, Everyone! Stay safe and warm!
Smiles,
Jennifer
I'm getting ready for Valentine's Day with the new challenge post on the DRS Designs blog this week. The challenge is to show off any project made using "Lovely Hearts!"
This is a 5" x 3.5" note card. I started by embossing the card front with a heart embossing folder. Then I stamped the Fill Up On Love Greeting (240C) and the Love Meter (261D). Both were cut out using Nestability dies and then sponged with light pink ink to create the white frame around them. The Love Meter was colored with Copic markers. The greeting was layered with a scalloped Nestability die and it was embellished with a single heart brad. I assembled the card as shown and added a sheer red bow embellished with a fabric flower and pink heart brad just below the greeting and then I added two red heart diecuts to finish it off. This was fairly quick to make because of its small size but it turned out rather pretty, wouldn't you agree?
Thanks for stopping by today and have a great weekend!
Smiles,
Jennifer
And I thought the Valentine Flower (582K) colored with Copic Markers was the perfect match! I absolutely love how it turned out! This was such a fun group of colors to play with!!
I kept the design of this card simple since I didn't have a lot of time. Starting with a pink A2 card stock base, I didn't really know what else to add since the image is also the greeting. I created the background by stamping the Interlocking Hearts (247F) with Versamark, and then I trimmed the panel with a red scallop border. I put 2 simple pink heart brads in the upper left corner. Next, I added a bit of twine at the bottom to add a touch more red. The matted image was adhered to the center of the card and a beautiful satin, red bow was placed off center at the bottom.
ETA: I've had some requests to list the Copic Markers I used on this card. I used R27 R29 and R59 for the flower petals. For the leaves I used G05 G07 and G17. The flower center was colored with RV000 RV02 and RV23.
I hope you like it!
Have a great day!
Smiles,
Jennifer
So, now that the holiday hustle and bustle is over, has your daily routine returned back to normal? All of my holiday decorations are finally put away and now that my older son is back in school, I'm finding more time to work on my resolutions--to be more organized and take more time for me! This "me" time includes whatever I want to do and stamping is high on the list!
After cleaning up and organizing my stamping table this past weekend, I quickly got back to getting inky and one of the cards I created was this Warm Winter Wishes card. So appropriate for all of us in the Midwest and East Coast experiencing another Arctic Blast right now. We need all the warmth we can get!
I used the new Medium Mr. Snowman (242H) for the focal point of my card. I know there's not too much coloring you can do since a snowman is all white, but I researched how to color snowman images on Pinterest and found a few tips that were helpful. One technique is to actually color outside the stamped image line. If you look close at my snowman you can see the bluish-gray ink around the edges. I think this really helps enhance how the snowman looks. Of course coloring his hat and scarf in bright colors helps him stand out as well! I paired this image with the Warm Wishes Greeting (611D), and decorated the card front with some iridescent snowflakes that were adhered with matching turquoise brads. The finished card size is 4.25" x 5.5."
I hope you're all staying warm and cozy inside today!
Thanks for stopping by!
Smiles,
Jennifer
Hi Everyone!
Today I have two opportunities for you to win free stamps from DRS Designs!!
The first, like every Thursday, is a new blog challenge on the DRS Designs blog. The theme is "How Sweet It Is!" You are to use any image, punch or die cut that says "Sweet" to you...think candy, cupcakes, or a "sweet" greeting! I chose to use DRS Designs Valentine's Hold For You Greeting (184F) because it mentions chocolate and that's about as sweet as it gets!!! Yum!
The second chance for free stamps from DRS Designs is over at Send a Smile 4 Kids. DRS Designs is their sponsor this week and the theme is "Valentine's for Kids." I added the Sweet Offering Cutie Pie Kid (623G) to my card to qualify for this challenge as well.

I started with a 4.25" x 5.5" red card stock base. Smooth, black card stock was used for the top of the card front, and the pink panel at the bottom was stamped with the Interlocking Hearts (247F) that I colored with Copic markers. I added red grosgrain ribbon to hide the seam between the two panels and tied a knot in it at the far right side. The greeting was stamped and then cut out with a Nestability die and before removing it from the die, I sponged it with red ink. It was matted with red card stock and then adhered to the center of the card front. The cutie pie kid was also colored with markers, fussy cut out and adhered to the left side of the greeting. I added a few heart punchies to decorate the empty space at the top and then my card was complete.
I hope you get a chance to play along in either or both of these challenges, and if you do, good luck! Leave me a comment and tell me about it so I can check it out. I'd love to see your work too!
Thanks for stopping by and have a great day!
Smiles,
Jennifer
Hi Everyone! Happy New Year!
This years first challenge on the DRS Designs Blog is to use Stencils. I created this Sweet Valentine for my challenge card utilizing a rectangle Nestibility die as a stencil to shade in and highlight the new Sweet Valentine's Greeting (257D).
I stamped and colored the Heart Drops (255F) with Copic Markers to create by own pattern paper. I used the heart embossing folder for the black cardstock in the background and embellished the empty space on the card front with some heart punchies--from the new punches I received for Christmas. I love how much they really enhance my Valentine cards this year! I placed a pearl in the center of each heart to complete the look. Finished card size is 5.5" x 4.25." Hope you like it!
Thanks for taking the time to visit today!
Smiles,
Jennifer
Hi Everyone!
I hope you're all doing well and that you had a nice holiday. Any big plans for the New Year? My resolution is to be more organized and with that I hope it helps me to stop procrastinating and stay focused! I'm sure this is a resolution that many of us share!
I chose to make the greeting as the focal point of my card. I love all its gorgeous variety! The different styles and sizes of text are really eye catching! To highlight it, I used a Nestability die to cut it out and then I sponged pink ink over the text while it was still in the die. I created my own coordinating pattern paper on the bottom of the card by stamping the Interlocking Hearts stamp repeatedly using red ink on pink card stock. This card was simply embellished it by using a decorative border punch on the red panel and I added several pearls to dress it up. Finished card size is 5.5" x 4.25."
I wish you all a very happy and safe New Year! Thanks for stopping by!
Smiles,
Jennifer
Well, the count down to the big day is on, are you ready? My shopping is done, but I still have all the wrapping to do. I took a break from the holiday prep this weekend and I found myself stamping a winter scene that's inspired by the upcoming winter storm were expecting this Christmas Eve. Unfortunately the timing is bad due to all the traveling everyone will be doing for the holiday, but I'm really excited, as we haven't had a true white Christmas in a very long time. The colors are used on this card were inspired by the color challenge that can be found on this weeks DRS Designs blog.
This scene was created by using the masking technique and several of the stamps from DRS Designs Christmas Village series. These stamps included:
Smiles,
Jennifer
I'm still working on my Christmas cards, are you?
Here's one I made for this weeks "Sing It To Me" challenge over on the DRS Designs Blog.
The image was colored with Copic Markers, cut out, and then opposite corners were rounded before distressing the edges with brown ink. The background was made by stamping the Christmas Music Background and then distressing the edges of that as well. Just one of the "Merry Christmas" versions was stamped from the Christmas Multi Greeting at the bottom. I added a red scallop border to the top and then and a thin red ribbon embellished the bottom portion rather nicely. Red and green fishtail banners were added underneath the image for a little balance. I really like how this one turned out. I hope you do too!
Thanks for stopping by!
Smiles,
Jennifer
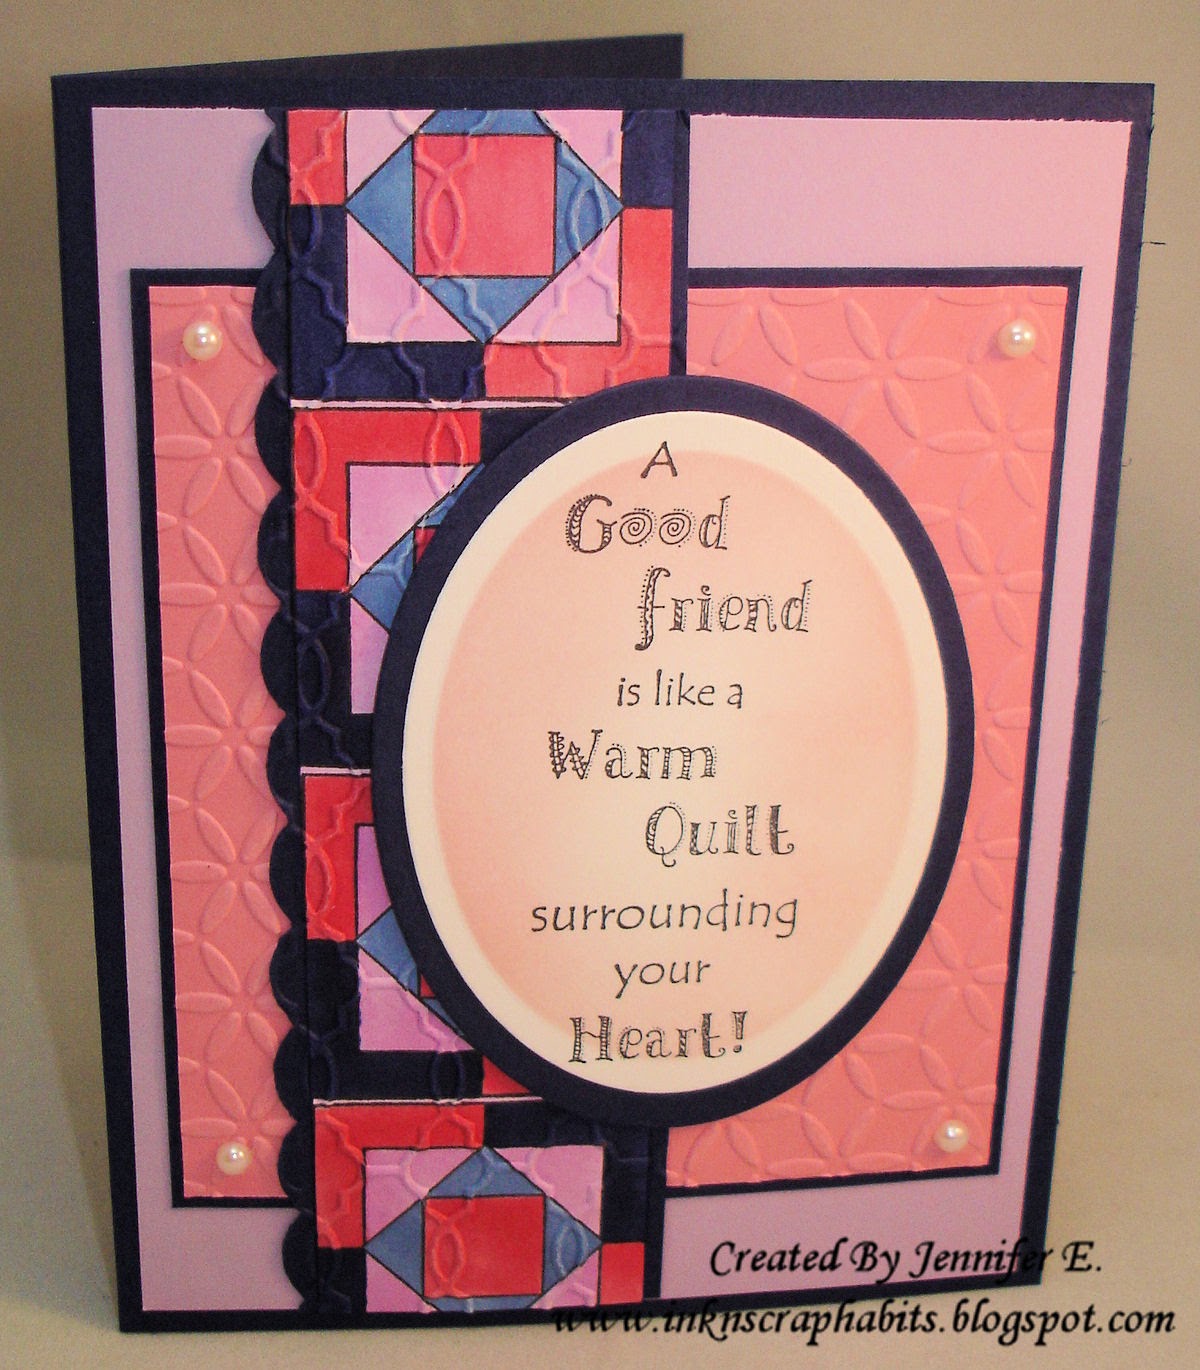
The colder temps are here and it's time to get out those quilts! And if you're anything thing like me you've also got out your space heaters and hoodie sweat shirts too! LOL! I can't stand the cold and even though I keep my house around 70*, I often use space heaters in the rooms I spend lots of time in, like my stamping room!
I made this with stamps from DRS Designs. The colorful vertical panel was created using the Designer Quilt Square (166D) which was stamped repeatedly in a vertical line and colored with Copic Markers. Then for added texture, it was embossed with an embossing folder. I used the Good Friend Warm Quilt Greeting (169G) in the center of the card front. It was sponged with light pink ink while still in the Nestability die to create the white frame around it.
I love the way this card turned out. I think the colors are cozy and I sure hope my friend enjoys it!
I hope you all stay warm too!
Thanks for stopping by!
Smiles,
Jennifer
Tis the season for hecticness and it's in full swing for me right now! It's taken me about 5 days to get this post typed up. But, as they say, better late than never...here's my creation for the glitter challenge that was posted on the DRS Designs Blog this past Thursday. Both the image and sentiment are by DRS Designs.
I used the sketch challenge from SC428 to inspire my layout. After stamping the Christmas Village Tree Store (214E), I created a Post-it Note mask for it and stamped the bare trees from the Christmas Village 4 in 1 Accessories #2 (210G) over top of it to create my scene. I colored the image with Copic Markers and applied glitter to all of the snowy areas. I arranged some fishtail banners as shown according to the layout and stamped "Merry Christmas" from the Christmas Multi Greeting (341H) on the largest one. I layered a few snowflake dies and pinned them together with a red brad for the embellishment.
I'm a little behind this year, but I'm happy to report that I have another quick and fairly easy Christmas card under my belt! The creation of this card was fueled by a nice, flavored cup of coffee, which seems to be one of my staples nowadays! The Arctic blast that we had blow through recently has caused nothing but warm and cozy thoughts in my stamping room--I refuse to let this kind of weather bring me down, or tolerate it so early in the season. I see it as the perfect excuse to stay in and stamp. What could be better?
The focal point of this card is the Christmas Village Cabin (212G). I masked it and then stamped the bare trees from the Christmas Village 4 in 1 Accessories #2 (210G) over top of it. I love the way the image turned out, especially once I colored it with Copic markers. It really came to life and reminds me of the cabin friends of ours have, Up North, deep in the woods. It gives me that warm and cozy feeling and because of this, I thought the Simple Joys of Christmas Greeting (957F) was the perfect pair for it. For a little bling, I used Stickles to make the snow and roof tops glisten. This card was simply embellished--2 red brads, a tiny red bow, and a textured card front made this card complete!
Thanks for stopping by!
Stay warm!
Smiles,
Jennifer
Hi Everyone!
I'd like to start today's post by wishing you all a very Happy Thanksgiving! Today is all about celebrating and being thankful for all we have. I am especially thankful for being a part of a very loving family, for having great friends and for being blessed with wonderful children, my health, and a job that helps to support our home. I'm also thankful for being a part of the DRS Designs Design Team and for all of the stress-relief stamping has helped with, LOL!
Well, another week has gone by and a new challenge is posted on the DRS Designs Blog. For their "I Pine For You" Challenge, you are to use any pine image, punch or die cut. I used the Christmas Pine Oval (279L).
I heat embossed it with silver embossing powder, and then matted it with a scallop rectangle cut from metallic silver card stock. The card front was simply embossed with the Swiss Dots embossing folder and the bottom was embellished with white satin ribbon and a snowflake die cut attached with a small silver brad. After adhering the matted image to the upper portion of the card front, I added three fish tail banners to the upper right corner and embellished it with a red and white twine bow. I tried to keep things simple since I really thought the embossed image and metallic card stock really made this card elegant. The card base was created from metallic silver card stock and the finished size is 4.25" x 5.5".
Thanks for stopping by today. I hope you all have a wonderful Thanksgiving!
Smiles,
Jennifer
Hi Friends! Hope your weekend is going well!
I'm taking a break from the craziness of getting my house ready to host Thanksgiving for our family this year. We are expecting about 40 people and I'm sure we will have enough food to feed an army, but that's what the holidays are all about, right? Good company and good food--We have so much to look forward to and to be thankful for!
A color challenge was recently posted over at the DRS Designs blog. It utilizes a poinsettia image with different hues of red and greens for the challenge. Here's my challenge entry depicting Christmas Leonard Pig (709K) in the hustle and bustle of Christmas. I've paired him with one of the new Christmas sayings from DRS Designs most recent release, the O.C.D. Christmas Greeting (183E).

The image was colored with Copic Markers, cut out, and masked. Blue ink was sponged around the edges and the upper portion was masked as well so that when sponge with brown ink it resembles him standing on a floor. I created my own pattern paper by using a portion of the Cut-apart Woven Plaid Stamp (613P). I split up the sentiment into two parts and cut them out with Nestability dies. Blue ink was sponged over top while still in the die and then each one was matted with green card stock cut with a scallop die. My card front was assembled as shown and was simply embellished with only pink grosgrain ribbon tied in a knot.
Well, I'm sure with all that is going on this week I probably won't be on the computer much until after the holiday. I hope you all have a very safe and Happy Thanksgiving full of all your favorite things!
Thanks for stopping by!
Smiles,
Jennifer
Hi Friends!
Today I have a CAS card to share with you to show off the new Lovely Gifts Christmas Greeting (235G) just release from DRS Designs.
I created the card front to resemble a wrapped Christmas gift, to play on the words "present" in this saying. Sorry about the quality of this picture--I used shimmer cardstock for the card front and greeting and it didn't photograph as well as I thought. I no longer have this card in my possession so, unfortunately, this is as good as it gets!
Run over to DRS Designs to see all of their new Christmas stamps HERE, or check out the new challenge on their blog, "Hang It Up" and enter your project for a chance to win stamps from DRS Designs just for free!
Thanks for stopping by!
Smiles,
Jennifer
I feel like everyone often forgets about Thanksgiving and all that we should be thankful for by rushing around making Christmas a 2 month holiday. I understand it's probably hard to do when the stores have Christmas decorations out before Halloween even gets here, but I'm nowhere near decorating my tree or doing anything else Christmas right now. My house is still decorated with sunflowers, pumpkins, orange leaves and other things that celebrate the Fall harvest and Thanksgiving. At the same time though, I understand that since Christmas is such a large holiday, you have to prepare early. As we all know, this is particularly important when hand making your own Christmas cards! The card I'm sharing today was created for this weeks DRS Designs blog challenge "Hang it up." Of course, this doesn't particularly relate to Christmas, since you can hang Fall leaf garland as well, but Christmas decorations were the first thing that came to mind when I read this challenge theme!
My card front began with a white piece of card stock that I sponged with blue ink. Next, I stamped the Cardinal On A Branch (856M) so that only the leaves at the bottom of the stamp were inked to create the Christmas tree border. I colored it with Copic markers and stamped the lower portion of DRS Designs new Lovely Gifts Christmas stamp (235G) at the bottom between the pine needles. The Nativity Ornament (526K) was stamped on another piece of white card stock and colored with Prismacolor pencils. Then it was fussy cut out and adhered in the center of the card front with red ribbon to resemble it hanging on a Christmas tree. A big satin red bow was attached at the top of the ornament and then the card front was matted with pink card stock to match the color scheme. Finally, the card front was attached to an A2 dark green card stock base and my challenge card was complete.
So, how is your house decorated right now? Are you eager to decorate for Christmas or is your house still decorated for the Fall harvest like mine?
Thanks for stopping by and have a great day!
Hi Everyone! Welcome back!
The tricks and treats have passed and now November is here! Can you believe it?!?! This is the time to start thinking about what you will be doing for your holiday cards this year. With that in mind, DRS Designs is getting ready to release new holiday stamps perfect for this occasion. Today I am showing off the new Feeding Reindeer (188F) stamp that will be released very soon. I chose to use him alone on my Christmas card, but he coordinates with the pieces to the Christmas Village.
I colored the Feeding Reindeer with Copic markers, and I cut the card stock around him in the shape of a tag to show it off. I added Stickles for the snow, and sponged light blue ink around the top of the tag for the sky around him. I added different colored cardstock cut on a diagonal to form my card front and in the empty space formed between the 2 red panels I stamped "Merry Christmas" from the Christmas Multi Greeting (341H). The Reindeer tag was embellished with a big red bow and adhered to the card front with foam tape. I hope you like it!
Thanks for stopping by and have a great day!
Smiles,
Jennifer