Welcome to Ink N Scrap Habits!
I've created this blog to share my life & love of paper crafts with others. You will read bits and pieces of what goes on in my world and be able to see my paper craft creations! Please leave me a comment if you see something you like. I'd love to hear from you!
Hi Friends!
Well, it's Thursday again, or should I say already?!?! Things have been really hectic lately and I'm feeling like I'm bearly staying above water. Just when I think I've got a good handle on this card making and blogging thing, life throws me a curve ball. So please accept my aplogies for not posting as often as I'd like to.
I found this Valentine's Day card in my stash to use for the Brads challenge on the DRS Designs blog this week. This was a card I made awhile ago and I submitted it to 2 different magazines for publication. Unfortunately, it was never selected, so its never been shown off on my blog before...until now!
Both stamps are by DRS Designs. The focal image is the Valentine Tree (976H) and the sentiment is the One Line Valentine Greeting (996D). The hearts on the tree were colored with Copic Markers and then I added Diamond Glaze to each one. I love how it makes them all look like tiny glass hearts! I think the light pink sponging around the tree makes it look really elegant too! This is one of my favorite cards yet!
I know brads are pretty much a card makers/stampers staple nowadays, so run over to the DRS blog and link up your latest creation to win! **Stamps by DRS Designs are not required!
Good luck and thanks for stopping by!
Smiles,
Jennifer
Hi Stampers! Happy Wednesday to you!
Today I'm sharing a masculine Birthday card that I made over the weekend. I know many Stampers struggle with masculine themed cards since many of us are so used to embellishing our cards with lace, ribbon, flowers, and bling! Unfortunately, those embellishments don't work well for the guys, but when the Double Tall Pines (741P) came out in DRS Designs latest release, they immediately screamed "masculine" to me. I challenged myself to give a masculine themed card a try and I love how this one turned out!
This was fairly easy to create. More or less, the most involved part was all of the coloring and shading...Time consuming, but not difficult. To start, I stamped the pines on the far right side of a piece of white cardstock and colored them with Copic Markers. I used a Post-It Note to mask off the bottom so that I could sponge the ground with brown ink and then distressed the edges all the way around with the same ink. Next, I stamped the Buck Bust (319K) on a separate piece of white cardstock and colored it with Copics as well. I used an oval Nestabilities die to cut it out and sponged brown ink around it while it was still in the die. After matting the image, I adhered it in place as shown, slightly overlapping the pines. The Birthday Sentiment that I stamped above the Buck image was part of the Birthday Multi Greeting (219P). I matted the card front on brown cardstock and embellished the bottom with some natural hemp cord (used for jewelry making) that was wrapped around twice and then tied in a knot. It was finally adhered to a green cardstock base.
I hope I've inspired you to get creative and stamp some masculine cards. I find they are easier to make when I'm not under the pressure of actually needing one.
I challenge you to give it a try!
Smiles,
Jennifer
Lucky me, I've been able to do lots of stamp-related things over the last 2 days! I was able to take my time shopping at a local scrapbook store and Hobby Lobby 'kid-free' (big thanks to my Hubby for that!), I sketched a bunch of layouts in a notebook and now with new supplies in-hand, I was also able to get inky and watch some of those drawings come to life! I'll still have a lot more cards to finish up, but I'll hopefully be showing many of them off in the upcoming week! Now that's lucky for you! LOL!
In the mean time, this owl card I have for you today was one I put together about a week ago. I was playing around with the Double Tall Pines (741P) and found that I like them as a background the best. I think they make for some really great masculine cards. For the card front below I used the masking technique to create the background so that the pines overlapped a bit. I used a Post-It Note to section off the area I wanted for the ground and sponged it with Vintage Photo ink. I used the same ink to distress the edges all around the card front as well.

I used Oswald the Owl (132H) for my focal point. He was colored with Copic Markers and I used the Out-of-the-box Technique to cut him out. If you look close, his tail is sticking out from the oval frame. I sponged beige ink around him to create the frame while he was still in the Nestie die. I did the same thing with the Whooo's Special Greeting (142B), but when I adhered it in place, I used foam tape to pop it up and add some dimension to the card front. I added 2 brown brads to the upper left corner and then adhered the card front to a dark green cardstock base. Finished size is 4.25" x 5.5."
Thanks for stopping by and have a wonderful weekend!
Smiles,
Jennifer
Wow, It's Thursday again already! The weeks are flying by and we're almost to the end of January. Can you believe it? Now, it's time for another challenge on the DRS Designs blog and the new theme is ...Pigs!
I created this fun Valentine last night and chose to use the Pig in Puddle (374F) image. I colored it with Copic Markers. I stamped the background using the Checkerboard Background stamp (342P), and embossed the vertical panel with the Heart Blocks Cuttlebug Embossing Folder. I added decorative trim using an EK Success border punch and embellished it with some pink and white twine. The sentiment is the newly released "Hogs and Kisses" greeting (785B). I added a brown brad to each side and adhered it using foam tape so that it popped up above the image.
DRS Designs is giving away a your choice of 2 stamps for FREE! Won't you play along? Check out all the details HERE and link your card for a chance to win! Good Luck!
Thanks for stopping by!
Smiles,
Jennifer
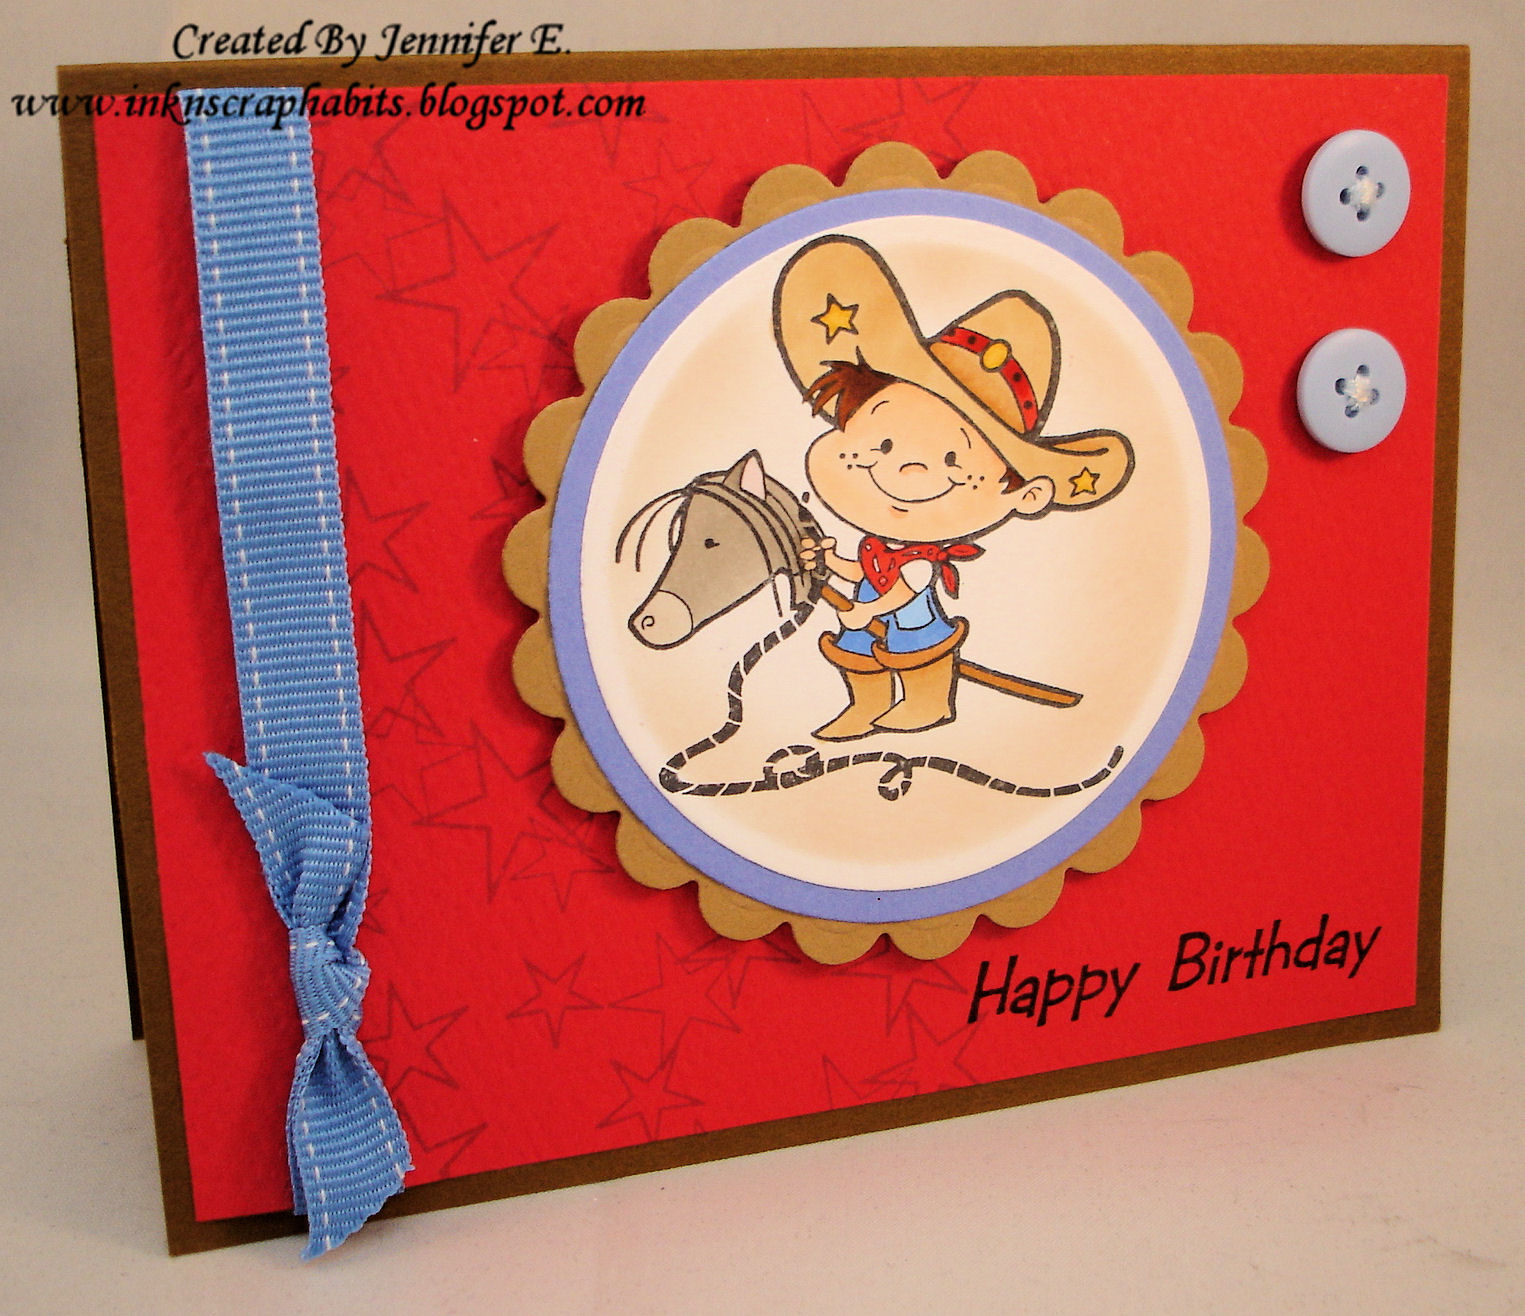
I started first by coloring the image with Copic Markers and then I sponged light brown ink around it while it was in a circle Nestability die. I layered it as shown and next I decorated the red cardstock for my card front. I stamped the Interlocking Star Background (819H) on the left hand side with blue ink and I used one of the greetings from the Birthday Multi Greeting (219P) for the sentiment. I adhered the image in the center of the card front using foam tape. I added some ribbon to the far left side and a couple buttons on the upper right side. Finally, I adhered the card front to an A2 brown cardstock base. Cute and fun, wouldn't you say?
If you're interested in playing along in the "Gone Country" challenge you only have a few more days to do so. Check out all the details HERE.
Thanks for stopping by and have an awesome weekend!
Smiles,
Jennifer
The DRS Designs Blog this week has challenged us to create Trifold cards. I had some sympathy stamps that I've never used so I decided to get them inked up for this challenge.
I started with a dark brown cardstock base for my trifold card. I stamped up my own background paper using the Polka Dot Background (688P). For the top flap, I stamped the polka dots with Versamark ink and for the bottom they were stamped with Momento Rich Cocoa ink. The edges of both panels were distressed with Vintage Photo ink.
I created the opening by layering the Sealed With A Prayer image (1010D). I colored it with Copic Markers and attached it to the top flap of my card. I added a small piece of Velcro so that it could be opened and closed repeatedly. The bottom flap was decorated with a strip of dark brown cardstock that was layered with light blue grosgrain ribbon. The silver metal cross I added was a left over embellishment from my son's Baptismal invitations. Love that I have found a great way to reuse them! It was attached by placing a silver brad through the ring at the top of the cross.
I stamped the Extending Sympathy Greeting (1090G) on the inside and embellished it with the praying hands image from the Sealed With A Prayer stamp. I colored them with Copic Markers, fussy cut them, and then used craft glue to adhere them above the inside greeting. The edges of the inside panel were distress with light blue ink and as you can see there is plenty of space to write your own heartfelt message.
Well, that's it for me today. Thanks for stopping by! I appreciate your visit and hope you'll check out all the challenge details and the great prize up for grabs on the DRS Designs Blog!
Smiles,
Jennifer
I've started to make my Valentine's Day cards, have you?
Here's a fairly quick and simple one I whipped up this past weekend. I love that it didn't require any coloring! Don't get me wrong, I LOVE to color, but I'm pretty certain I've never made a card like this before!
All of the stamps I used are by DRS Designs:
Interlocking Heart Background (808H)
The background is made up of 3 different panels. The top was simply stamped with the Interlocking Heart Background. The bottom was embossed with the Heart Embossing Folder from Bringing Crafts-Too You. The seam between them was layered with red and pink cardstock embellished with a white satin ribbon which was tied in a knot.
I used SU!'s Real Red for all of the stamping, except for the sentiment which was stamped in Onyx Black Versafine. The Dotted Heart was stamped twice--once in the center of the Giga Heart Circle and then again on pink cardstock. I then paper pieced it in the center as shown. The layered and stamped image in the center was adhered with foam tape for added dimension. The card front was adhered to an A2 red cardstock base.
I think I've inspired myself to create more non-colored cards with this one. Hope you like it as much as I do!
Thanks for stopping by!
Smiles,
Jennifer
Hi Friends, Happy Monday! Hope you had a wonderful weekend!
Today I'm sharing the second part of my previous post. The "It's A Jungle Out There" ATC Challenge on the Wicked Wednesday Challenge Blog this week is sponsored by DRS Designs. I've used the ATC I created for the challenge on this card, and the layout I've used is a sketch from Splitcoast, SC418.
Smiles,
Jennifer
The Wicked Wednesday ATC Challenge this week is "It's A Jungle Out There." I created this cute ATC using DRS Designs Jenny Giraffe (859G) which was colored with Copic Markers. I used a Post-It Note to sponge in the ground line and then I tried getting a little creative with the tree. I used the Spooky Bat Tree (406H) for the tree trunk, cut off the moon and then covered the upper portion with leaf punchies punched from cardstock scraps.
If you like to make ATC's, I encourage you to play along and link yours HERE. DRS Designs is giving away a $15.00 voucher toward FREE stamps!
Stay tuned for my next post. I'll be showing 'It's A Jungle Part 2!' where I'll use this ATC on a card and I promise it will be just as cute!
Have a great weekend!
Smiles,
Jennifer
Here's my entry for the button challenge that can be found on the DRS Designs Blog this week. I created it to show off the new Life is Friendship sentiment (794F). I thought it was perfect for the Snowman Bird Buddies (232H) image. Since it is a Winter theme, I had to use snowflakes for my background paper. I stamped the Interlocking Snowflake stamp (015H) in blue and purple inks. I added 2 blue buttons to the background panel and love the finished look! I often forget to use buttons for embellishments, but I'm definitely inspired by all of the sample cards seen on the Challenge post! This challenge was a wonderful reminder and I hope to include buttons more routinely in my card making.
Thanks for stopping by and checking out my post today. Hope you'll be back soon!
Smiles,
Jennifer
I have a little something different to show you today, and I bet you've already peeked at the pics below and your first thought was 4th of July cards...Nope! My friend Nancy participates with an organization called Blankets Of Hope. Blankets Of Hope provides blankets to sick or wounded Soldiers/Veterans who are returning to the US. Each blanket has a 4-1/4 x 5-1/2 cardstock tag attached to it that the blanket maker uses to write a note to the soldier. That's what I've made below--10 blanket cards!
I apologize a few of these pictures are blurry. Had I not already sent the cards in I would have retaken them, but they are in transit to Nancy for the assembly event later in January!
Each card was hand stamped with stamps from DRS Designs. The cards didn't have to be patriotic but what US soldier doesn't love red, white, and blue? I thought making them patriotic was appropriate and DRS Designs has some stamps that were perfect for the occasion. Here's a list of stamps that I used to create them:
These were a lot of fun to make and I loved the fact that I had to leave room for a handwritten message. It made me remember to keep them simple, and that made these quick and easy to create!
Smiles,
Jennifer
DRS Designs is starting off the New Year just right...with new stamps! Check them all out HERE! If you make Valentine's Day cards, cards for Winter Wishes, or even some masculine cards then this release is for you. I'll be sharing a card for each of these occasions very soon and today I'm sharing my Valentine's Day card.
I know this almost looks like a Christmas card, but I love red and olive colors together. I've used the Heart Stem Rose (789G) and the Love You More Greeting (796B) on this card. Both are brand new. I colored the image with Copic Markers. It's so elegant and can be used for many different types of cards. I've got many ideas in my head for it!
Hope your weekend is full of lots of stamping fun!
Thanks for visiting.
Smiles,
Jennifer
Happy New Year!
I hope you've all had a wonderful holiday! I've taken a small break from all things crafty to spend more time with family over the holidays. But now, I'm eager to get back into the swing of things. During my break I received some new dies and stamping supplies, and fresh batch of rubber was just the icing on the cake! Nothing gets me in the mood to stamp like new stuff!
I'm having a blast creating cards with stamps that DRS Designs is releasing this Saturday, January 5th. The "Hogs and Kisses" sentiment (785B) I've used here is part of this release. It goes so well with this Cupig image (607G) and the stamped Interlocking Heart Background (808H). All together they make an adorable Valentine's Day card!
Have a great day!
Smiles,
Jennifer


